 BUY NOW, PAY LATER. Starting at 0% APR


Can-Am X3 Secondary Clutch Roller Pin Puller
X3 Secondary Clutch Roller Pin Puller
In the box
Parts and tools
Included parts
- 2M4 Set Screw
- 1M4 Hex Nut
- 11/2" Hex Nut
- 11/2" Flat Washer
- 1Puller Plate
- 1Puller Bolt
Required tools
- 3/4" Open End Wrench
- 3/4” Socket
- T-20 Torx
- 7mm Hex Wrench
- 5/16” Roll Punch
Procedure
Assembly
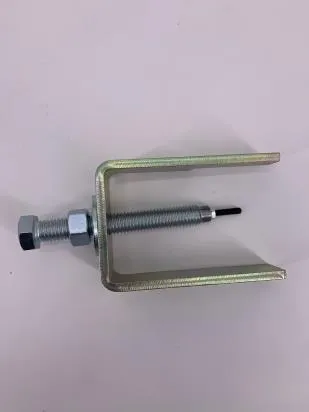
- Step 1
Install 1/2" hex nut on puller bolt and thread all the way to the top of the threads.
- Adding a little grease to the threads will help prevent thread deterioration and ease use.
- Step 2
Install 1/2" flat washer.
- Step 3
Install M4 set screw in the end of the puller bolt. Tighten with 7mm hex wrench.
- Step 4
Install M4 hex nut and thread to the base of the puller bolt and tighten.
Procedure
How to Use
- Install puller bolt and flat washer through puller plate.
- The cutouts on the puller plate should face the driven clutch sheave.
- Thread the M4 set screw into the roller pin until it stops.
- Make sure that the two arms of the puller plate are sitting down into the clutch fins evenly on each side. This will assure that the puller is lined up straight with the pin
- Using two 3/4" wrenches hold the end of the puller bolt while turning the nut clockwise in towards the puller plate. This will pull the pin out.
Setup
Tool Tips
- In certain cases, the roller pin can become seized in the clutch and slight heat on pin boss can ease removal. DO NOT OVERHEAT
- Pull in out just far enough to remove the roller.
- Leaving it in the boss will aid with installing the new rollers.
- Replacement tip sku: 875FC0009 qty. 2 $12.00
Setup
Installation Tips
- Use a 5/16” roll pin punch to drive the roller pin back into place. A suitable holding fixture, such as the DCP21, helps to hold the clutch when driving the roller pin back in.
Emissions notice. This product is exempt from the emission standards and related requirements of 40 C.F.R. § 1051 as provided by 40 C.F.R. § 1051.620, and California law [e.g., vehicle code §§ 27156 and 38391]. This product is sold only for use in connection with EPA certified, purpose-built, nonroad vehicles used solely for closed course, nonroad competition/racing and not used for any recreational purpose or on public highways or right of ways maintained by and open to the public. This product is sold only in connection with machines that do not fall under state and/or federal noise or emission standards/regulations. Purchasers who/that purchase this product represent and warrant that the product is purchased only in connection with EPA-certified, emission-regulations-exempt and noise-regulations-exempt competition/racing vehicles as interpreted under applicable state and/or federal law.
Need technical support?
Submit a ticket with your vehicle and what you're seeing, and our support team will get back to you.
