 BUY NOW, PAY LATER. Starting at 0% APR


Installation and tuning instructions for the EVP Big Chute/Holeshot/Monster Chute/Blitzkrieg/Super Chute/Sling Shot Turbo V-Map with Launch Control multi-map for the Arctic Cat 9000/1100T. Covers ECU plug wiring, launch-control switch installation and use, octane switch-position settings, and clutching.
Arctic Cat 9000/1100T V Map Big Turbo with Launch Control
EVP Arctic Cat 9000/1100T Big Turbo V-Map with Launch Control: ECU wiring, switch install, 91/93/100 octane switch positions, clutch 8100 RPM.
Reference
Overview
Reference
Arctic Cat Z1/Proclimb/Procross 1100T/9000 Big Chute/Holeshot/Monster Chute/Blitzkrieg/Super Chute/Sling Shot turbo V-Map with Launch Control multi map instructions
Warning
These instructions must be carefully adhered to!!! Failure to follow these instructions can result in engine damage.
This product requires mechanical skill and knowledge. Do not attempt to install this kit if you do not have the necessary skills!!!
Our EVOPS 1100T boost recirculation required for all big turbo installations horsepower tunes for safety!!!
Reference
Disclaimer:
Launch Control, when misused can and will destroy your engine and/or turbo. The button should never be used for more than 2 seconds at a time!!!!!
Launch Control can only be used while the sled is stationary!!!
Make sure your sled is pointed in the direction you want it to go before engaging this feature. When the button is released, your sled will likely not be controllable because the skis will not be on the ground.
Procedure
Directions for use:
- Again, make sure your sled is pointed in a direction where there are no people and/or obsticals.
- Push button in
- Apply the appropriate amount of throttle for the situation. For drag racing, you will likely apply full throttle. For a stand still direction changes, much less than full throttle would be used.
- It is very important that once the button is pushed and throttle is applied that the button is not held for more than 2 seconds
- When the button is released, you will have 5-6 LBS of boost in the charge tube -- the sled will launch violently -- be prepared
- Again use with caution!!!!!!!!!!!!!!!!!!!!!!!!!!!!!!
Procedure
Installation instructions
- Remove left side panel, remove seat
- Remove both plugs from the ECU
- On the back side of the larger plug (that plugs into the ECU) remove the two white "plugs" from pin locations 29 & 30 (see the photo below)
- Using a small screwdriver, push the ECU plug lock in (see picture below)
- Insert the red wire into plug location 29 and the white wire into plug location 30. Re lock ECU pins by depressing the white tabs on the oppsite side of the plug (note -- the ECU will not re lock if the pins are not inserted all the way)
- Run the black wire to the tree that houses the sensors or another good chassis ground (it is very important that this wire has a good ground.) (see the photo below)
- Locate the switch on the part of the sled that the back of the hood slides into -- the part that covers the aluminum manifold and fuel tank access. Mount it where you will not bump it with your knee while manuvering. Also, mounting it in this location will eliminate the need to unhook the harness if you remove the hood. Mount it so the swich knob protrudes through the top of the dash pod -- this will protect the switch from water infiltration.
- Mount the bracket on the lower hole of the front side of the hand/thumb warmer pod. Make sure the braket does not interfere with the operation of the brake lever!
- Run the harness from the switch location up the handle bars and to the switch bracket location. Make sure the button wiring harness does not interfere with the steering or brake operation. Use zip ties to secure the button harness.
Reference
The octane ratings must be strictly adhered to:
| Switch position | Octane | Knob position |
|---|---|---|
| 1 | 91 | Knob rotated all the way to the left (turned counterclockwise until it stops) |
| 2 | 93 | 1 click clockwise from pos 1 |
| 3 | 100 | 3 clicks clockwise from pos 1 |
Reference
Clutching:
Clutch for 8100 RPMS -- this RPM will make more power safer from 7700-7800 like stock
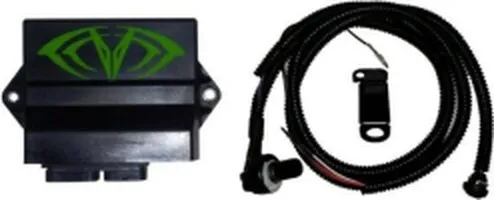
EVP launch-control wiring harness: an electronic control module with red, white, and black leads and a push-button switch (the launch-control button).
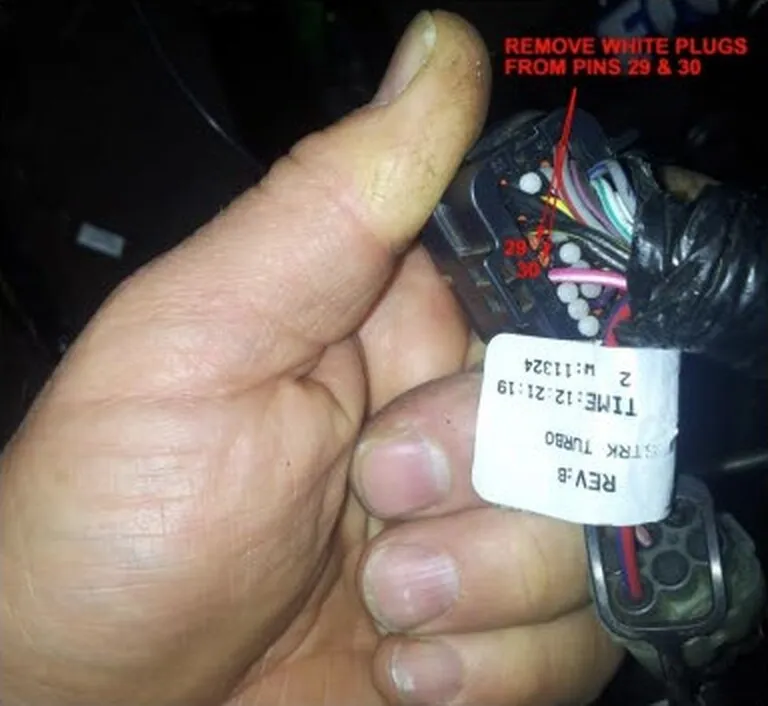
Back side of the larger ECU plug, with a red annotation 'REMOVE WHITE PLUGS FROM PINS 29 & 30' pointing to the two white plugs to be removed from pin locations 29 and 30.
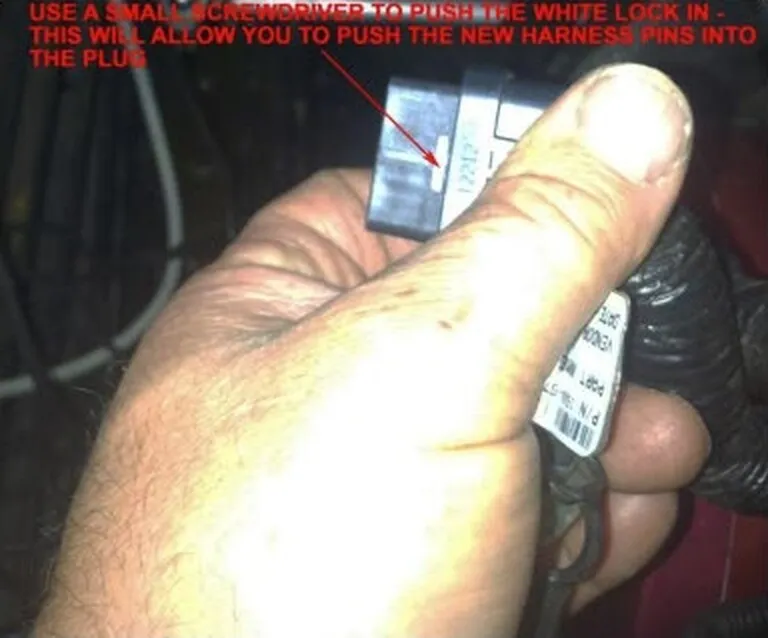
Close-up of the ECU plug being held, with a red annotation instructing to use a small screwdriver to push the plug lock in / depress the white tabs to release and insert the new red and white wires.
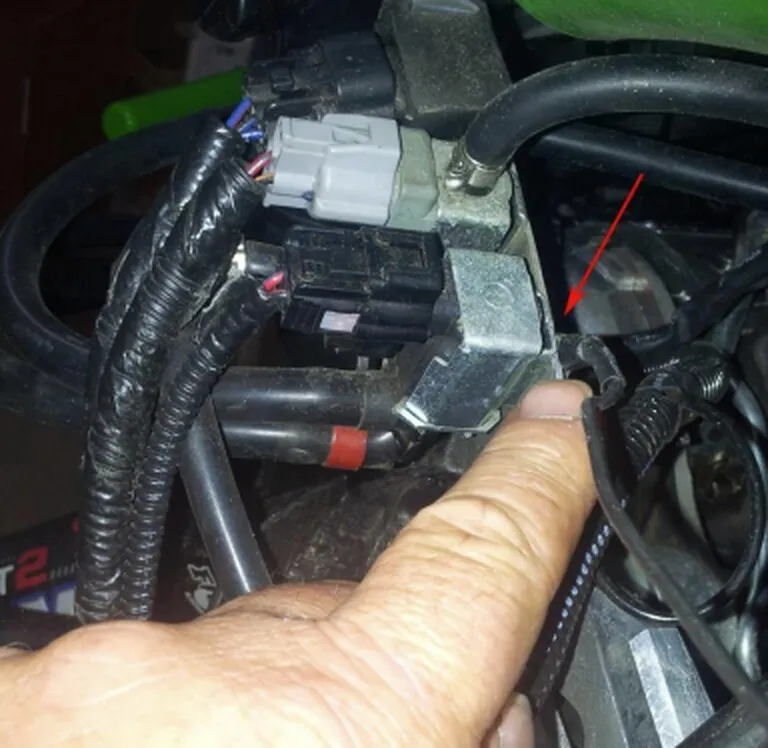
Engine bay view with a red arrow pointing to the sensor tree / chassis ground location where the black ground wire is attached.
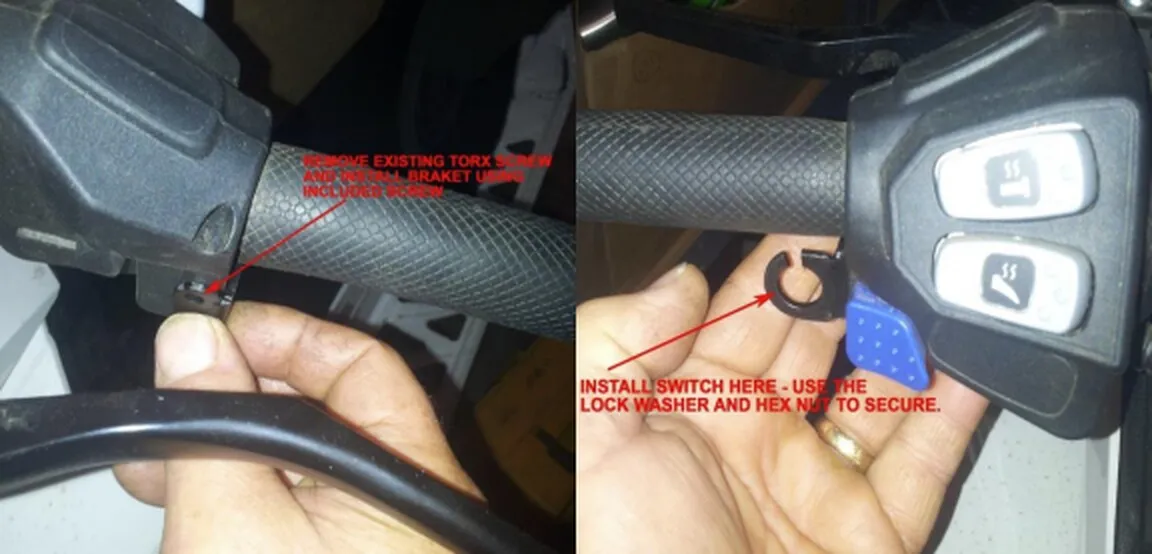
Handlebar showing the launch-control button bracket mounted on the lower hole of the front side of the hand/thumb warmer pod, with red annotations indicating switch and bracket mounting and routing relative to the brake lever.
Emissions notice. This product is exempt from the emission standards and related requirements of 40 C.F.R. § 1051 as provided by 40 C.F.R. § 1051.620, and California law [e.g., vehicle code §§ 27156 and 38391]. This product is sold only for use in connection with EPA certified, purpose-built, nonroad vehicles used solely for closed course, nonroad competition/racing and not used for any recreational purpose or on public highways or right of ways maintained by and open to the public. This product is sold only in connection with machines that do not fall under state and/or federal noise or emission standards/regulations. Purchasers who/that purchase this product represent and warrant that the product is purchased only in connection with EPA-certified, emission-regulations-exempt and noise-regulations-exempt competition/racing vehicles as interpreted under applicable state and/or federal law.
Need technical support?
Submit a ticket with your vehicle and what you're seeing, and our support team will get back to you.
