 BUY NOW, PAY LATER. Starting at 0% APR


This is a high-performance upgrade! Although we have gone through great lengths to build safety into the upgrade turbo system, the fact is installing any upgrade / turbo system requires care in both operation and installation. Poor fuel, improper setup or any number of things that are done incorrectly can damage your engine!
Polaris Pro R Paragon-54 450 Turbo Upgrade System
Installation instructions for the Pro R Paragon-54 450 Turbo Upgrade System on the Polaris Pro R (RZR) (SKU 604FP0077). Parts, tools, and full procedure.
Before you start
Note
Expect 24–48-hour turnaround from the time we receive your ECU for unlock. Please send your ECU to EVP WI headquarters. Create your Maptuner/CodeShooter account before starting the project.
- You have likely voided the sound and exhaust emission standards of your country if applicable.
- This upgrade is intended for OFFROAD and RACING use only.
- This is a performance upgrade which will VOID your engine warranty especially if installed incorrectly or operated without regard to your instruments.
- The fuel requirements must be adhered to. Poor fuel can destroy an engine in seconds.
- Evolution Powersports bears no responsibility for damage caused to your vehicle by the installation of EVP products. The warranty on big turbo kits is 30 days from the date of purchase. Evolution Powersports, at its discretion will determine whether a part meets the warranty requirements. In no case is there any warranty from EVP for your vehicle or vehicles drivetrain. Although we have been careful to supply you with the highest quality parts possible, we assume no liability for damage to the vehicle or personal injury from installing or using any of our products.
- The installation of this kit is technical and mechanical in nature with many opportunities to make mistakes – mistakes that can be very costly. If you are not qualified to install this kit, bring your vehicle to one of our qualified installation centers to do the installation.
- This kit will make your vehicle faster, climb higher and accelerate more quickly and take a longer distance to brake than a stock tuned vehicle. If you are not capable of controlling the vehicle with the added performance, do not install the kit.
- High boost is hard on spark plugs – they must be changed frequently. If you experience misfire issues – Gap and replace the spark plugs.
- A full exhaust and clutching are required for this kit and can be purchased separately.
- Do not ever allow a child or an unqualified driver to operate this vehicle.
In the box
Parts and tools
Parts Included in Paragon 54-400 Turbo Upgrade System
| 604FP0075 | Pro R Paragon 54/68 Black Turbocharger Assembly |
| 604FP0076 | Pro R Paragon Installation Kit |
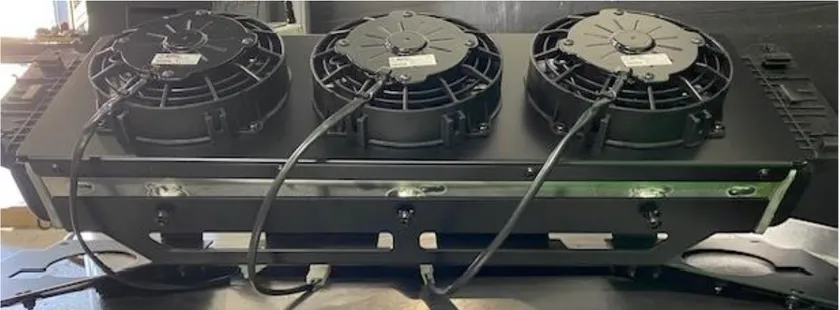
| 100FP0186 | Pro R Triple Fan Kaizen Intercooler Assembly |
| 953RU0485 | Pro R Triple Fan Intercooler Hardware Kit |
| 100RP0154 | Pro R Charge Tube Kit, Black |
| 953RU0421 | Pro R Turbocharger Charge Tube Hardware Kit |
| 203FP0110 | Pro R Turbocharger Air Intake Kit |
| 804FP0259 | Pro R Coolant Tank Relocation Kit |
| 953RU0486 | Pro R Turbocharger Boost Control Kit |
| 803FU0011 | Pro R Catch Can Kit |
| 100FP0187 | Pro R Blow Off Valve 2.0 (BOV) Kit |
| 300FP0374 | Pro R Turbocharger Header/Exhaust System |
| 604FP0078 | Pro R Turbocharger Hardware Installation Kit |
| 004FP0361 | Pro R Turbo Bench Power Flash, CAN Unlock |
| 502FU0018 | 1300cc Injector, ID1300-XDS Uscar, 34mm Length, 14mm top, 14mm lower, set of 4 |
| 603FP0005 | Pro R External Wastegate Assembly |
| 705RU0029 | 3 Bar MAP Sensor |
| 925FP0184 | Pro R Exhaust Facia Trim Plate |
| 102FP0007 | Pro R Intercooler Mount |
Parts Included Pro R Paragon Install Kit
| 804FP0253 | Pro R Intake Manifold Spacer | 1 |
| 804FP0219 | Pro R Head Gasket, Shimmed | 1 |
| 804FP0252 | Pro R Valve Cover Spacer | 1 |
| 953RU0483 | Permatex 82180, 3oz | 1 |
| 953RU0484 | 1/4" Carbide Bur | 1 |
| Level | Tunes | Max Boost (psi) | Spark Plug Gap | Spring | Operating RPM | Engine HP |
|---|---|---|---|---|---|---|
| P54-350 | 91 | 8.5-9 psi | .016 - .018 | Pink (7) | 8200-8450 | 350CHP, 287WHP |
| P54-450 | 110 | 15-1 6psi | .016 - .018 | Pink (7) | 8200-8450 | 450CHP, 369WHP |
Required Parts (Sold Separately)
- EVP calibrated Tapp primary clutch
- EVP calibrated STM secondary clutch
- AFR Module
- Oil Change Kit
- Engine Coolant
- Compressed air and parts cleaner
- Damper puller OTC PN:6667
- P90X primary clutch puller
Procedure
Pro R Disassembly
- Step 1
Remove the (4) bed screws using a T-40. Remove the bed.
- Step 2
Remove the passenger and driver seat, if a 4-seater remove the rear seats.
- Step 3
Remove both firewall panels, (6) 1/4-turn fasteners.
- Step 4
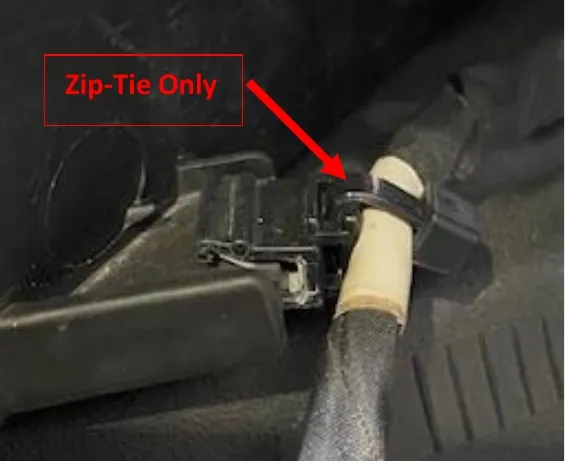
Cut all zip-ties holding the taillight harness and rear-view camera. DO NOT remove the clips from the panels, this way you can reuse all OEM clips and supplied zip-ties in the hardware kit.
Zip-Tie Only. - Step 5
Unplug both rear taillights and camera.
- Step 6
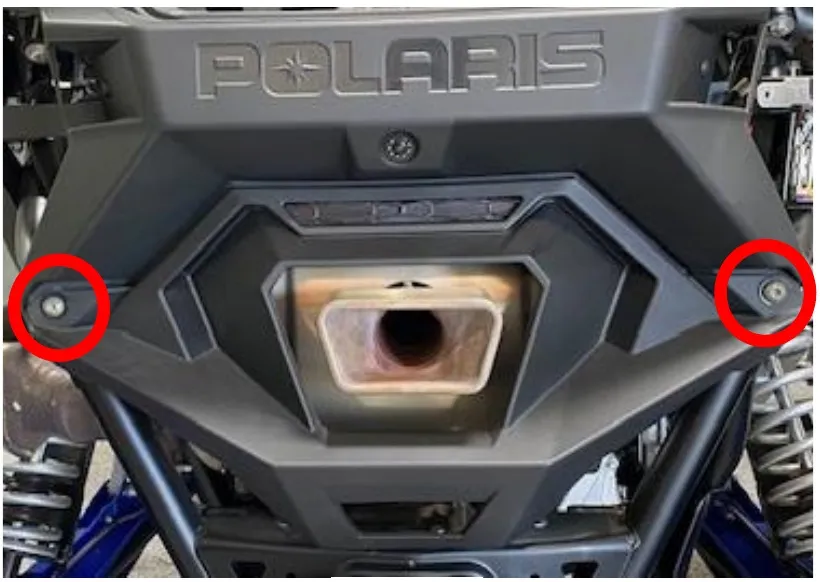
Remove the lower rear valance around the muffler tips. Use a T-50 socket.
- Step 7
Remove the upper rear valance with taillights. (4) T-40 screws and (6) push darts. (2) push darts are tucked underneath the rear fenders.
- Step 8
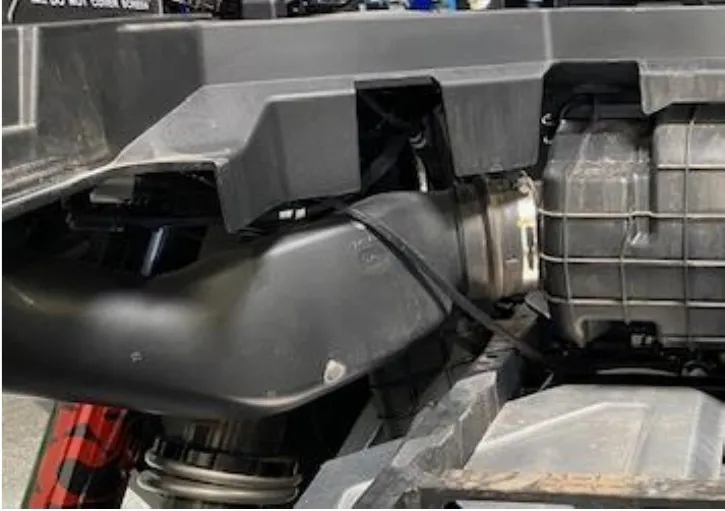
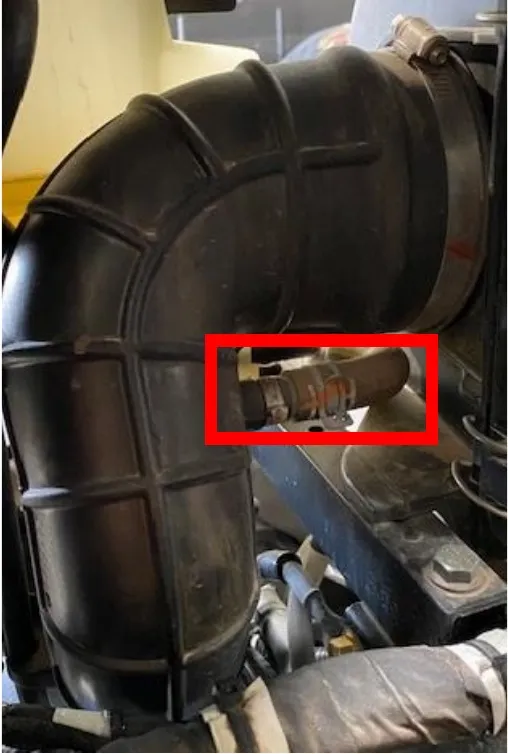
Remove the cold air intake tube (bed to airbox tube) and intake tube (airbox to throttle body). Remove the crankcase breather tube from the intake tube. (4) worm drive clamps total.
- Step 9
Remove the engine belly pan using a 10mm socket. (8) screws and oversized washers.
- Step 10
Remove the coolant reservoir cap. Locate the water pump housing (above the oil filter) and remove the 4mm Allen plug. Place a catch pan underneath the vehicle. (figure 5).
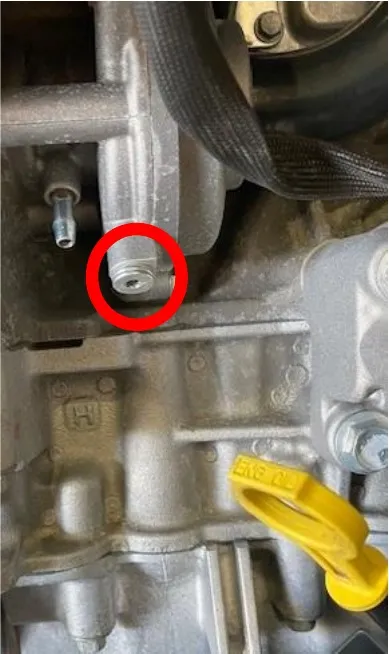
Fig. 5 - Step 11
Remove the (2) 10mm screws holding the airbox in place. Two tabs will be located underneath the airbox.
- Step 12
Remove (2) T-40 screws holding the coolant reservoir in place. Remove all hoses from the coolant reservoir.
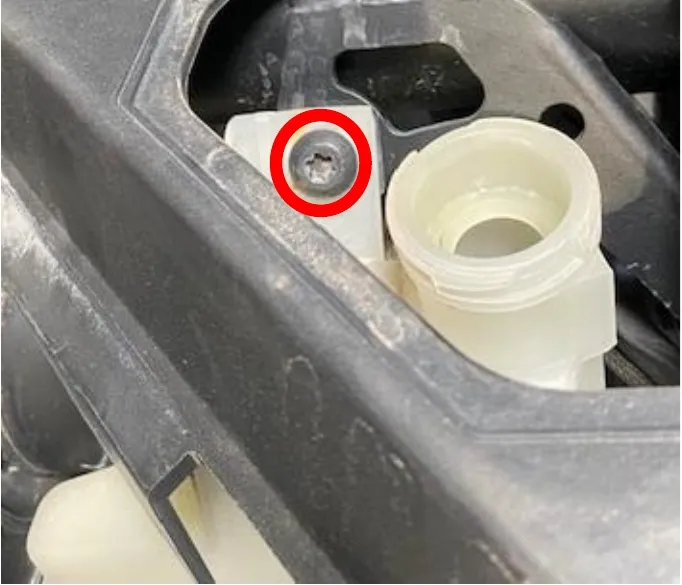
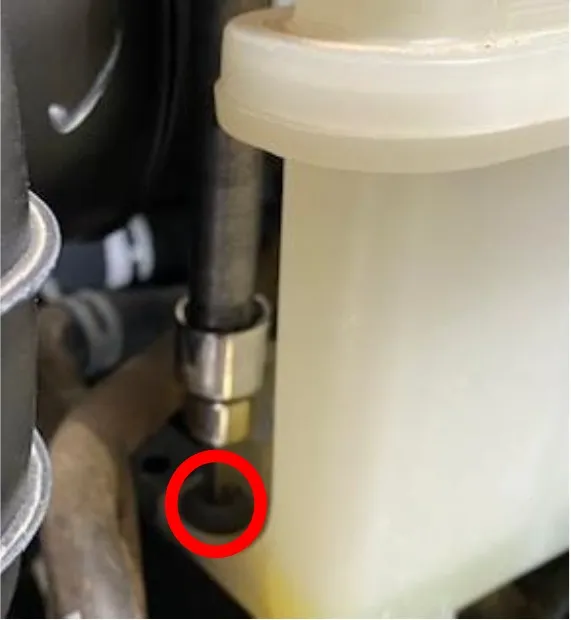
- Step 13
Remove the bed frame hardware (4) 13mm bolts and (1) T-40 for the CVT boot support bracket.
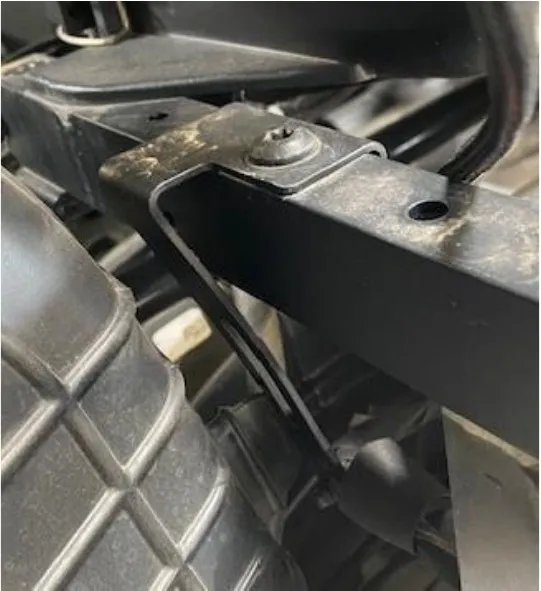
- Step 14
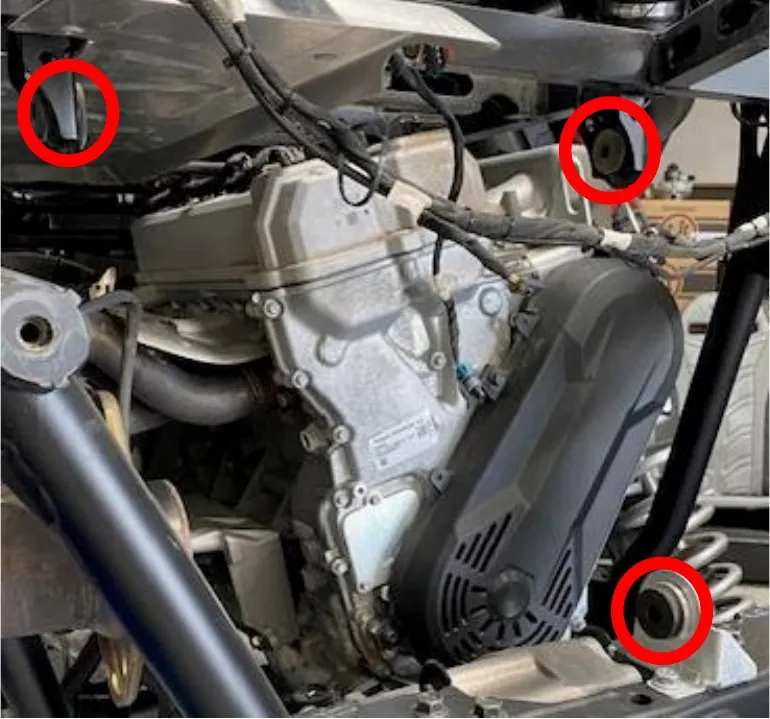
Remove (2) 14mm bolts holding the muffler and header pipe together. Remove the muffler by sliding it out of (3) rubber gromets (towards the left side of the vehicle. Gromets shown below.
- Step 15
Remove the airbox and bed frame. Cut all zip-ties holding the engine harness to the bed frame.
- Step 16
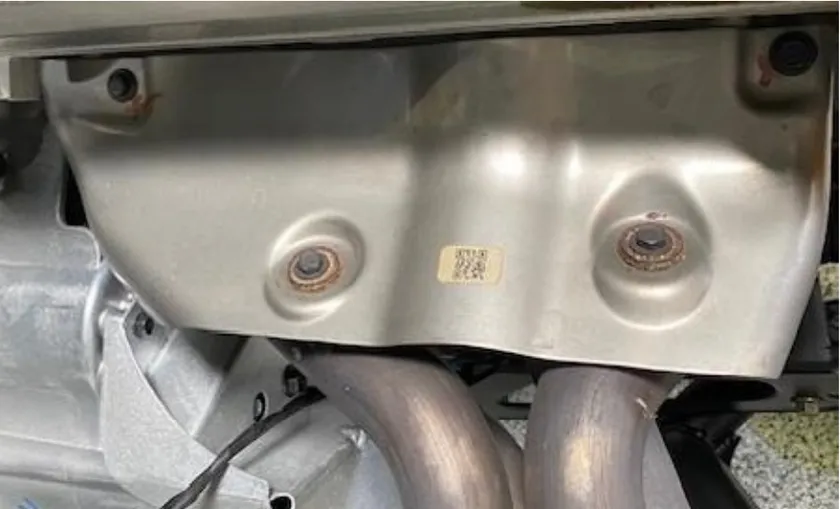
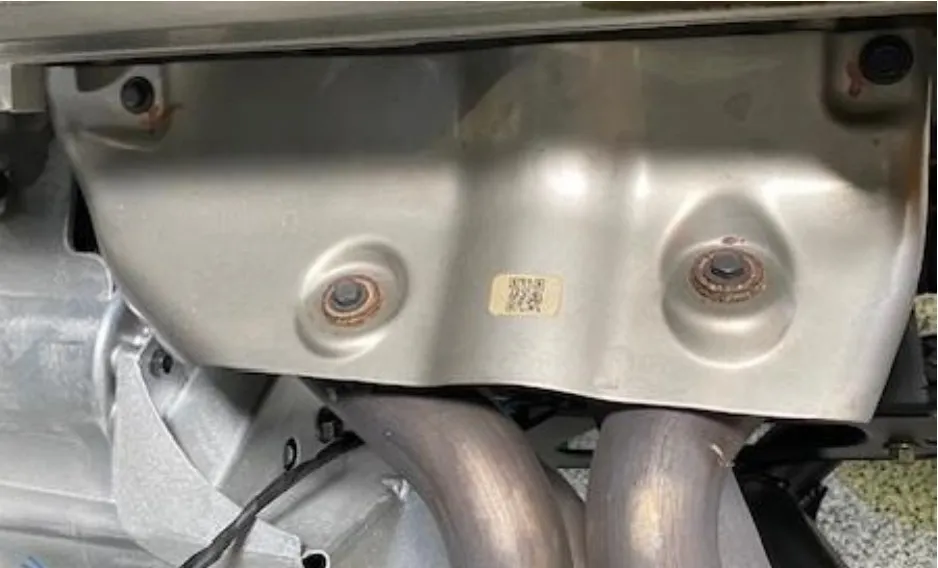
Remove the header heat shield. (4) 10mm screws.
- Step 17
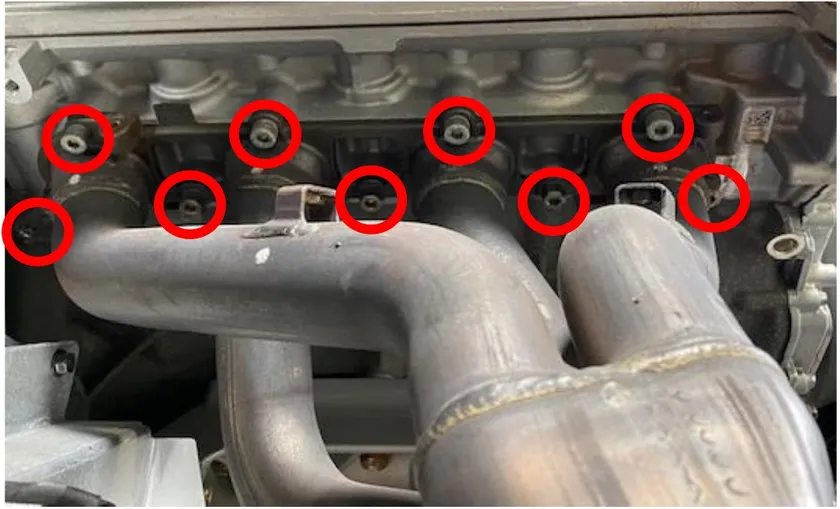
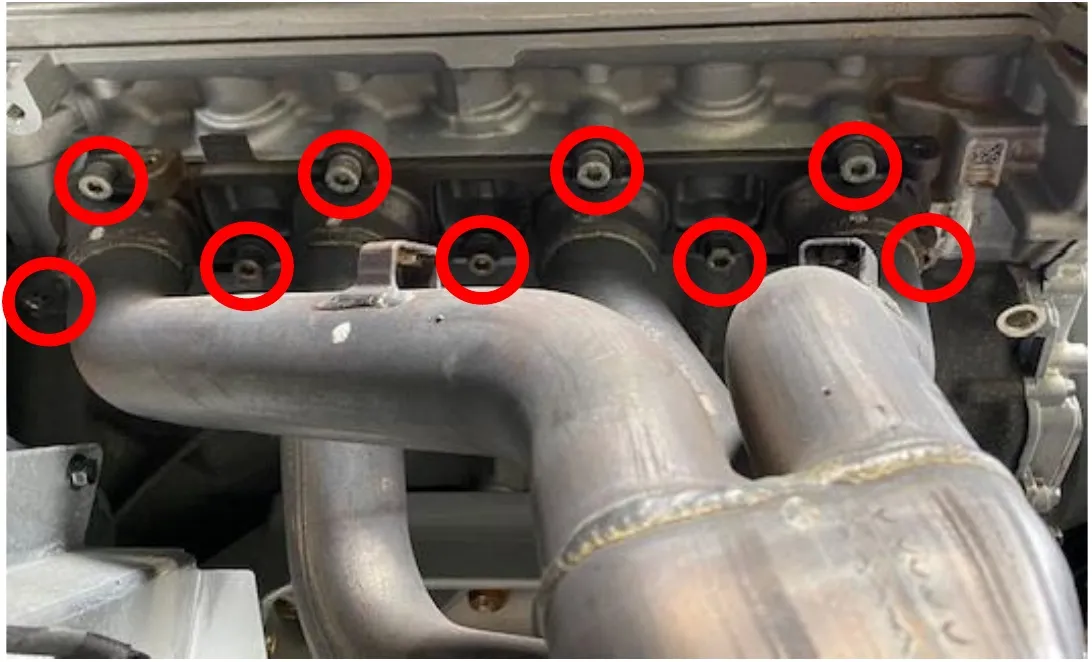
Remove (9) 6mm Allen screws holding the header to the engine block. Unplug the 02 sensor from the engine harness. Remove the header.
- Step 18
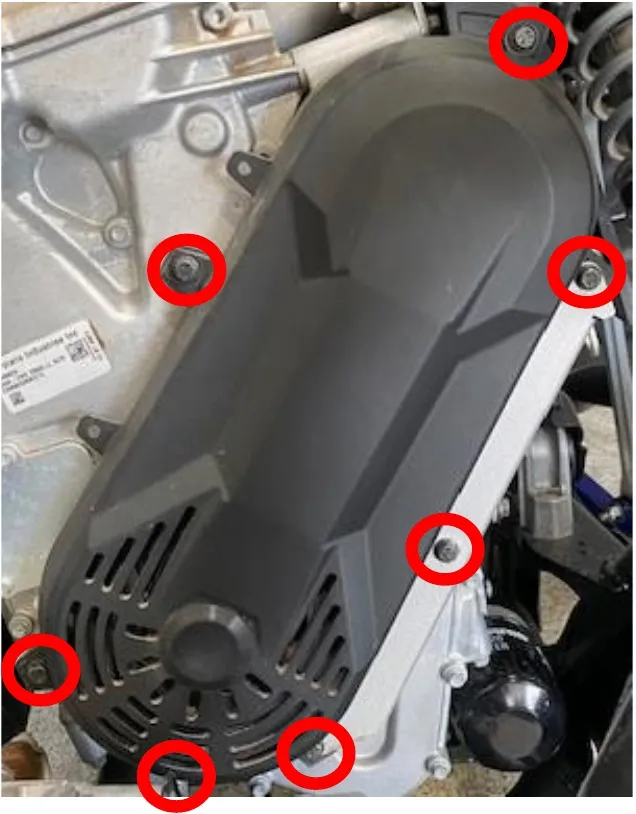
Remove the alternator belt cover. (7) 10mm screws.
- Step 19
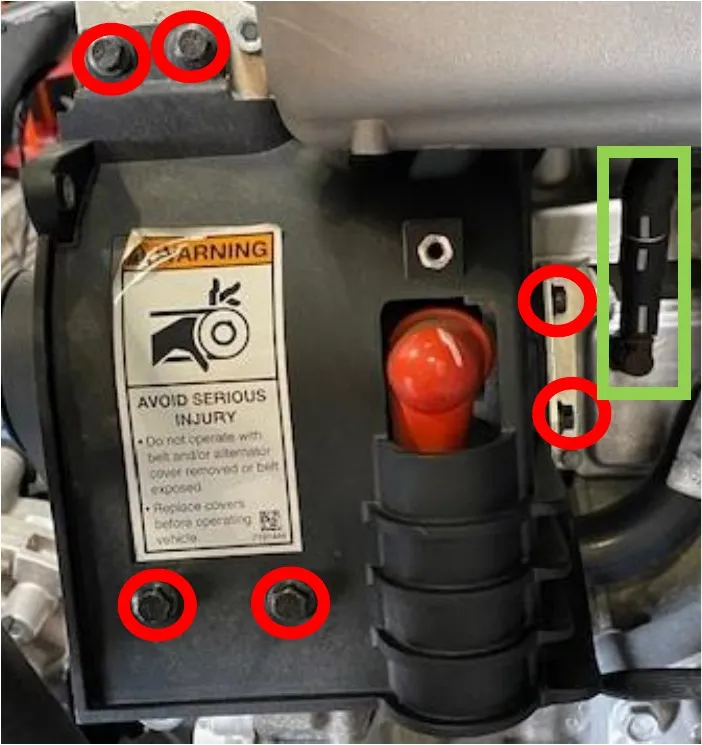
Remove the alternator shroud. (6) 10mm screws. It is easier to remove the hose from the engine breather box.
- Step 20
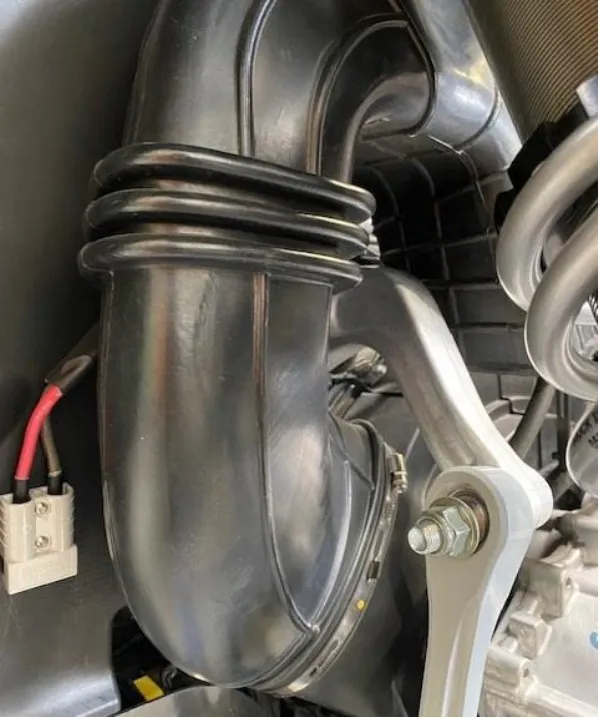
Remove the CVT box breather. (1) worm drive clamp.
- Step 21
Remove the alternator stretch belt. Use a 19mm socket to turn the crank.
- Step 22
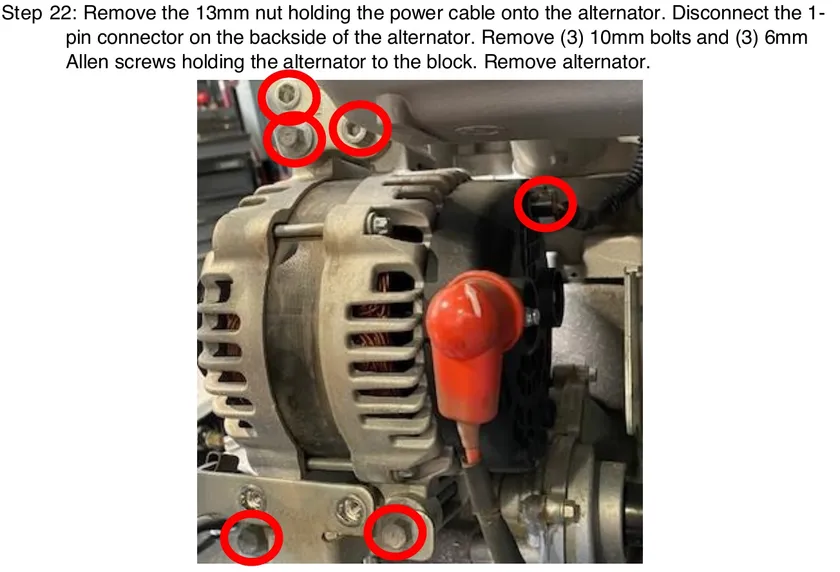
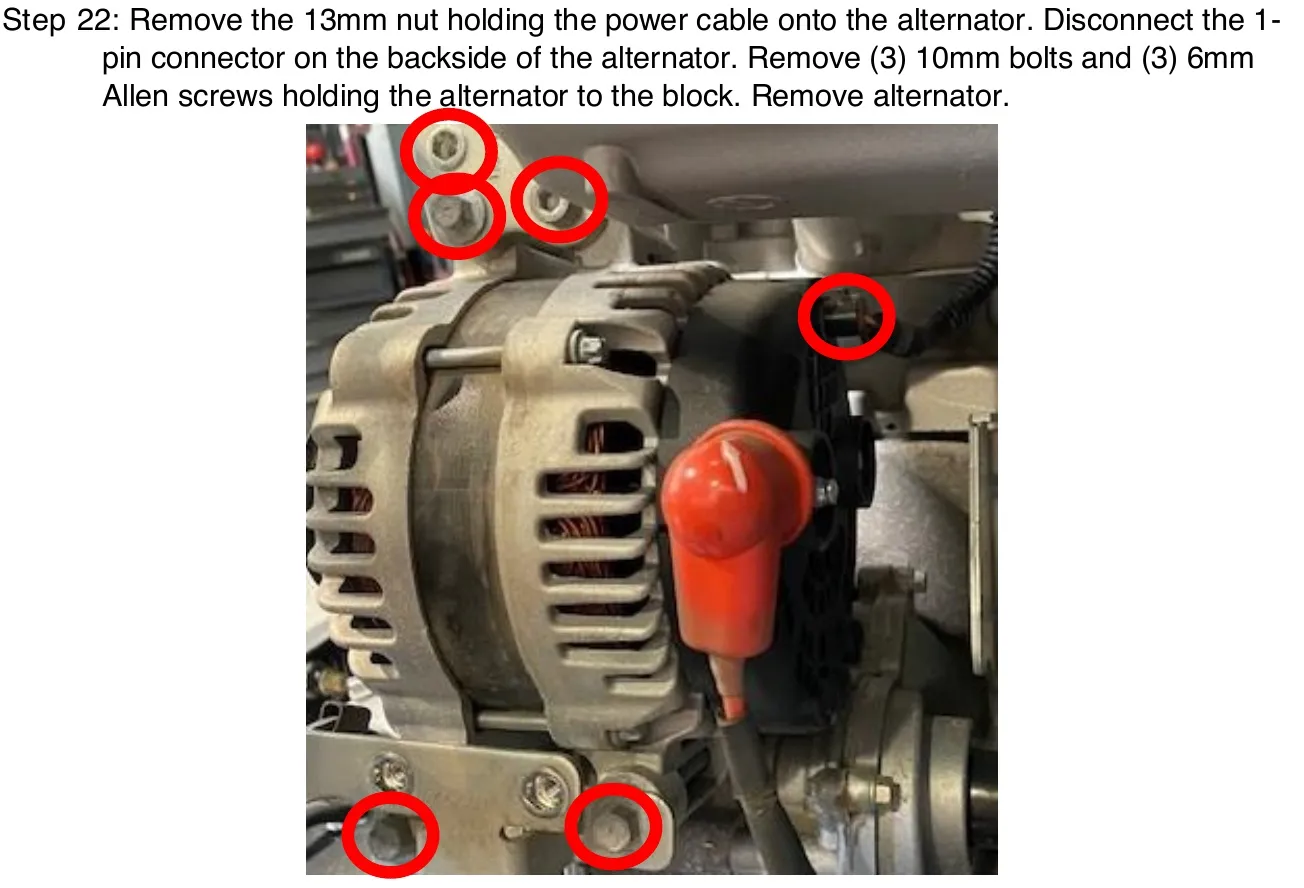
Remove the 13mm nut holding the power cable onto the alternator. Disconnect the 1-pin connector on the backside of the alternator. Remove (3) 10mm bolts and (3) 6mm Allen screws holding the alternator to the block. Remove alternator.
- Step 23
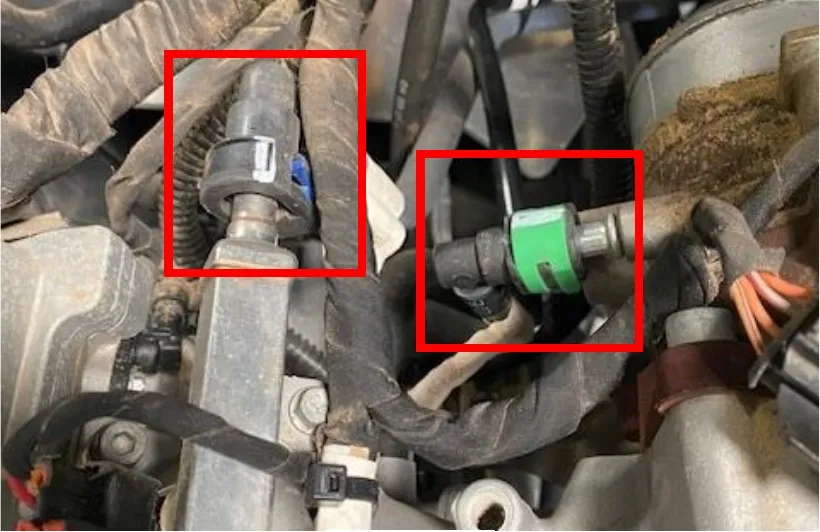
Remove the (blue clip) from the fuel rail and (green clip) from the throttle body.
- Step 24
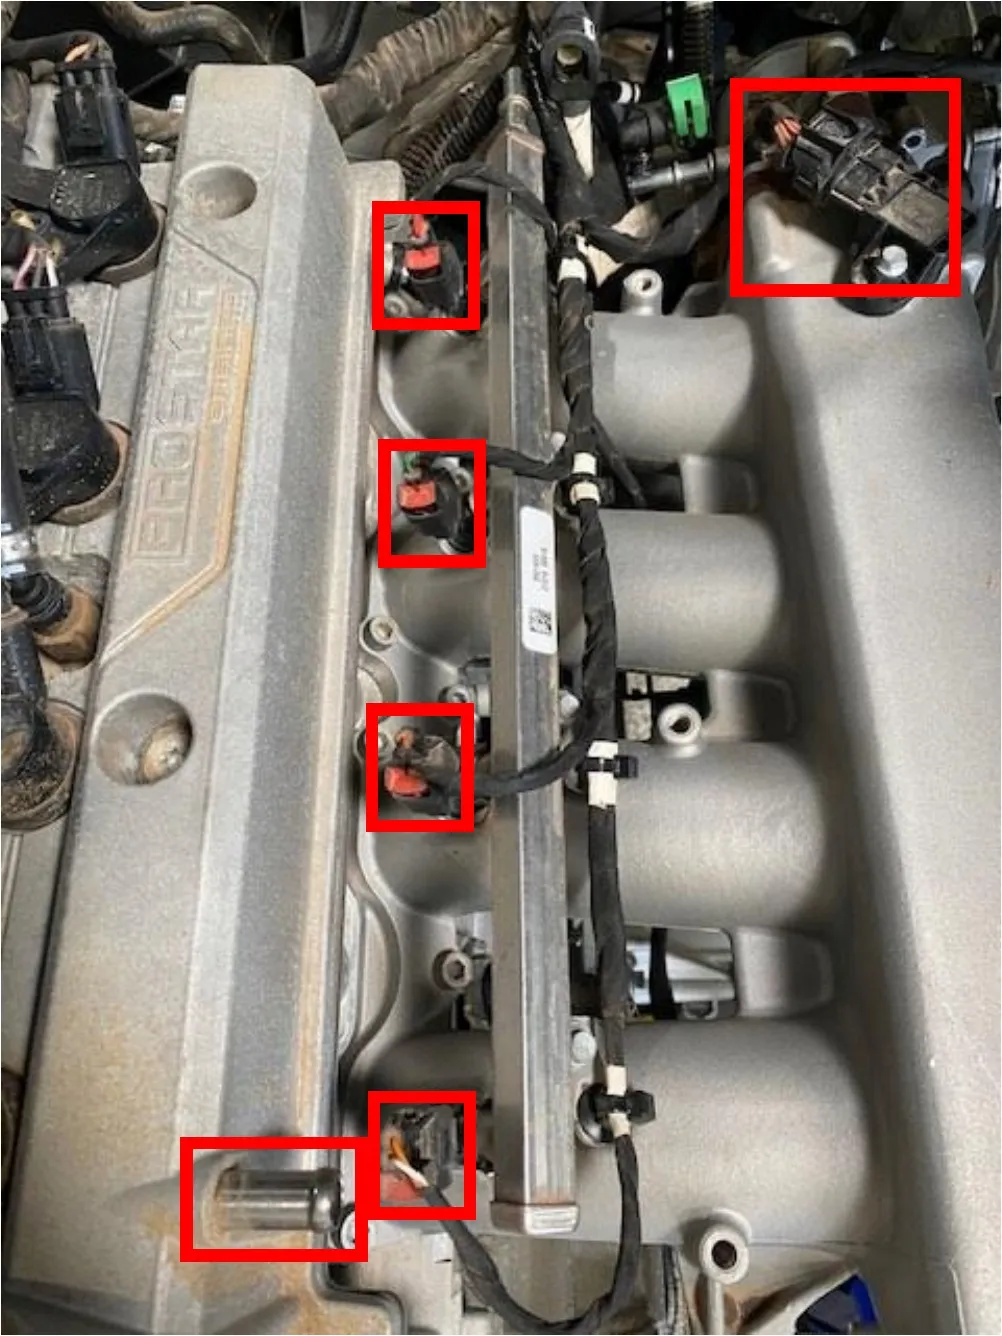
Remove (4) injector connectors, (4) coil connectors. Cut the zip-ties holding the injector harness to the intake plenum. Disconnect the MAP sensor from the engine harness. Remove the valve cover breather tube. Disconnect the coolant temperature sensor underneath the plenum. Located between cylinder 3 & 4.
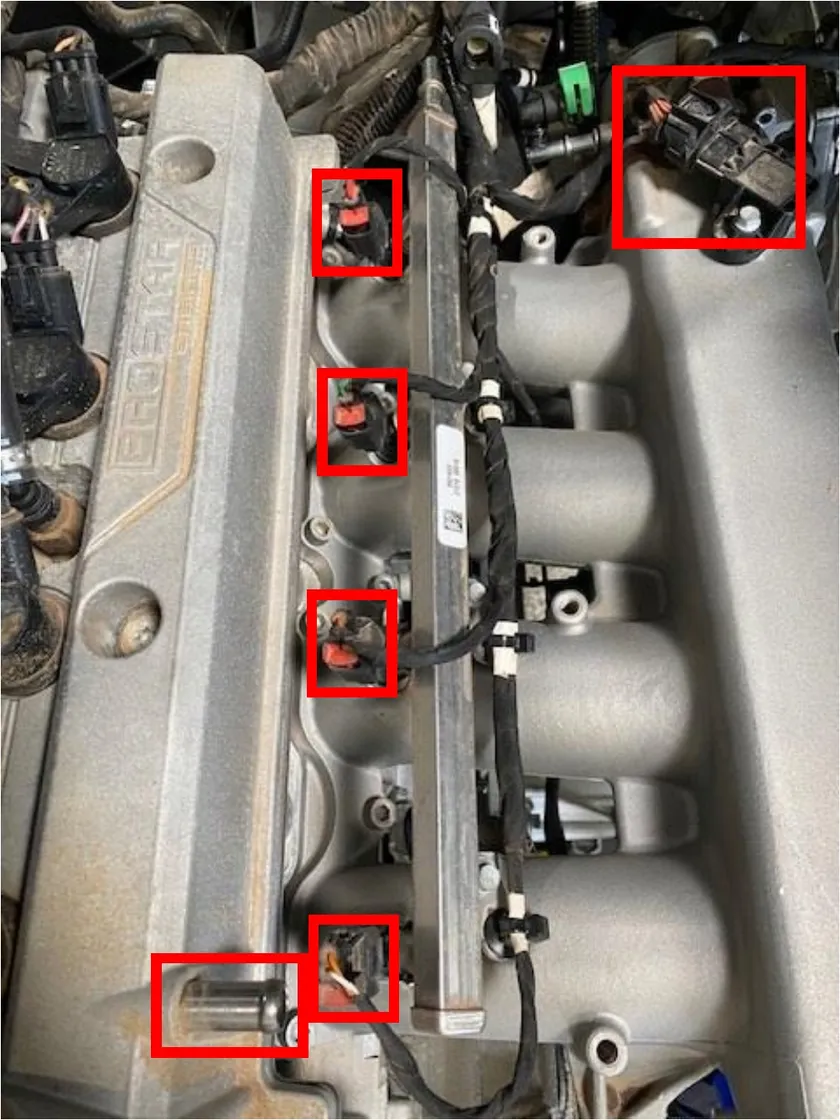 Note
clean the entire engine and intake plenum with compressed air if you haven’t already!
- Step 25
Remove the harmonic damper bolt, using a 19mm socket.
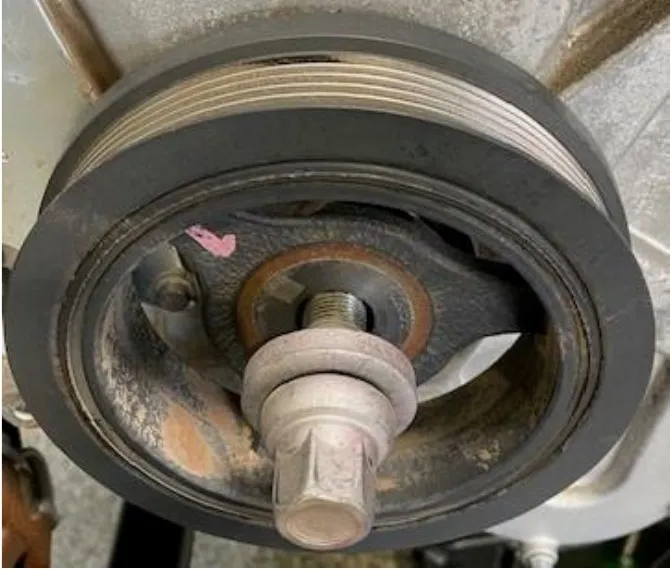
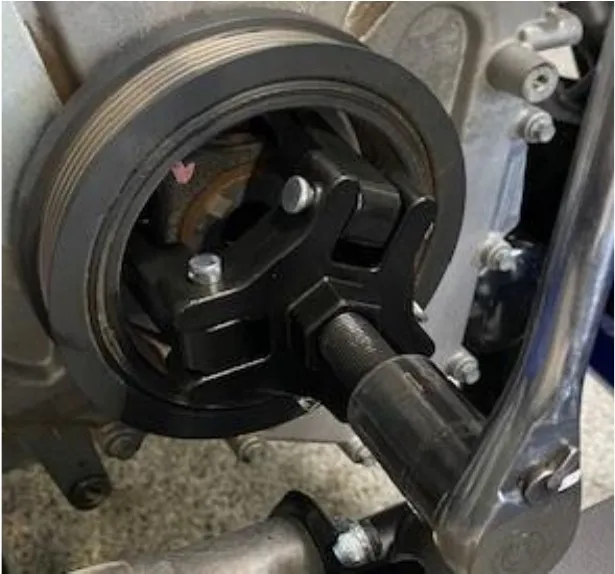 Note
Use a Damper Puller OTC PN: 6667 to remove the damper.
- Step 26
Remove the (4) ignition coils using a 8mm & 10mm socket. Remove the spark plugs using a 5/8” socket. DO NOT damage the spark plugs when removing them from the head. Use a magnet to pull them out.
- Step 27
Remove (7) intake plenum fasteners using a 6mm Allen socket. Remove the intake plenum and gasket from the engine block. The fuel rail and throttle body will come with it.
- Step 28
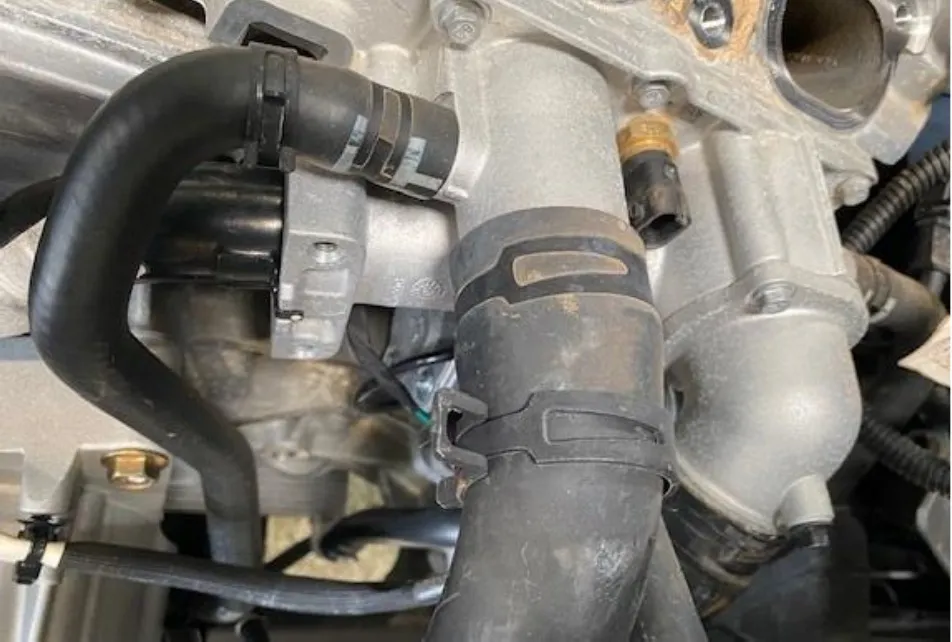
Remove all (4) hoses off the thermostat housing block. The large hardline with O-ring going to the water pump will stay on the block. Remove (5) screws holding the thermostat block to the engine. (Figure 20)
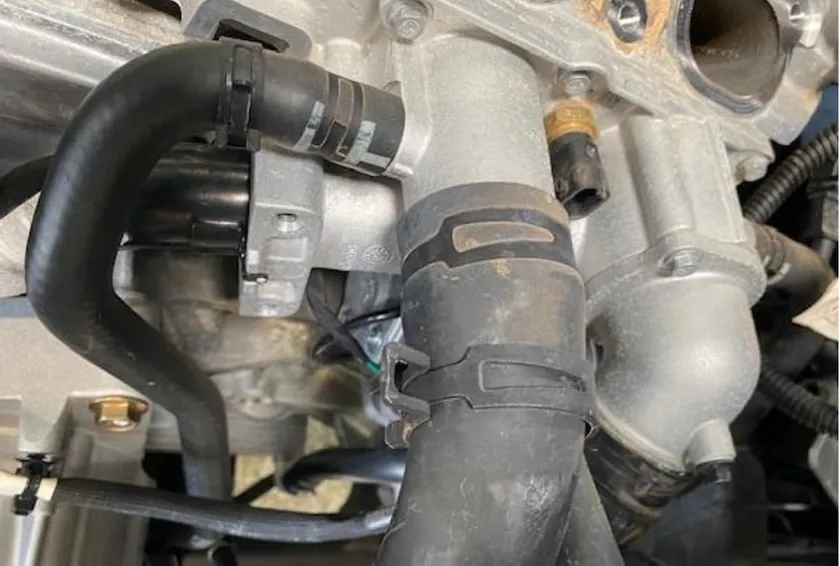
Fig. 20 - Step 29
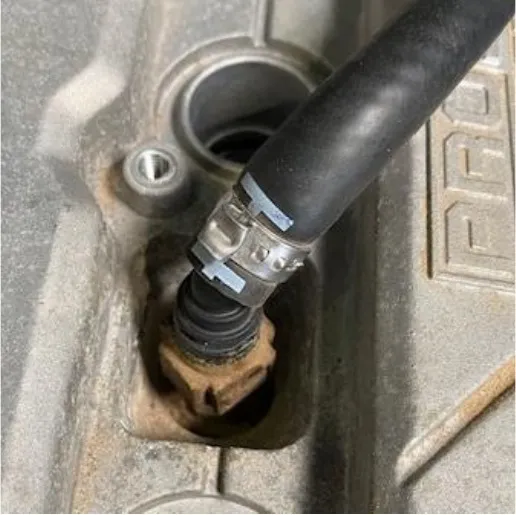
Remove the coolant line quick connector from the valve cover.
- Step 30
Remove the (8) valve cover screws using a T-40 socket. Remove the valve cover and rubber gasket.
- Step 31
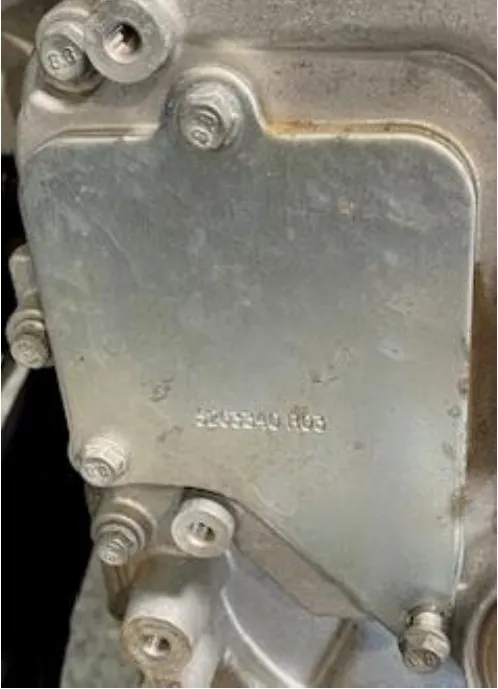
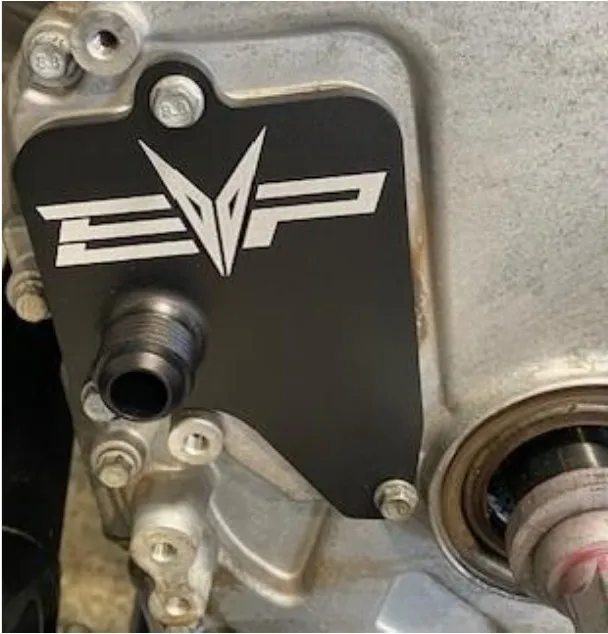
Remove the chain tensioner access panel from the timing chain cover, using an 8mm socket.
- Step 32
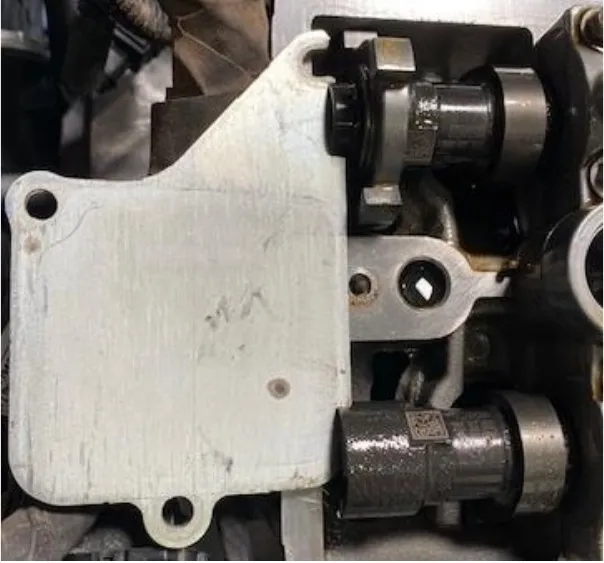
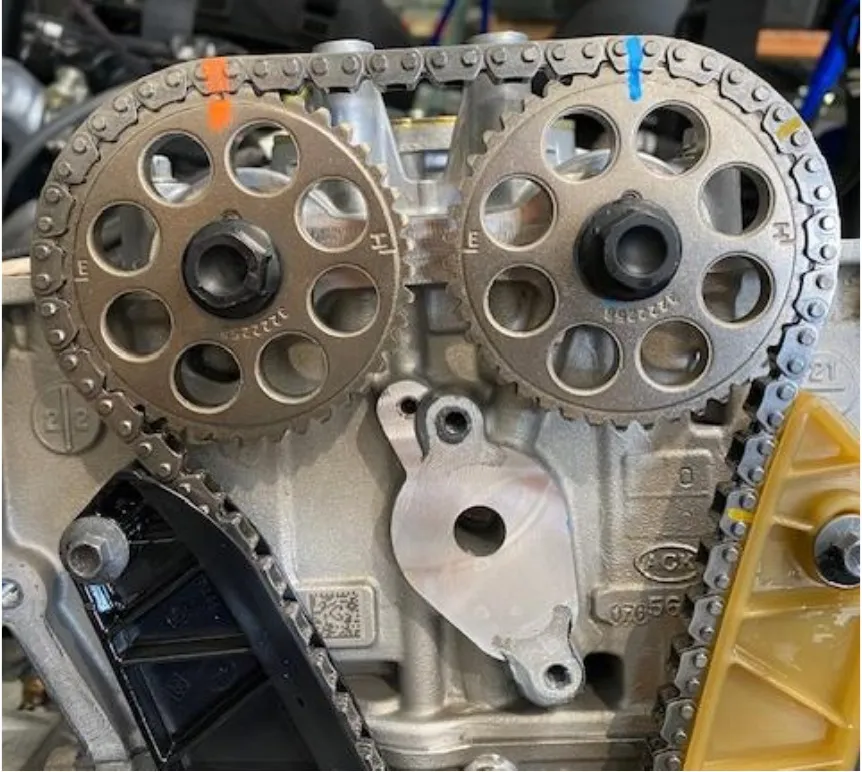
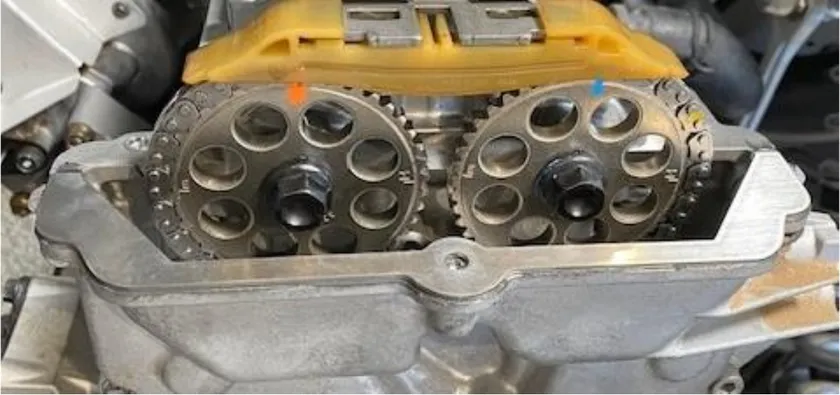
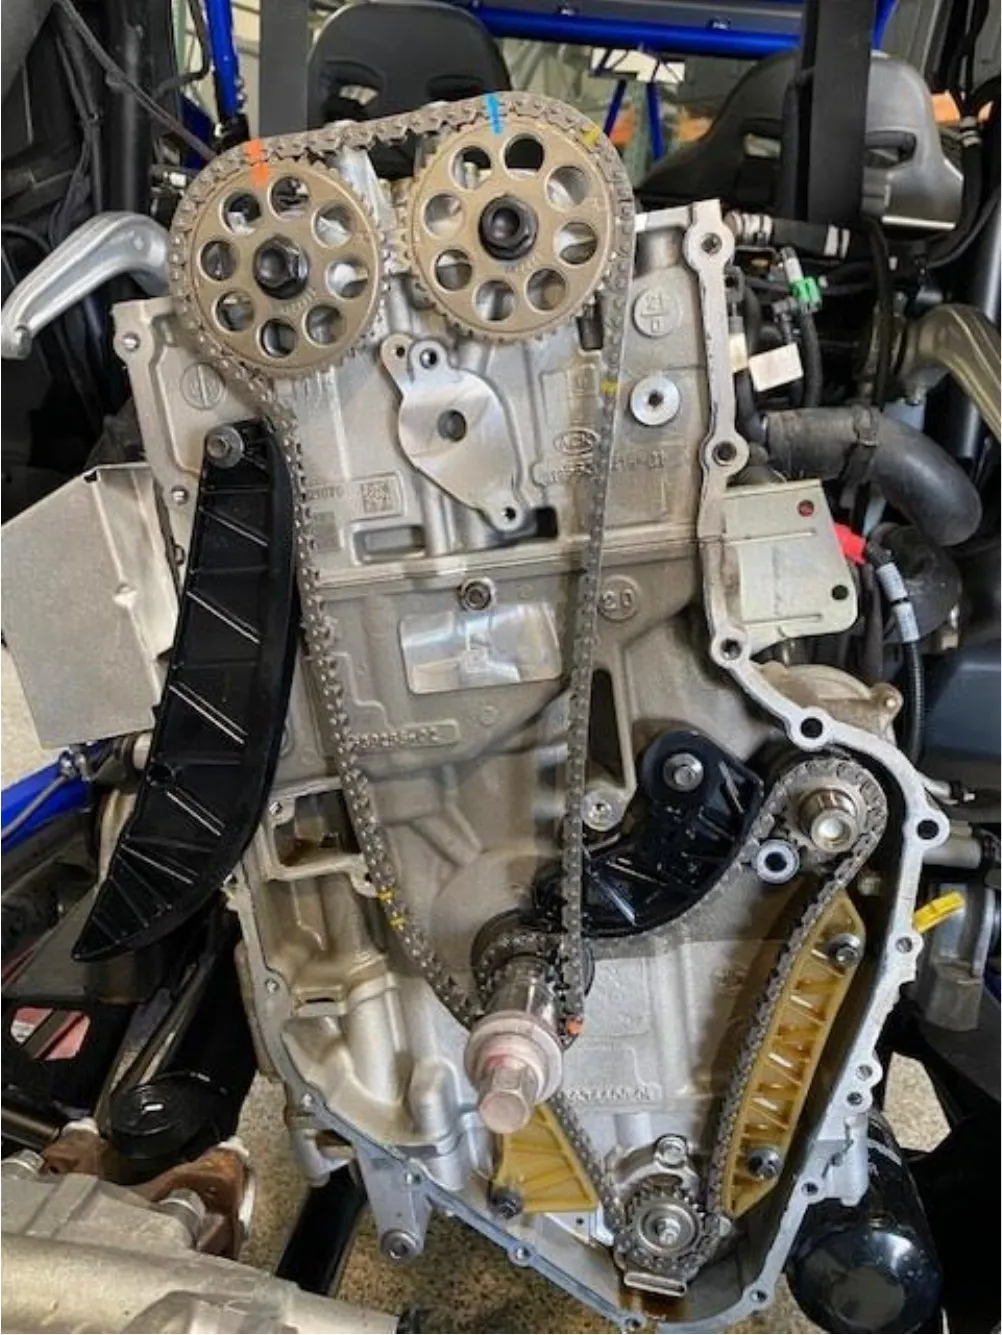
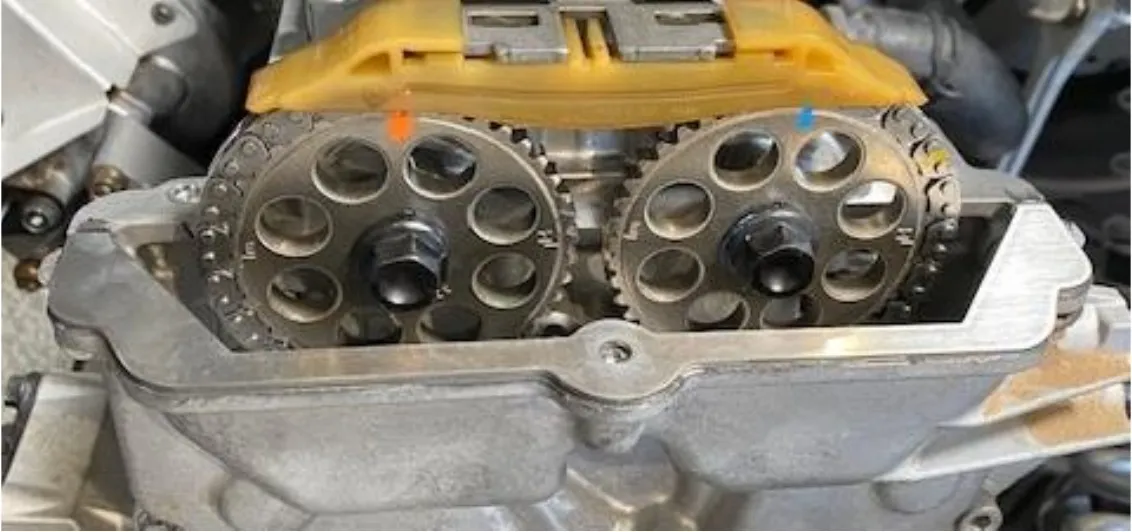
Find top-dead-center on the engine. Ensure the intake and exhaust camshaft notches are in the 12 o’clock position. The number 1 piston should be at top dead center (TDC), crankshaft key at 12 o’clock. The engine is timed top-dead center exhaust stroke. You can also slide the chain tensioner access panel into the key way on both camshafts.
- Step 33
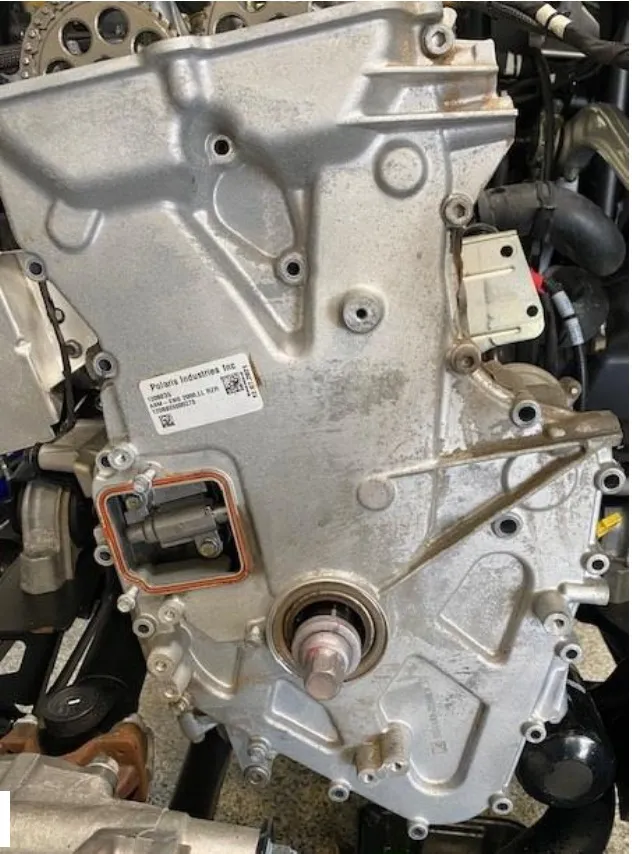
Place a catch pan underneath the timing chain cover. Remove the (20) timing chain cover screws using a 10mm & 6mm Allen socket. The cover may struggle to come off due to the water pump bearing in the cover.
- Step 34
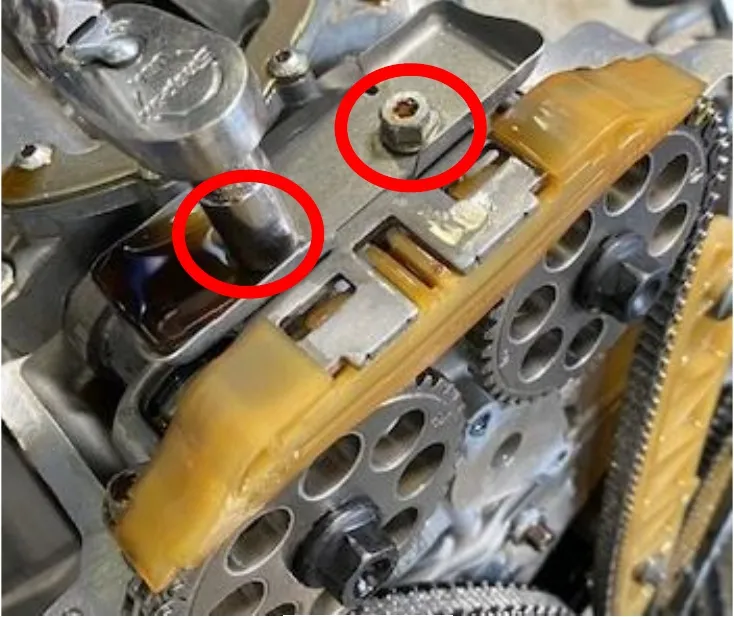
Remove the (2) screws holding the top chain guide using a 10mm socket.
- Step 35
Clean the timing gears and chain with parts cleaner, wipe clean and let dry.
- Step 36
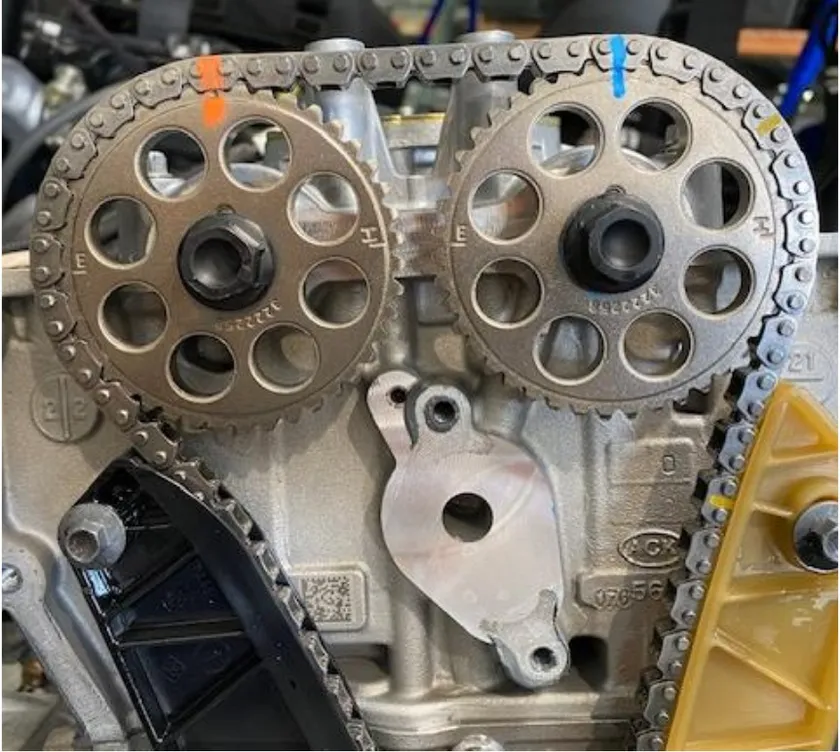
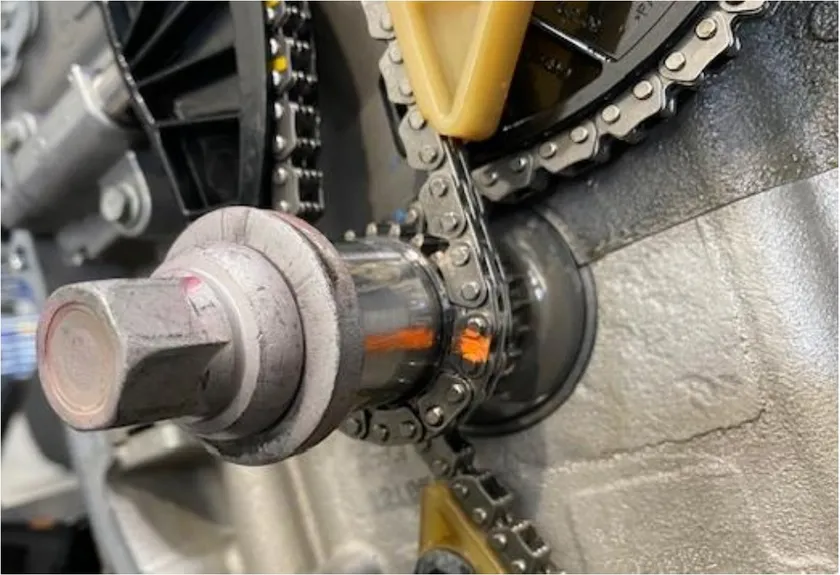
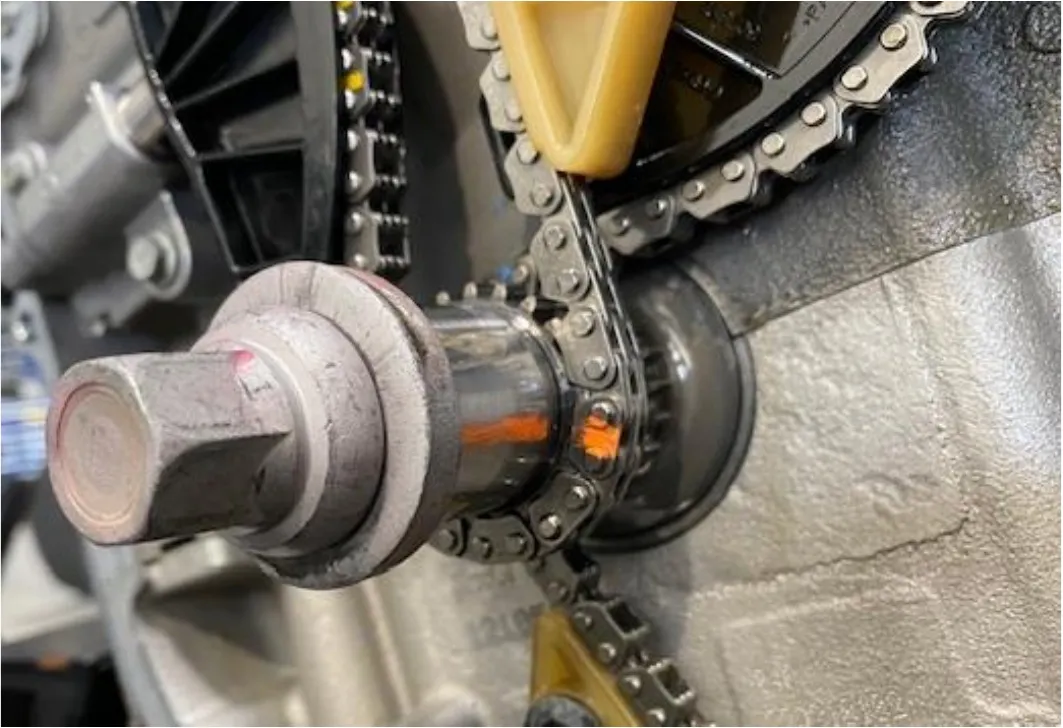
With a paint marker, mark the intake/exhaust cam gears and chain. Also make a mark on the crankshaft and chain. This is for reassembly purposes.
- Step 37
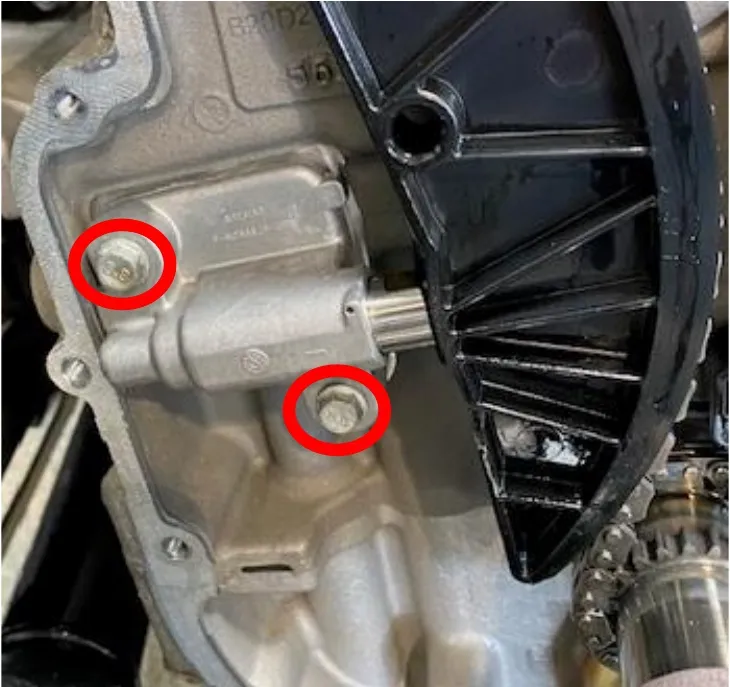
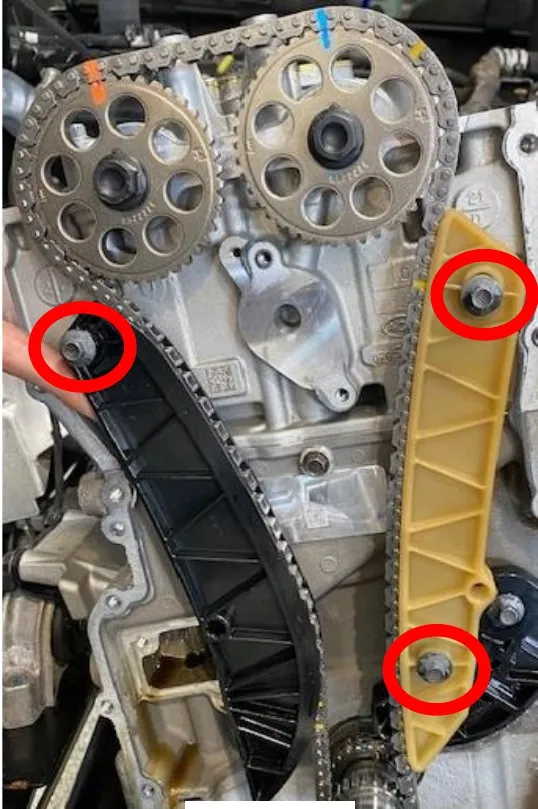
Remove the chain tensioner by removing (2) 8mm screws. When removing the chain tensioner be careful not to damage the piston or spring. This will be reused.
- Step 38
Remove both (black/neutral) chain guides. Total of (3) 8mm bolts. Remove the timing chain off the gears and place it in a safe area.
- Step 39
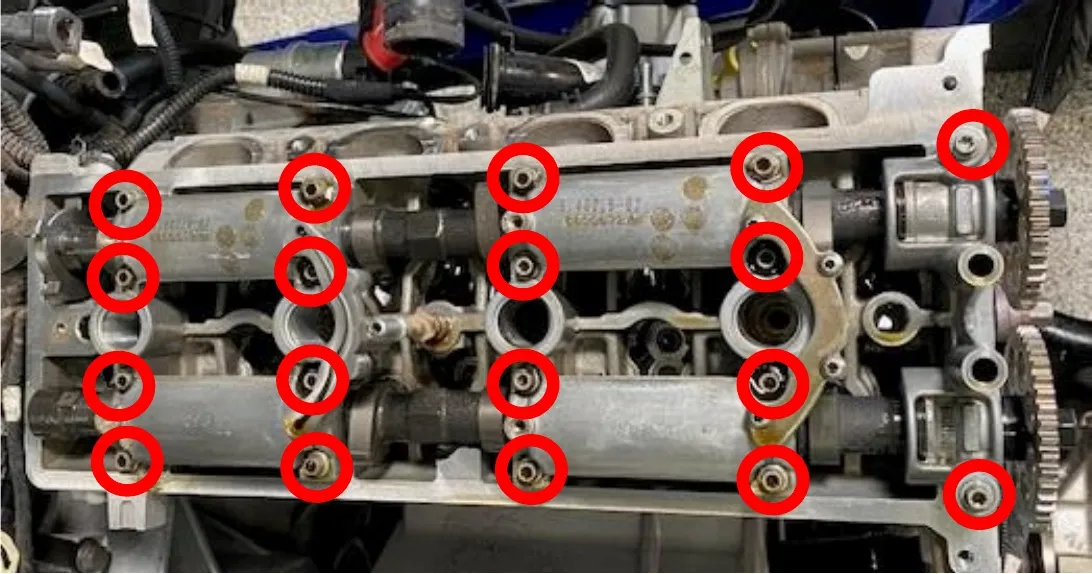
Remove the camshaft carrier fasteners. (18) 8mm and (2) 10mm screws. Remove the intake and exhaust camshafts.

- Step 40
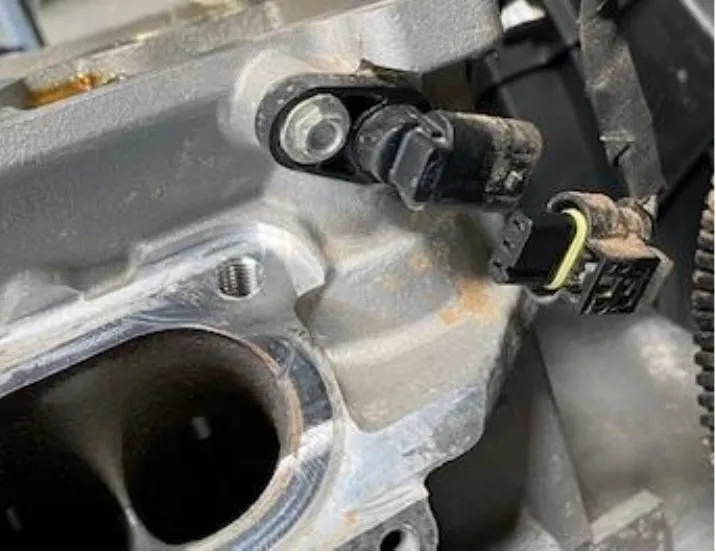
Unplug the camshaft sensor, located on the rear of the engine.
- Step 41
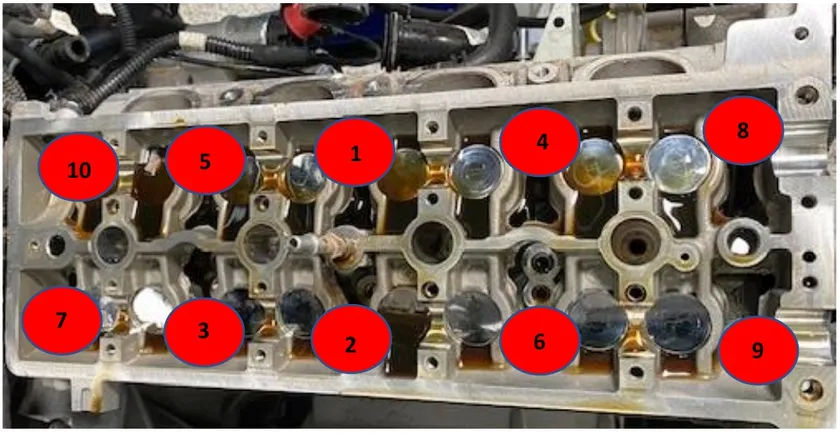
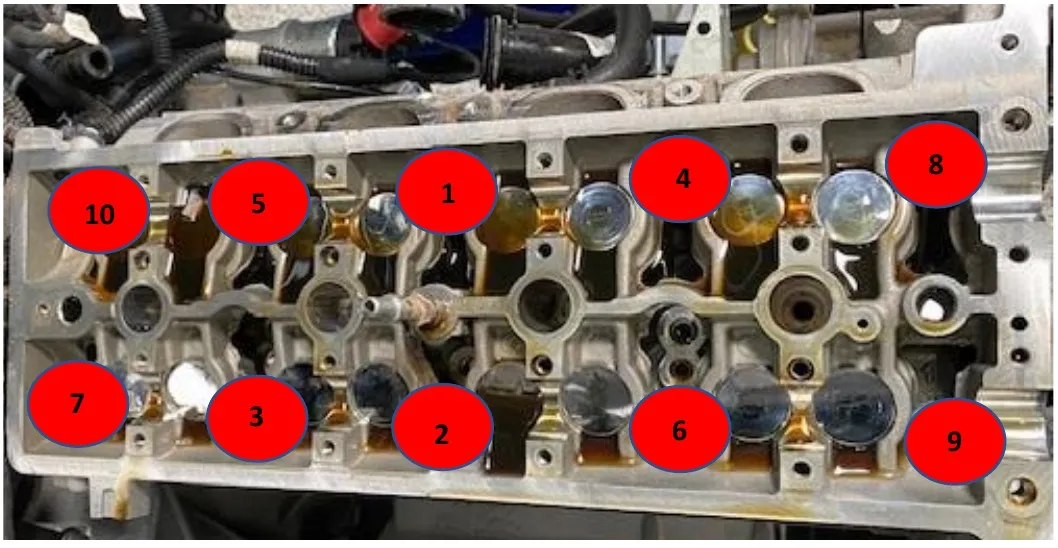
Loosen the (10) head bolts. Start from the inside of the head and crisscross towards the outside of the head, only doing a full turn on each bolt. Doing this takes any binding pressure off the head.
- Step 42
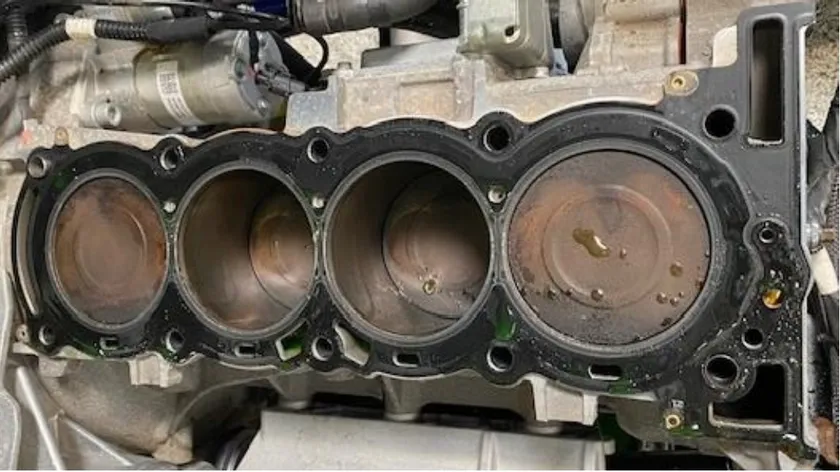
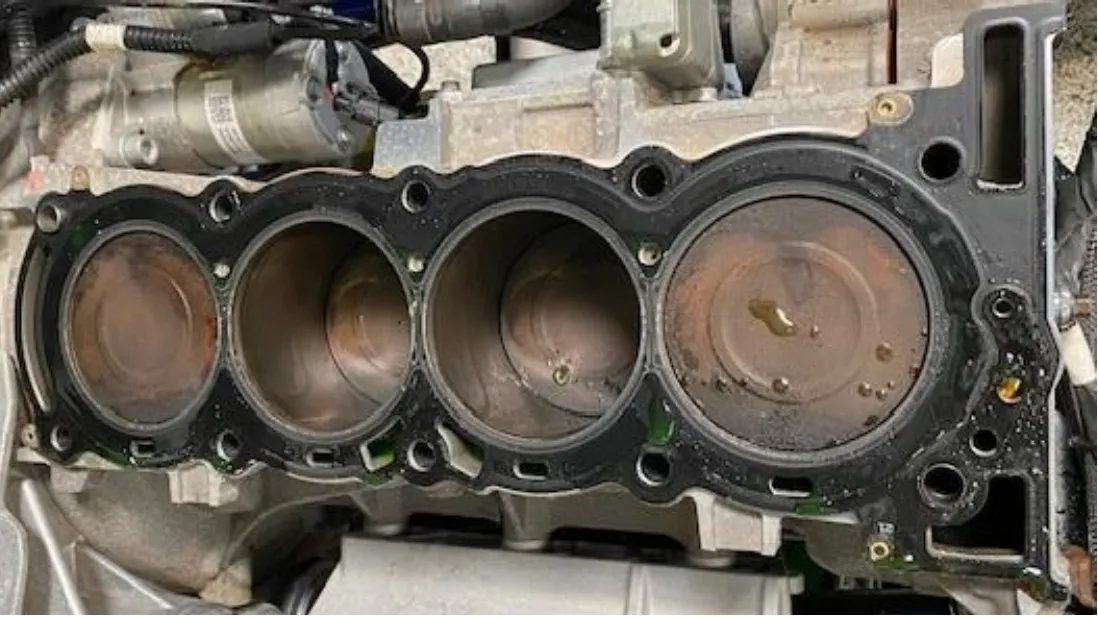
Remove the head from the block. Place the head on a dry clean surface. Remove the head gasket and inspect the top end of your engine.
Procedure
Cylinder Head Cleaning
Note
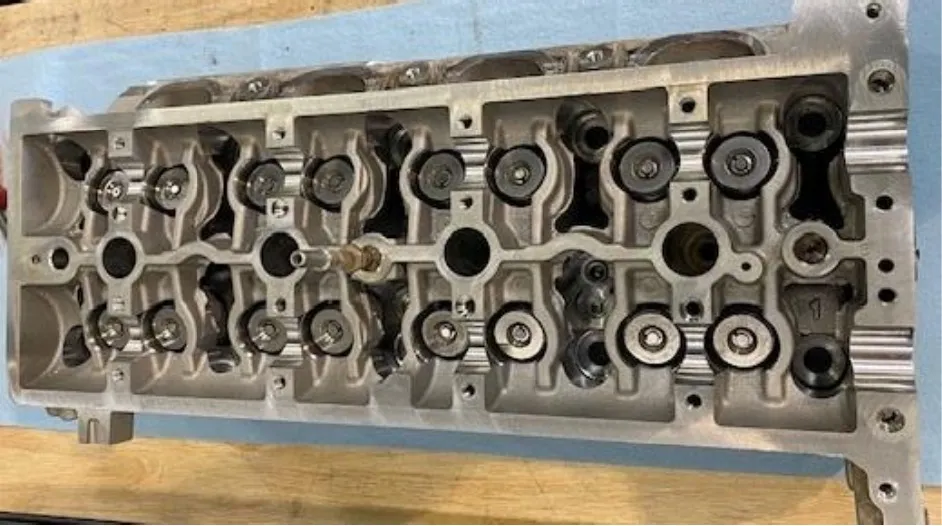
Now is a good time to inspect your cylinder head. Look for cracks around the valves / valve seats. For renewing valve seats please see shop manual Pg: 3.52-3.54. If any debris is found on the topside of your cylinder head, you can remove the intake/exhaust tappet from the valve and clean thoroughly. Keep mated parts together in order with respect to their locations in the cylinder head. Always reinstall tappets with a fair amount of assembly lube on the outer portion. Clean both surfaces where the intake/exhaust gaskets lay. For more information, please see shop manual Pg: 3.54- 3.95.
Procedure
Pro R Engine Reassembly
- Step 1
Install the EVP supplied head gasket. Reinstall the cylinder head and head bolts. Head bolts can be re-used up to 4 times. If you have removed your cylinder head more than 4 times without replacing the OEM head bolts, they need to be replaced. See torque sequence below.
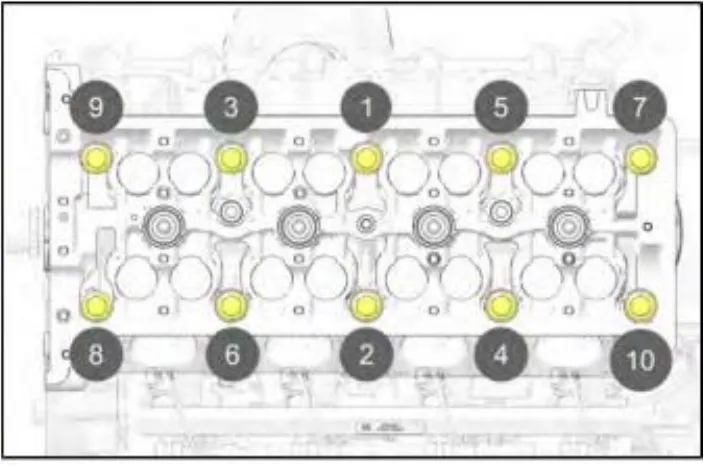
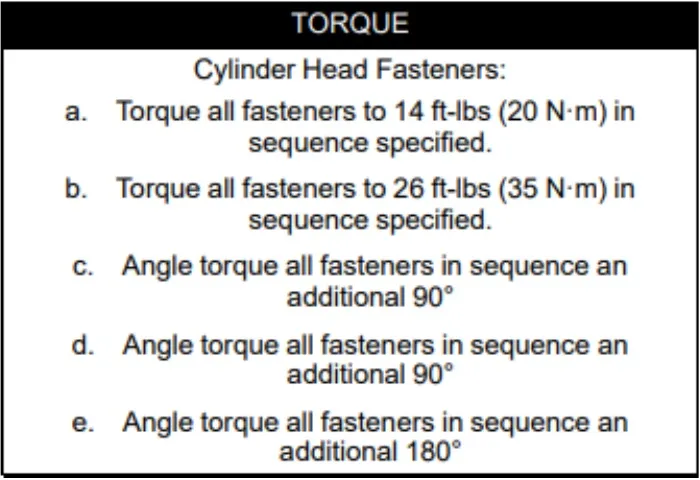
Cylinder Head Fasteners: a. Torque all fasteners to 14 ft-lbs (20 N·m) in sequence specified. b. Torque all fasteners to 26 ft-lbs (35 N·m) in sequence specified. c. Angle torque all fasteners in sequence an additional 90°. d. Angle torque all fasteners in sequence an additional 90°. e. Angle torque all fasteners in sequence an additional 180°. - Step 2
Install both intake/exhaust camshafts. Ensure the camshaft notches are in the 12 o’clock position (still at top dead center). Lubricate the camshaft bearing journal surfaces. Install camshaft gaskets and carriers. Torque sequence below.
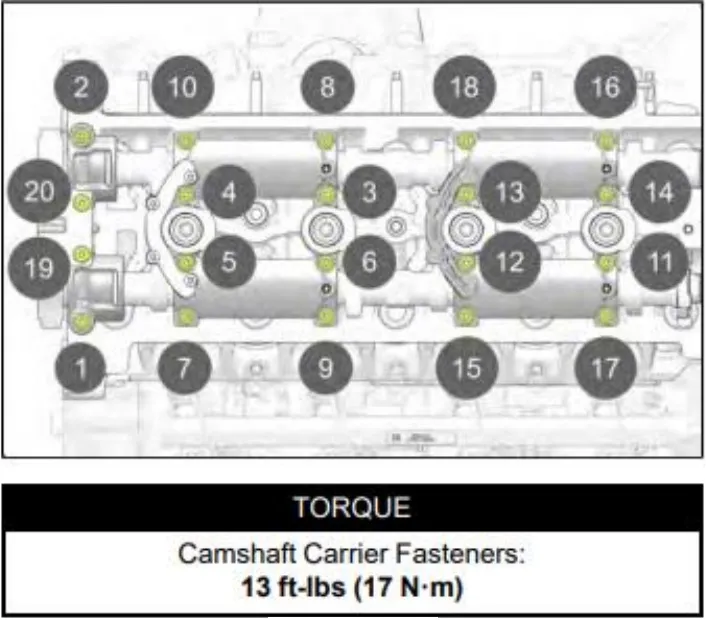
Camshaft Carrier Fasteners: 13 ft-lbs (17 N·m). - Step 3
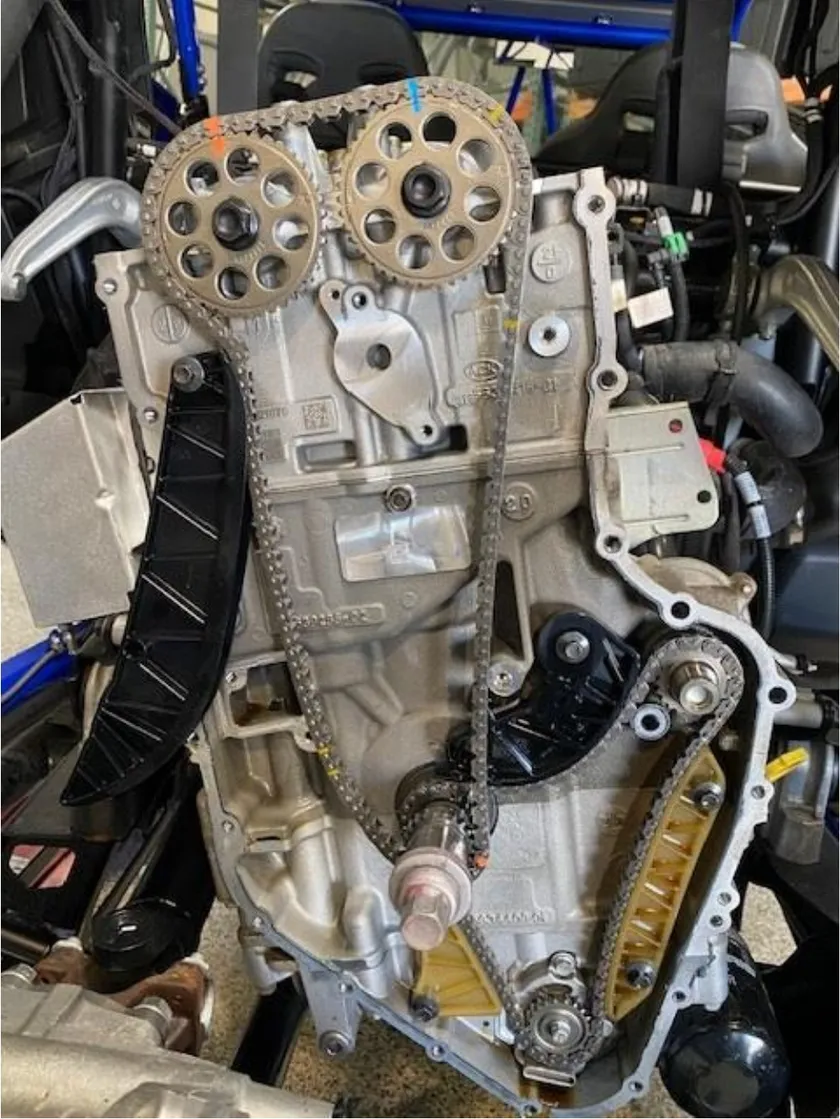
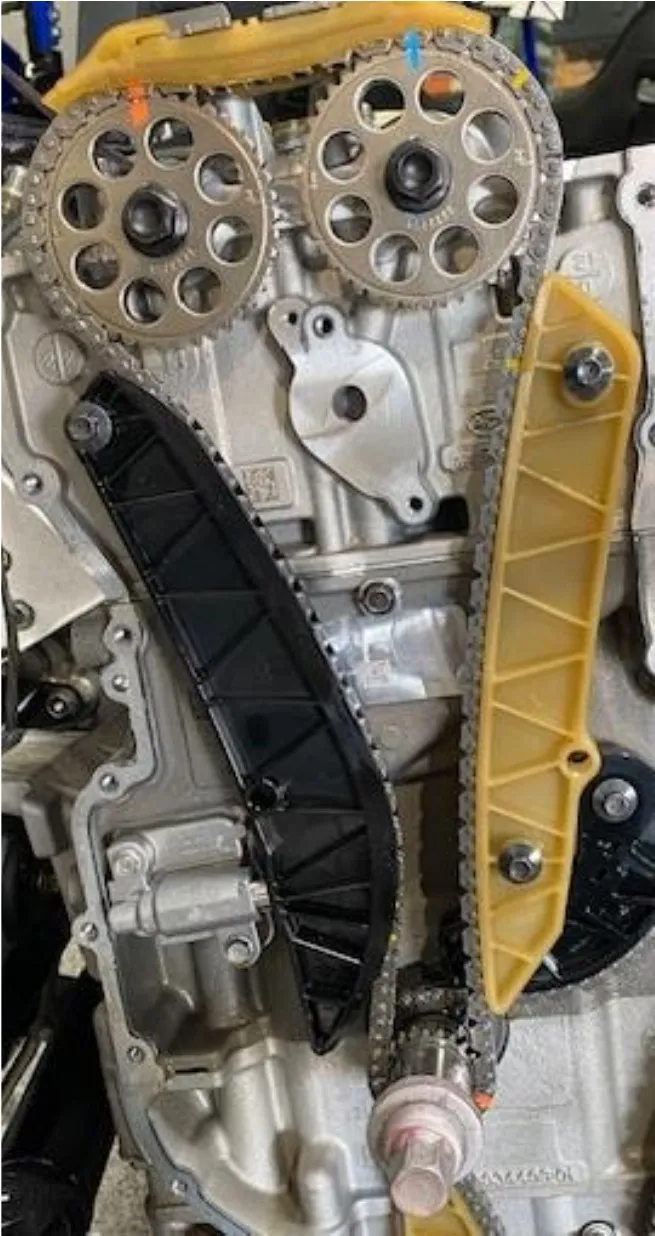
Install the timing chain with indicator marks on both camshaft gears and crankshaft gear. Install the timing chain guides and hand tighten for now. Double check all indication marks are still lined up with top dead center. Torque timing chain guides to 89 in-lbs.
- Step 4
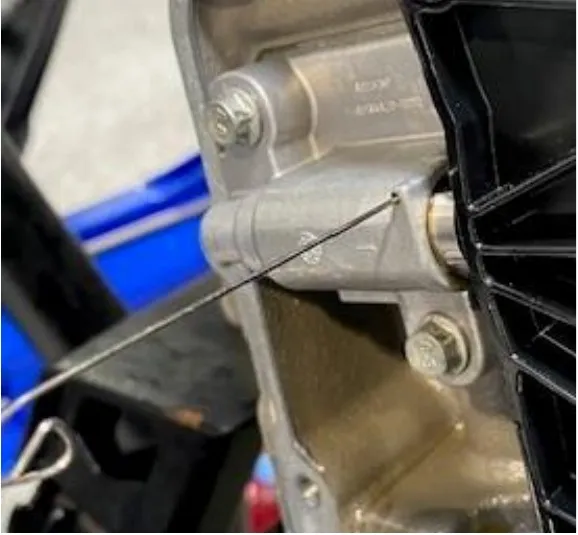
Reset the timing chain tensioner. Remove the piston from the body and dry completely off. Press in and twist clock-wise on the piston until it stays collapsed by itself. Reinstall the piston assembly into the body of the tensioner. Rotate the crankshaft clockwise to remove chain slack. Do not rotate the intake camshaft. Install the tensioner assembly into the crankcase. Torque tensioner fasteners to 80 in-lbs. Press in and release the tensioner piston to allow engagement with the chain guide. If you cannot get the piston to stay, there is a small hole on the body to retain the piston.
- Step 5
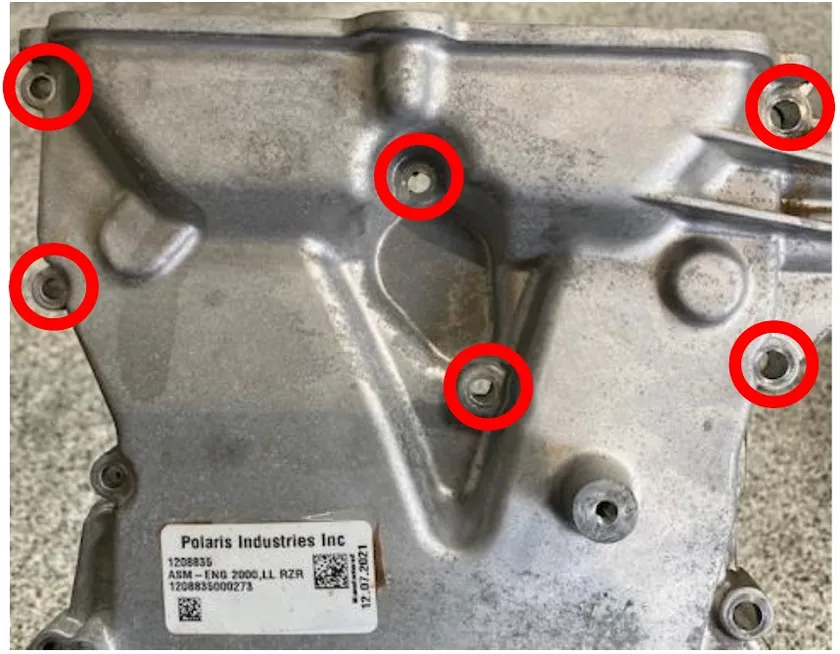
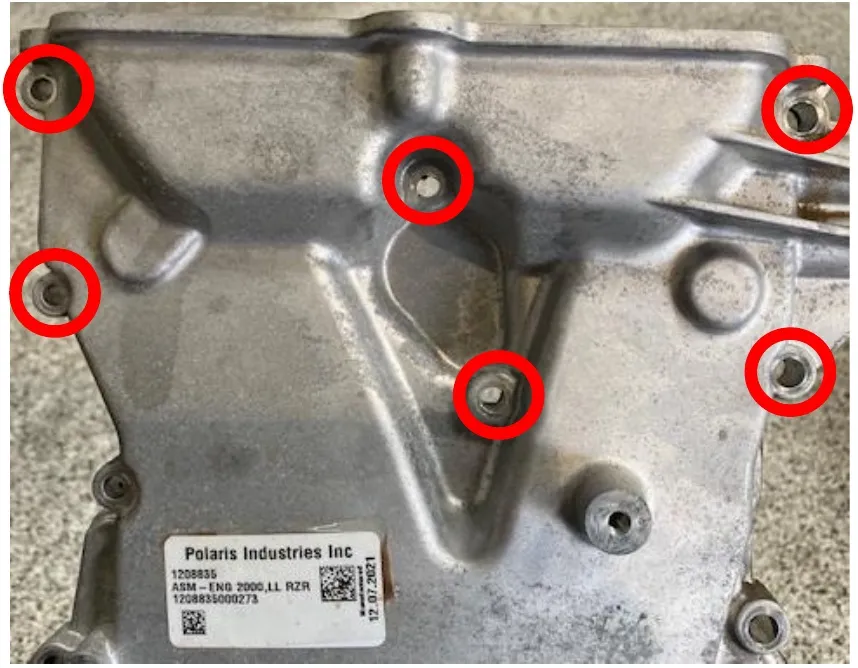
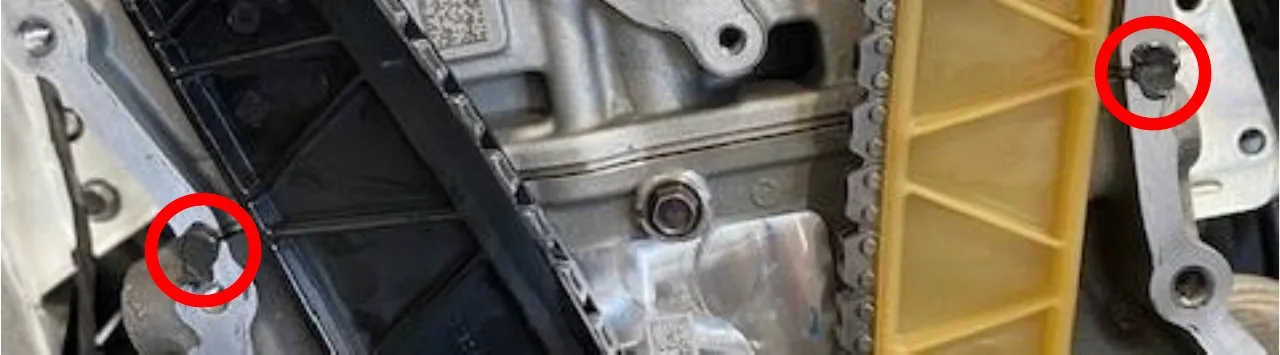
With the supplied 1/4" carbide bit or file, grind away 0.0500” (1.30mm) on the top of the (6) highlighted holes shown below. Take your time, test fit the cover a few times. Once those (6) screws thread in correctly, you are good.
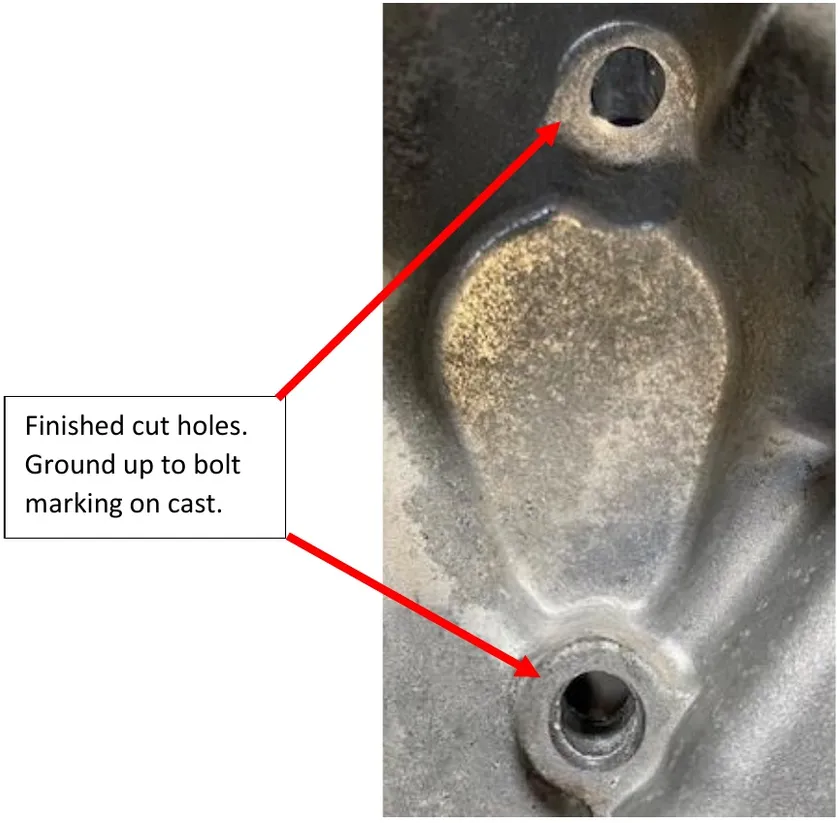
Finished cut holes. Ground up to bolt marking on cast. - Step 6
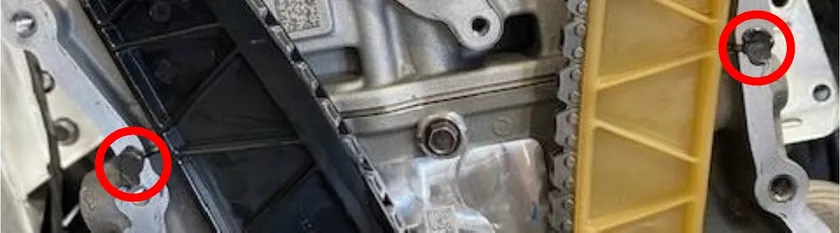
With scotch brite pad and parts cleaner, remove all old gasket off the timing chain cover, engine block and cylinder head. Clean out the timing chain cover and timing chain galley. Use supplied Permatex gasket sealer and apply a bead on the timing chain cover and (2) spots between the engine block and cylinder head.
- Step 7
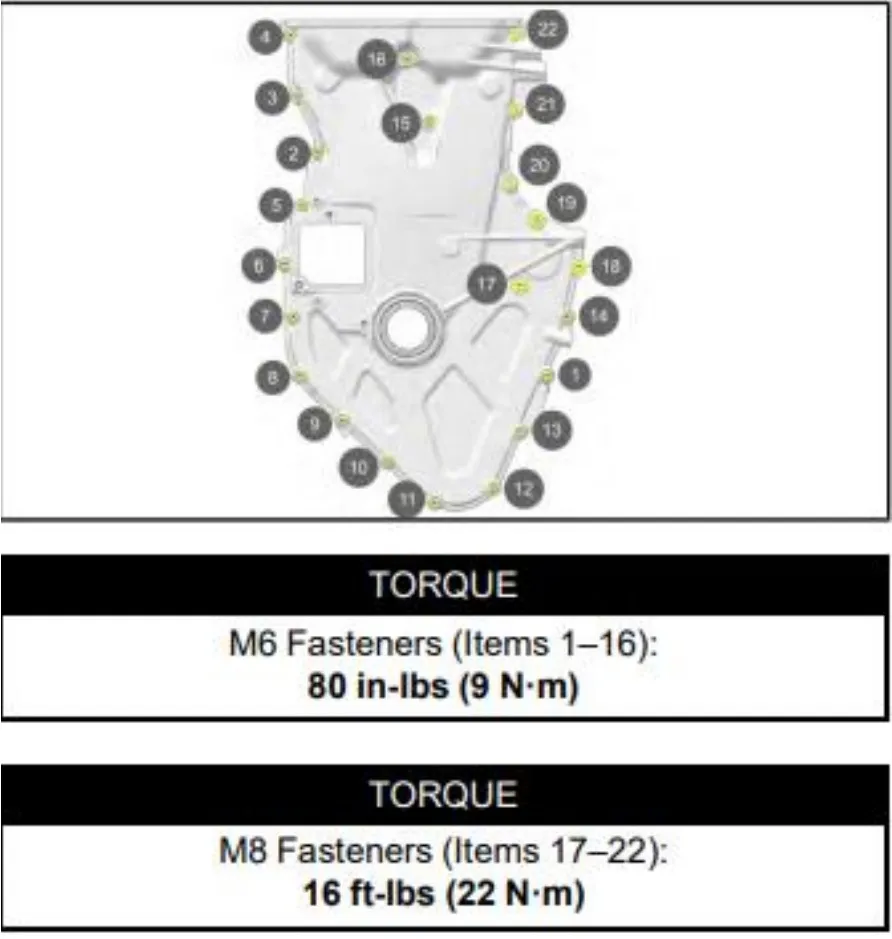
Install the timing chain cover and loosely install fasteners. The longer screws support the water pump. Make sure the pump is seated correctly before torque procedure. Torque sequence below.
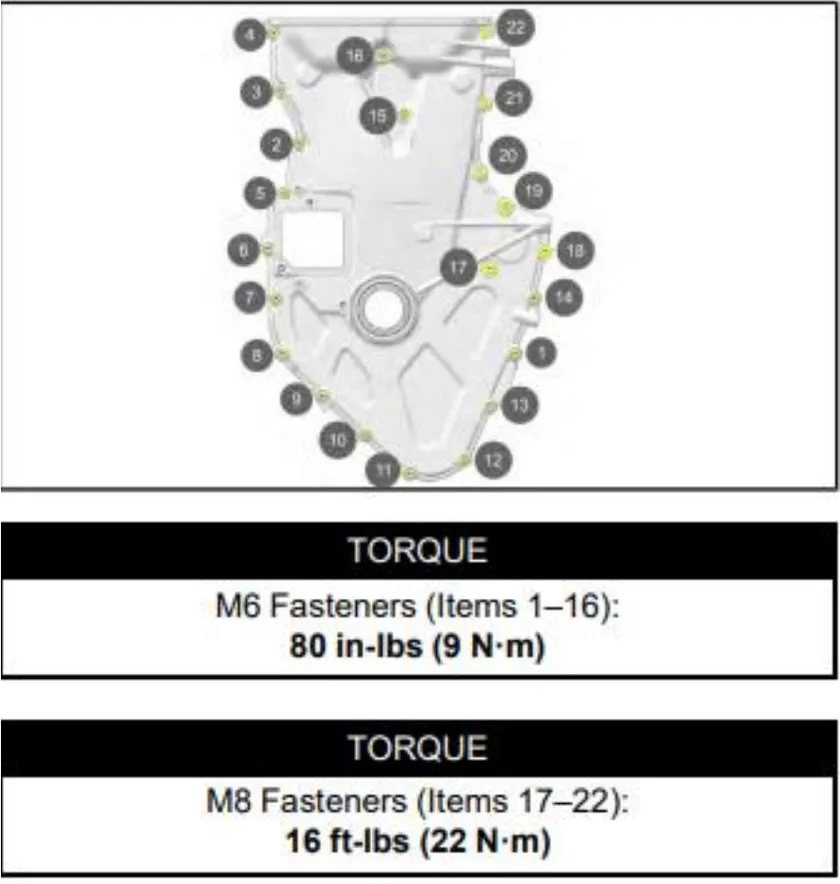
M6 Fasteners (Items 1–16): 80 in-lbs (9 N·m). M8 Fasteners (Items 17–22): 16 ft-lbs (22 N·m). - Step 8
Install supplied EVP chain tensioner cover. Torque the OEM hardware to 80 in-lbs.
- Step 9
Install supplied valve cover spacer. Apply Permatex gasket maker on the top of the timing cover.
- Step 10
Reinstall the valve cover and gasket. Torque in sequence. 89 in-lbs.
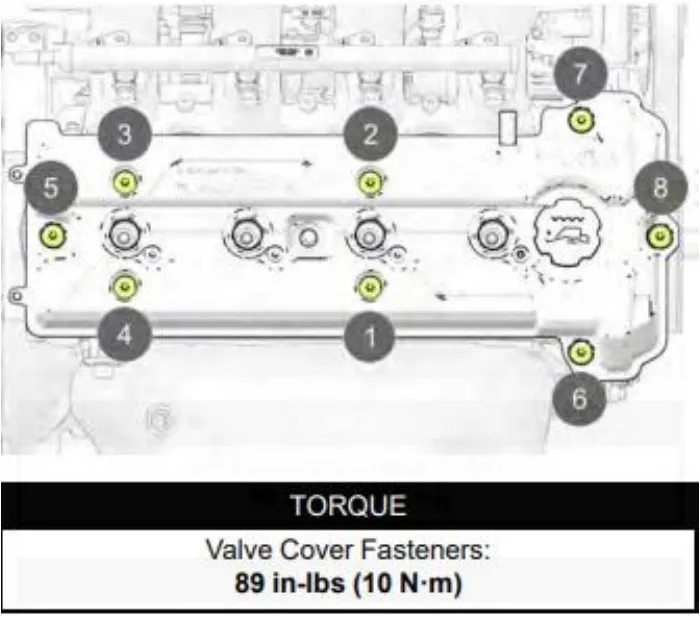
Valve Cover Fasteners: 89 in-lbs (10 N·m). - Step 11
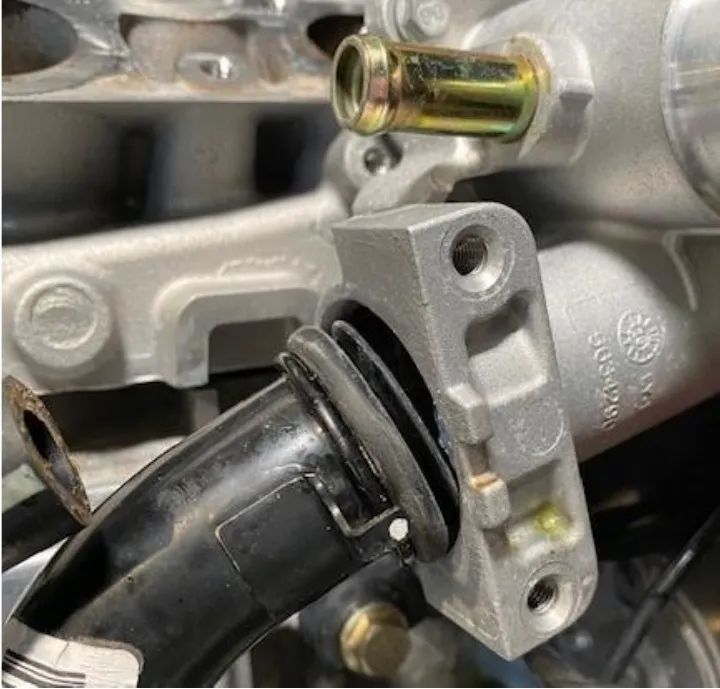
Reinstall the thermostat block onto the engine. Apply dielectric grease to the O-ring on the hardline. Torque bolts.
- Step 12
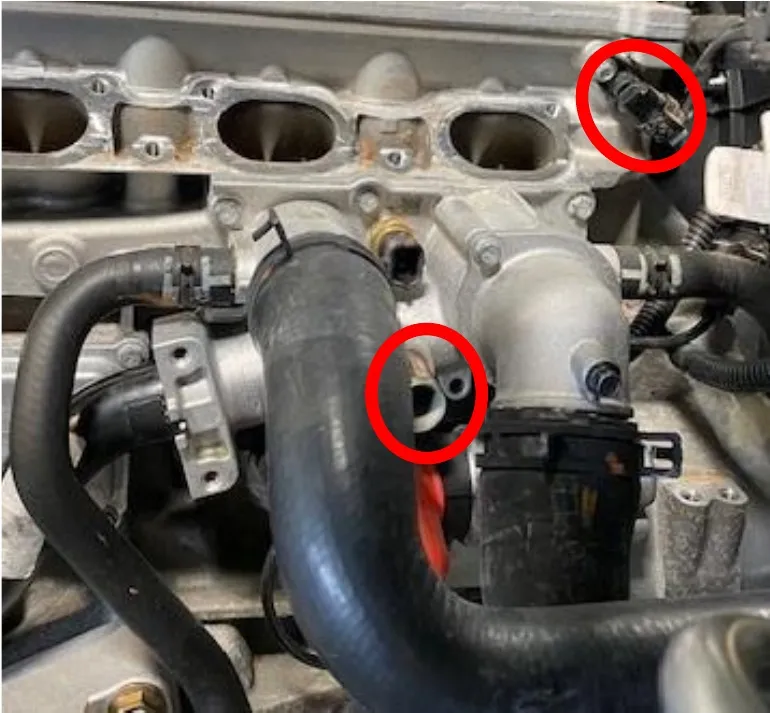
Reinstall 4 out of 5 OEM coolant hoses to the housing. Remove this hose from the car, it will be replaced with EVP supplied hose. Reinstall the camshaft sensor.
- Step 13
Re-gap the OEM (NGK-ZMR7A-10) spark plugs to 0.018”. Install the spark plugs back into the cylinder head. Torque to 9 ft-lbs.
- Step 14
Reinstall ignition coils and torque to 80 in-lbs. Reconnect all (4) ignition coils to the harness.
- Step 15
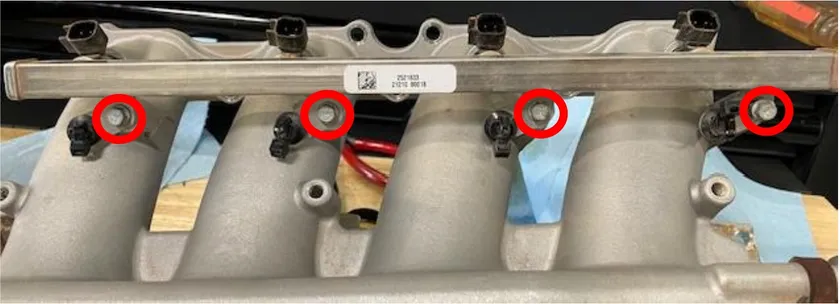
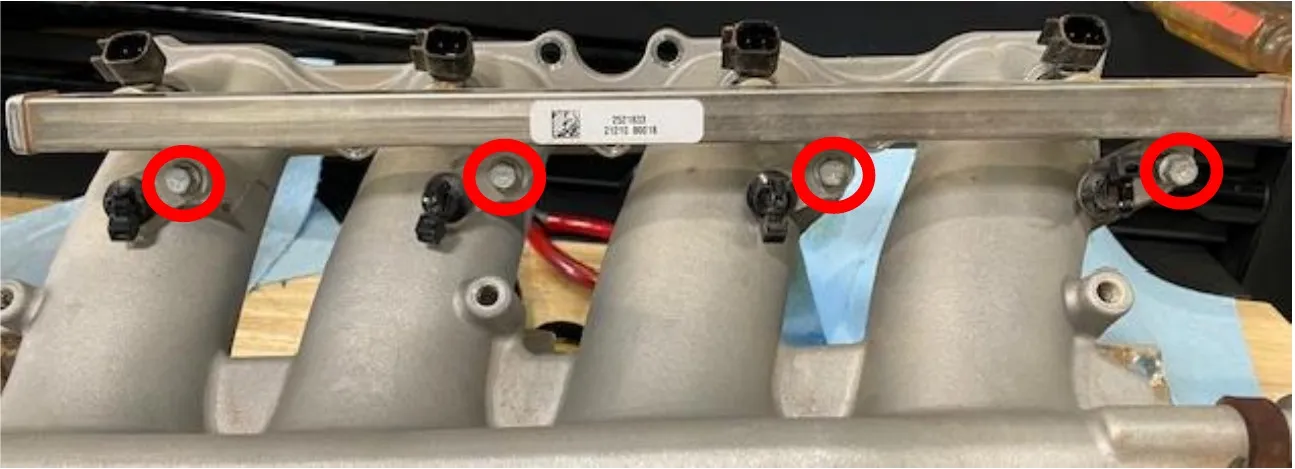
Loosen (4) 8mm screws holding the fuel rail to the intake plenum.
- Step 16
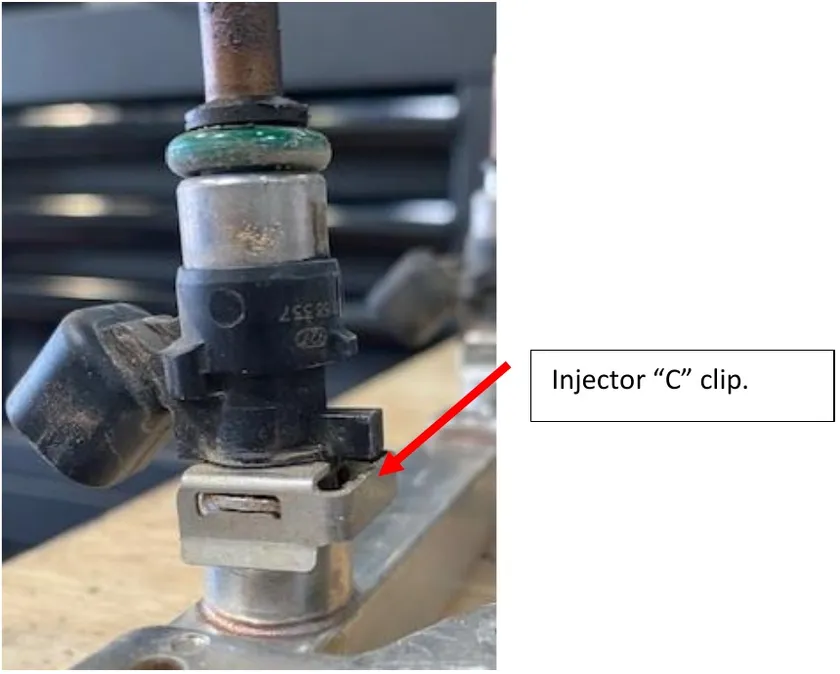
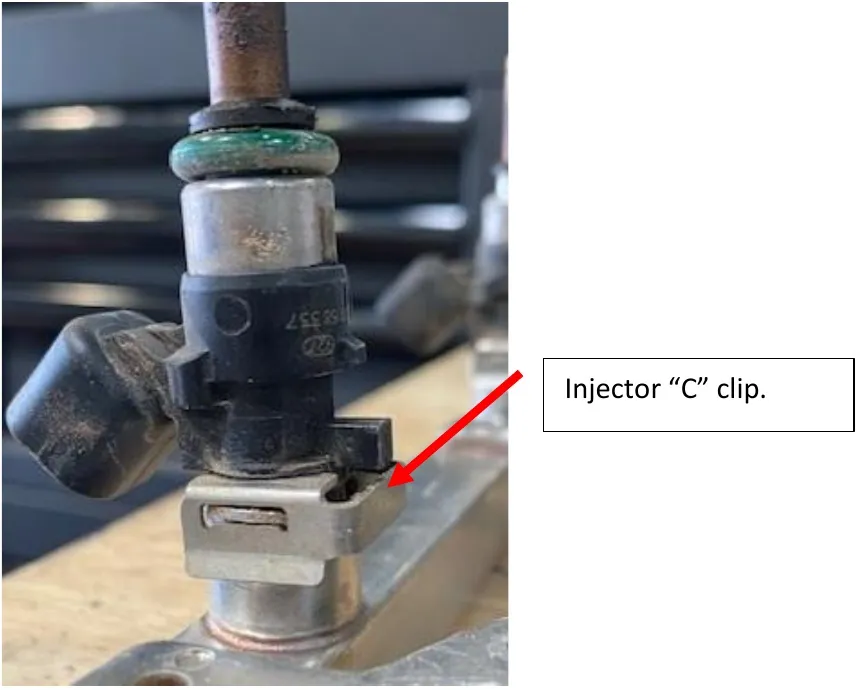
Remove the injector clips, remove the injectors. Blow out the fuel rail with all injectors removed.
- Step 17
Install the supplied (4) injectors. Apply dielectric grease to the O-ring on the injector. Reinstall the injector clip. Make sure the injector is properly seated. Torque fuel rail to 7 ft-lbs.
- Step 18
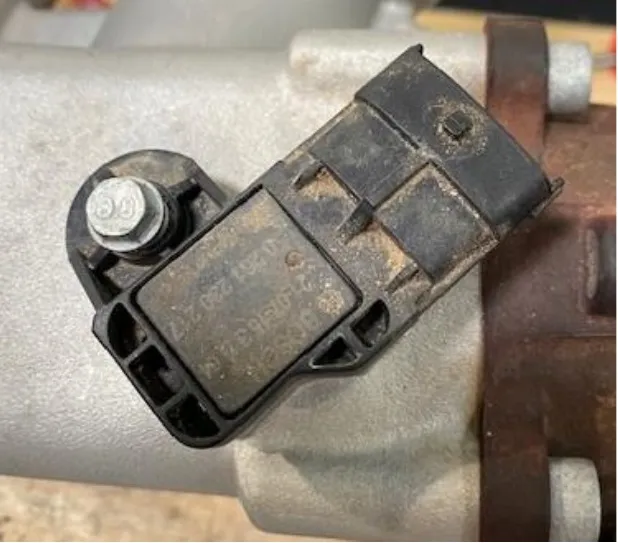
Remove the OEM MAP sensor using a 8mm socket. Install the supplied MAP sensor, apply dielectric grease on the O-ring before installing.
- Step 19
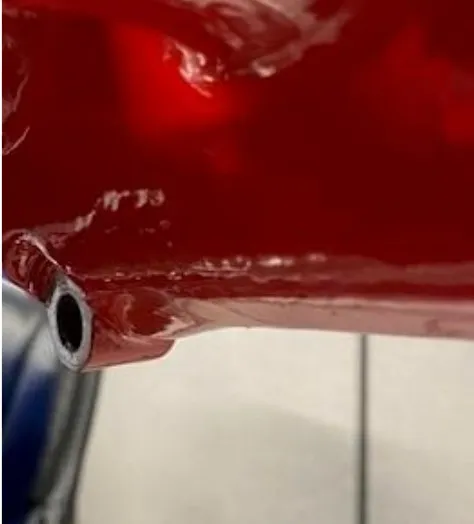
Remove the brass barb fitting on the bottom side of the intake plenum. Install the supplied M12 x 1/4" barb fitting.
- Step 20
Reinstall the intake plenum and gasket. Torque sequence below.
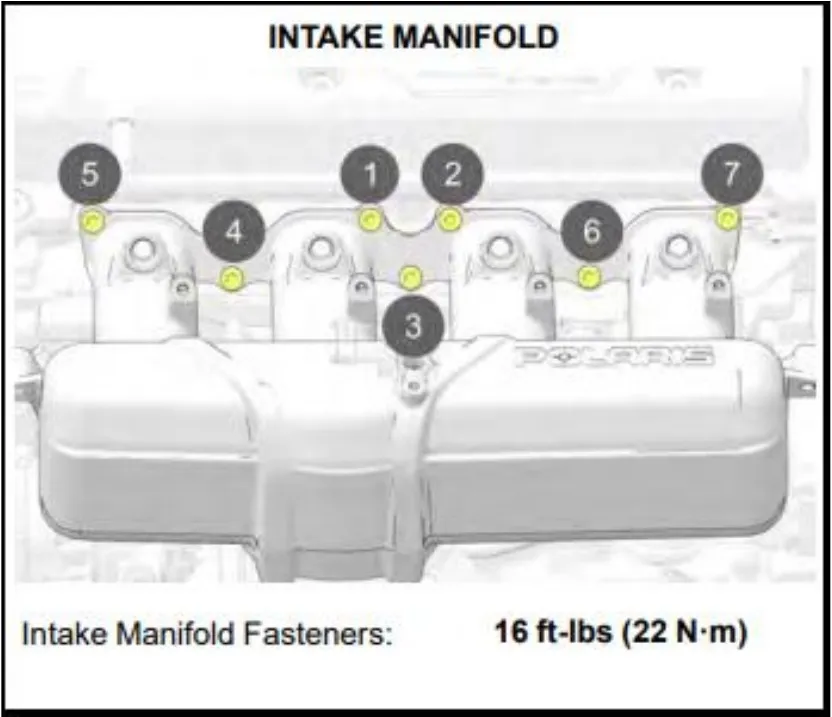
Intake Manifold Fasteners: 16 ft-lbs (22 N·m). - Step 21
Reinstall the fuel line to the fuel rail (blue clip) and EVAP connector to the throttle body (green clip).
- Step 22
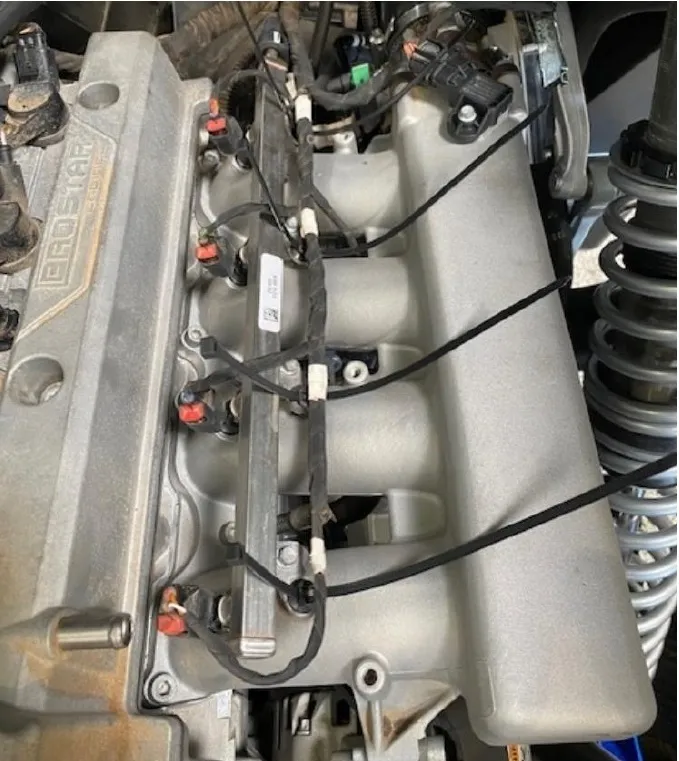
Install new zip-ties onto the plenum to hold the factory harness.
- Step 23
Reinstall the alternator and torque to 15 ft-lbs. Reconnect the positive lead and 1 pin connector on the back of the alternator.
- Step 24
Reinstall the harmonic pulley onto the crankshaft.
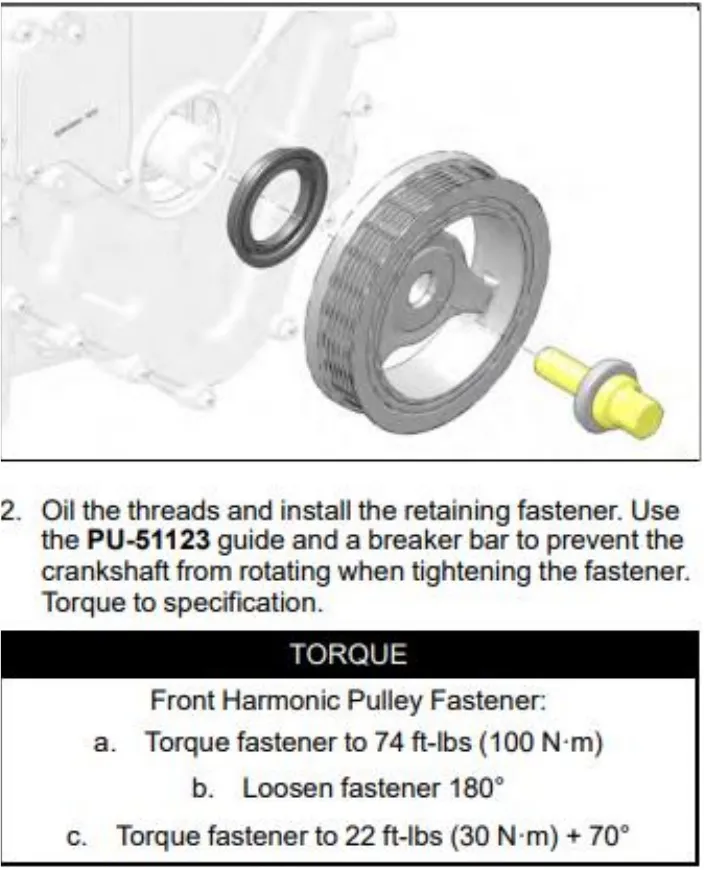
2. Oil the threads and install the retaining fastener. Use the PU-51123 guide and a breaker bar to prevent the crankshaft from rotating when tightening the fastener. Torque to specification. Front Harmonic Pulley Fastener: a. Torque fastener to 74 ft-lbs (100 N·m). b. Loosen fastener 180°. c. Torque fastener to 22 ft-lbs (30 N·m) + 70°. - Step 25
Reinstall the alternator stretch belt.
- Step 26
Reinstall the alternator shroud.
- Step 27
Reinstall the alternator stretch belt cover.

Procedure
Pro R Intercooler
- Step 1
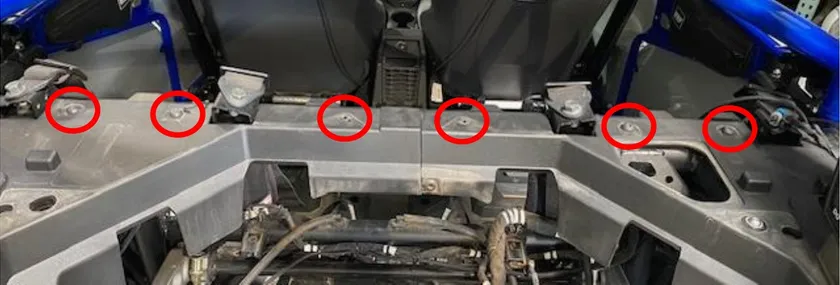
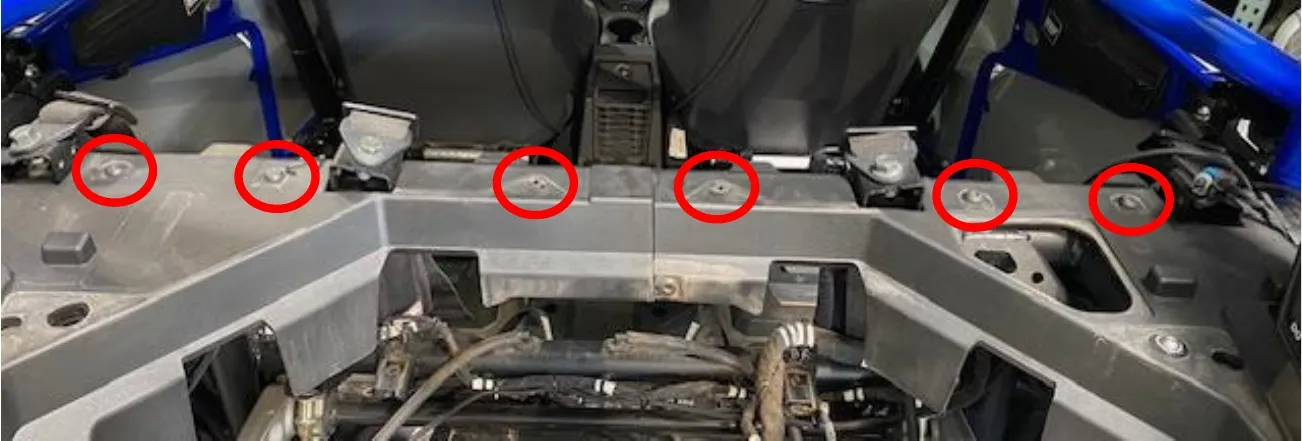
Remove (6) T-40 screws on the back cargo area. See photo below.
- Step 2
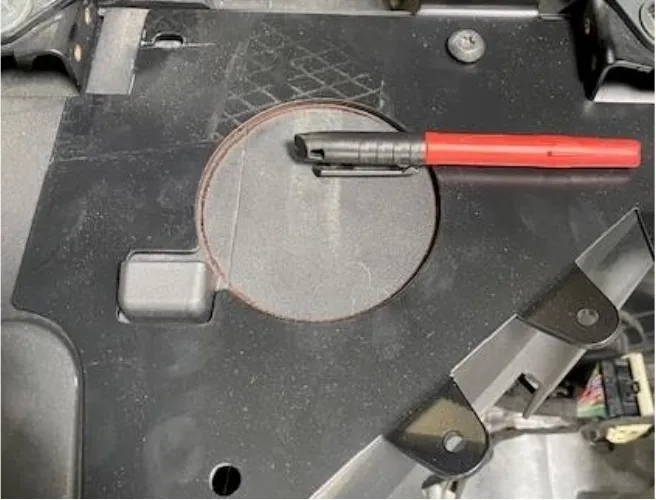
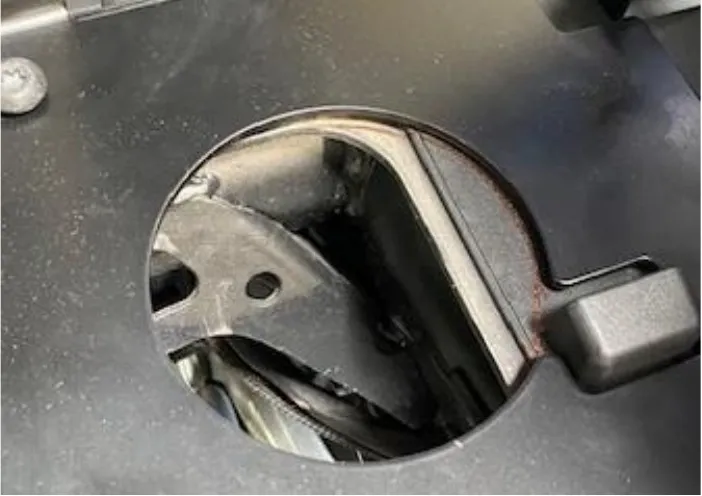
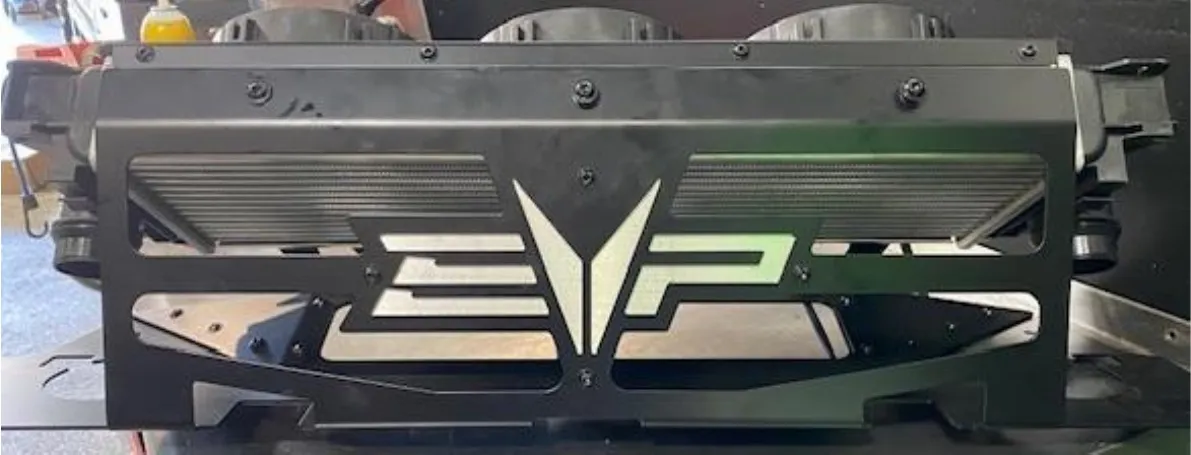
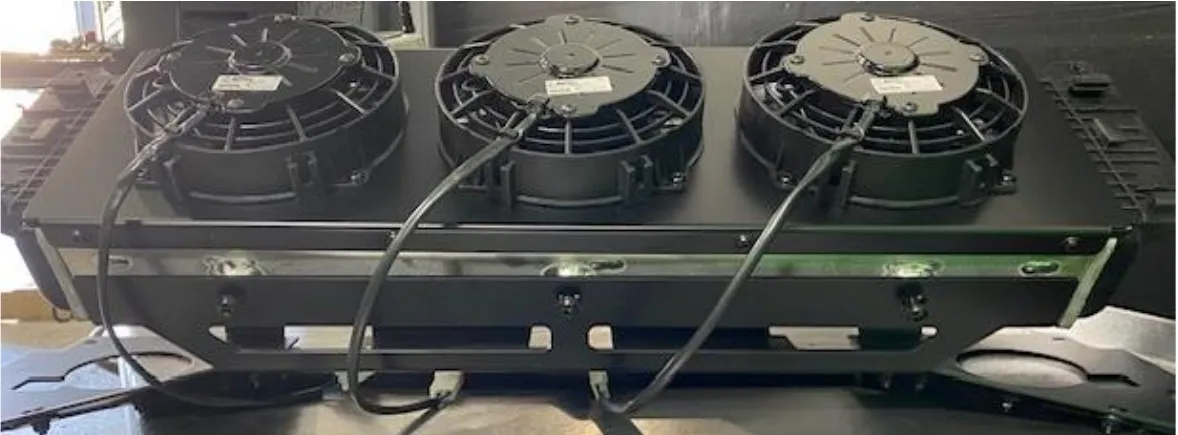
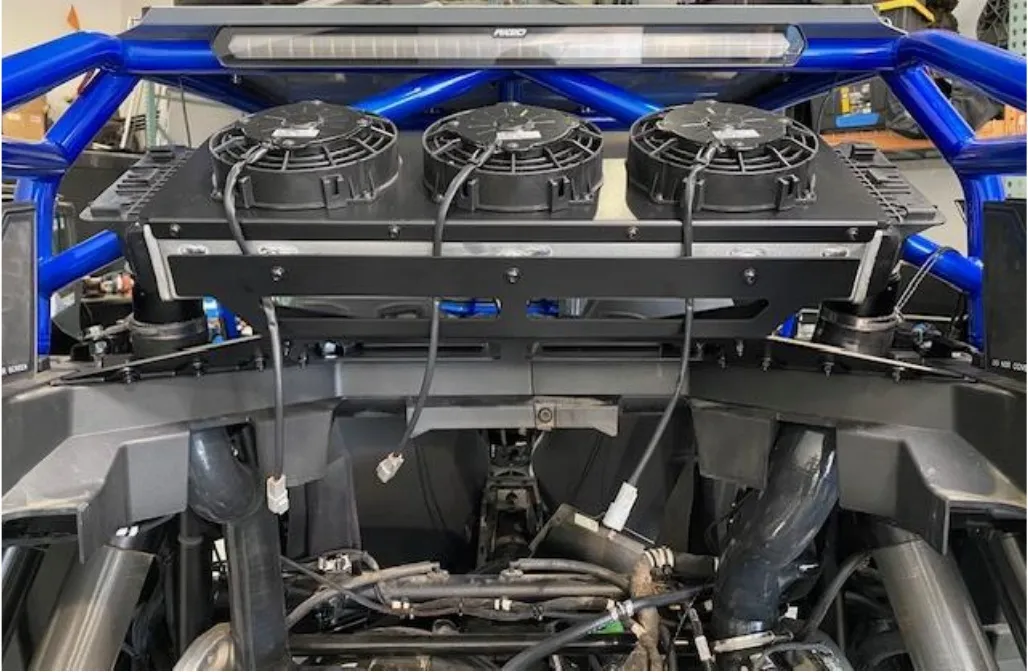
Install the intercooler cage onto the vehicle. Hand tighten a few T40 screws to hold it secure. With a silver sharpie, outline both circles onto the plastic. Remove the cage. With a 3.50” whole saw or Dremel with a carbide bit, cut out both holes. Use fine grit sandpaper and a heat gun to clean up the burs.
- Step 3
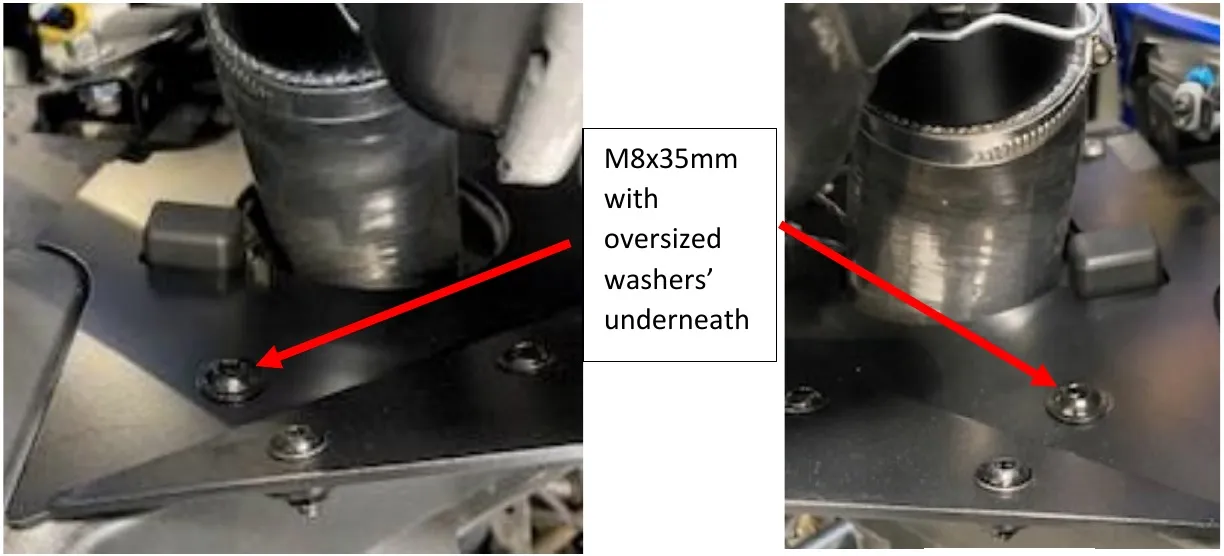
Install the intercooler and cage onto the vehicle. Use OEM hardware to secure the intercooler cage to the vehicle. Use (2) M8x35mm button head, (2) oversized washers and nyloc nuts to secure the rear of the intercooler cage.
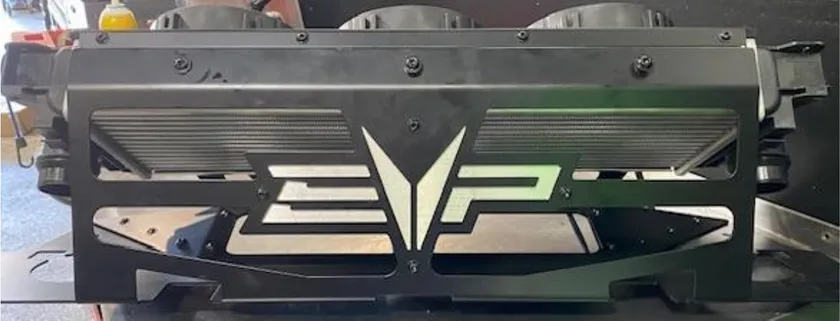
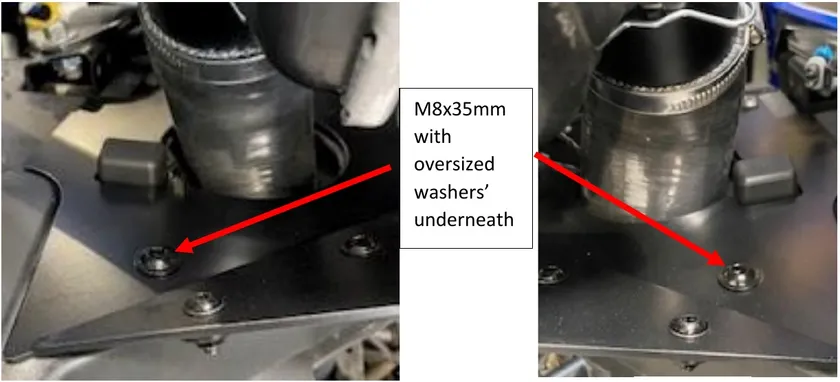
M8x35mm with oversized washers’ underneath.
Procedure
Pro R Header
- Step 1
Make sure all debris is off exhaust ports on the cylinder head, install supplied header gasket, header pipe, (9) M8x30mm screws with (9) conical washers. Torque to the sequence below.
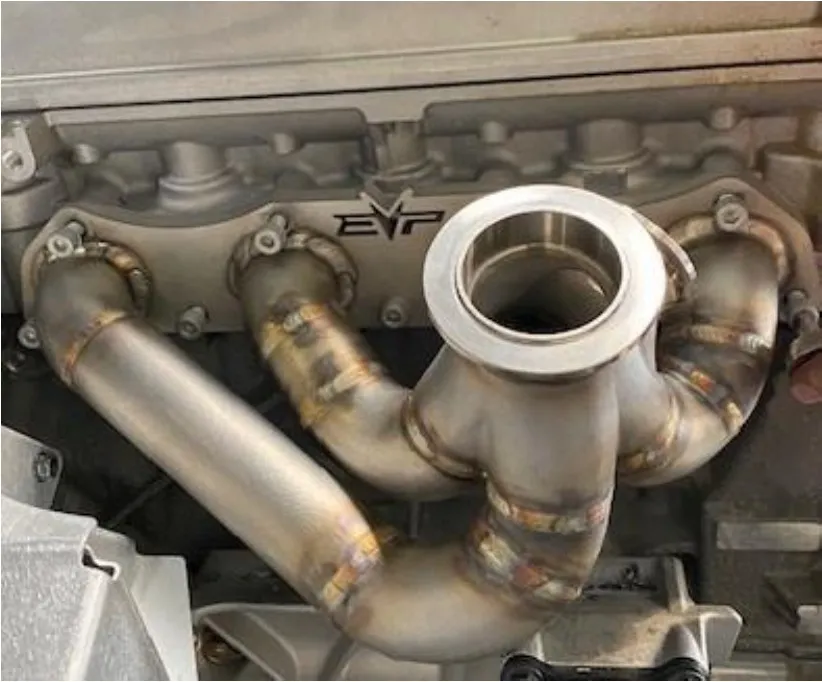
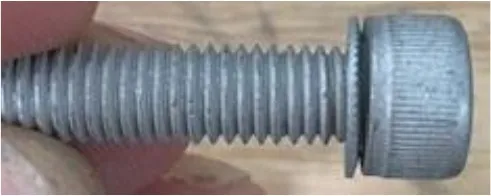
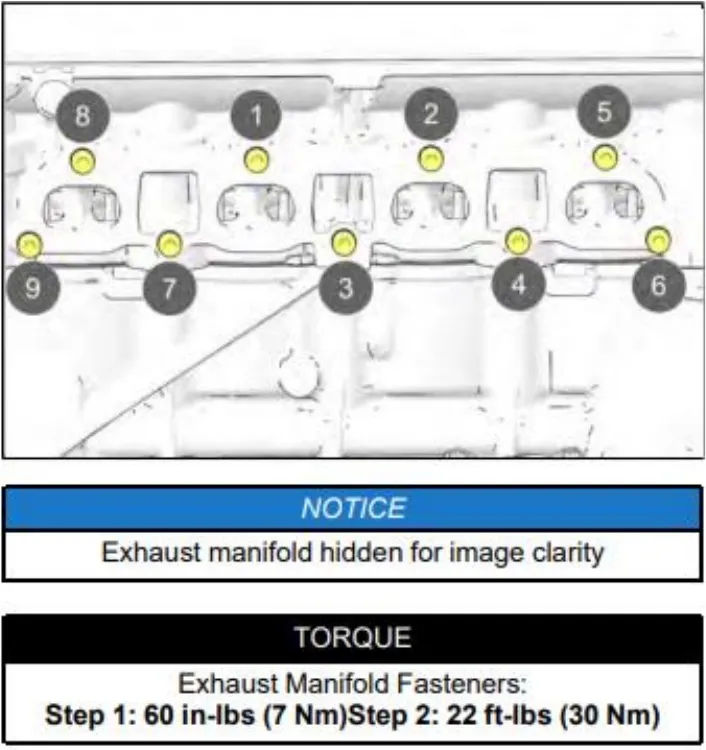
Exhaust Manifold Fasteners: Step 1: 60 in-lbs (7 Nm). Step 2: 22 ft-lbs (30 Nm). - Step 2
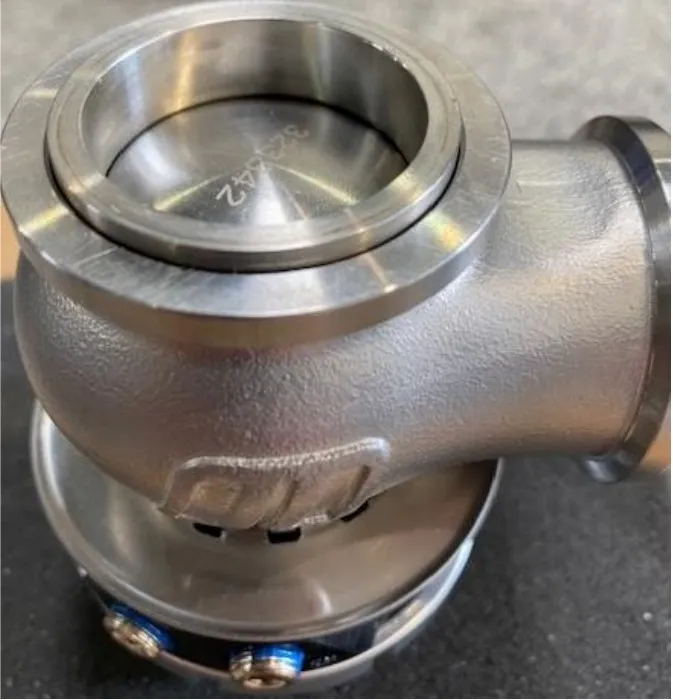
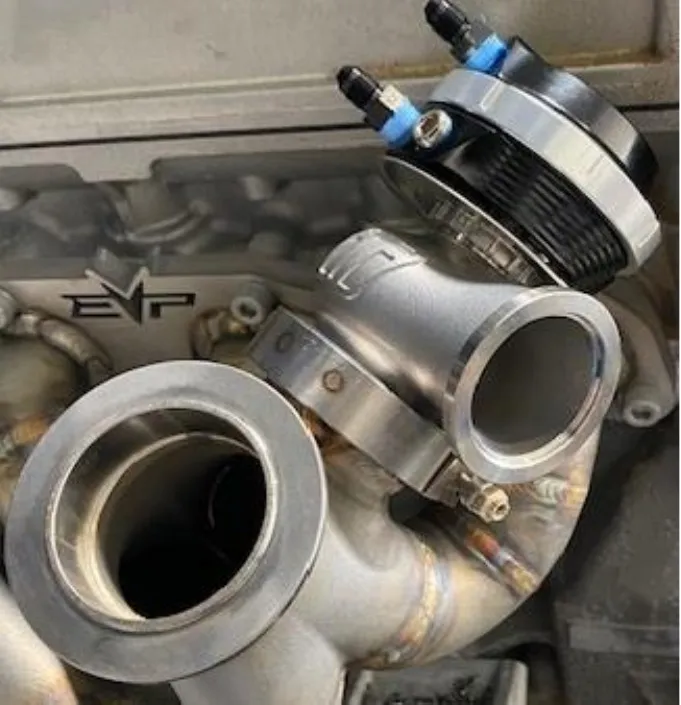
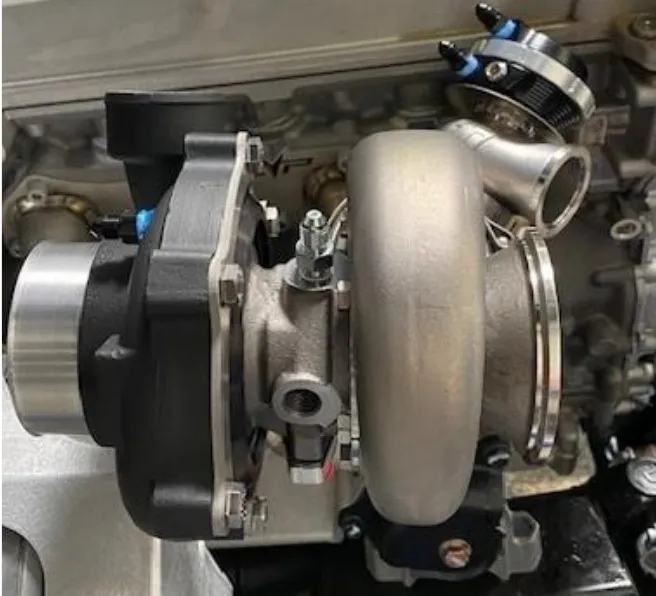
Install the 41mm OD stainless steel sleeve into the intake cylinder on the wastegate. Install onto the header with a 204221 clamp. Apply anti seize on threads of the clamp. Keep clamp loose for now.
- Step 3
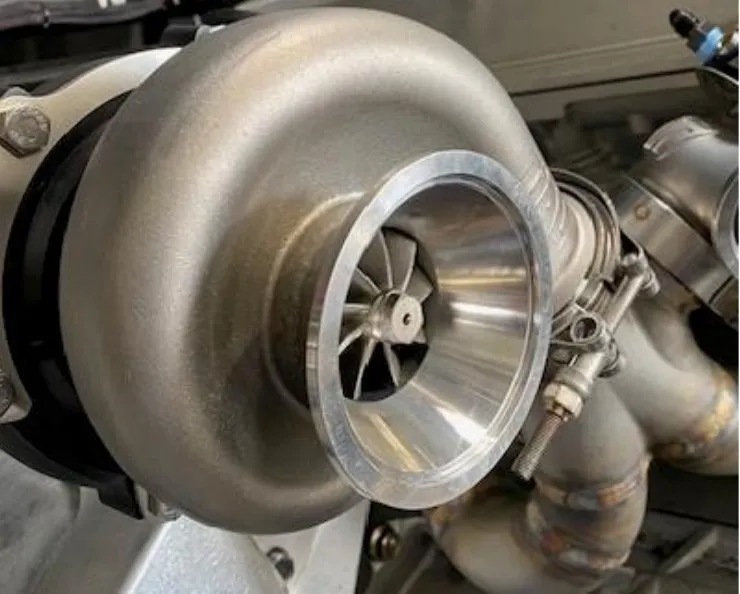
Install turbocharger to the header using a 215221 clamp. Apply anti seize on threads of the clamp. Keep clamp loose for now.
- Step 4
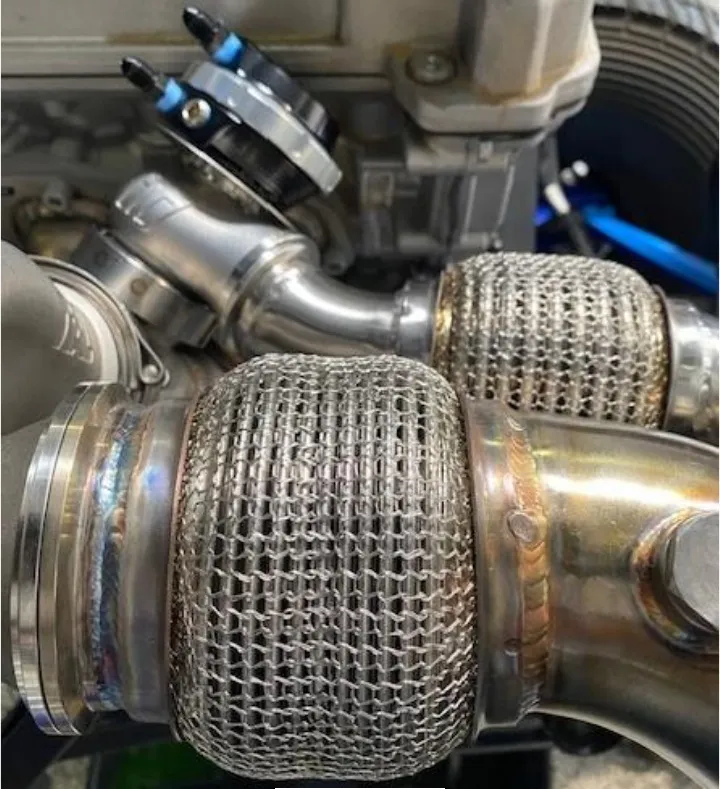
Install the mid-pipe to the turbocharger and wastegate dump. Apply anti seize on the threads. Leave clamps loose for now. Wastegate dump to mid-pipe will use clamp 105212. The turbocharger to mid-pipe will use clamp XXXXX.
- Step 5
Leave the mid-pipe hanging for now, you will connect the muffler later when the bed frame gets reinstalled.
Procedure
Pro R Coolant Tank/ECU Removal
- Step 1
Located behind the passenger seat (if a 4 seater the rear passenger seat), remove the (4) push darts holding the sound dampener in.
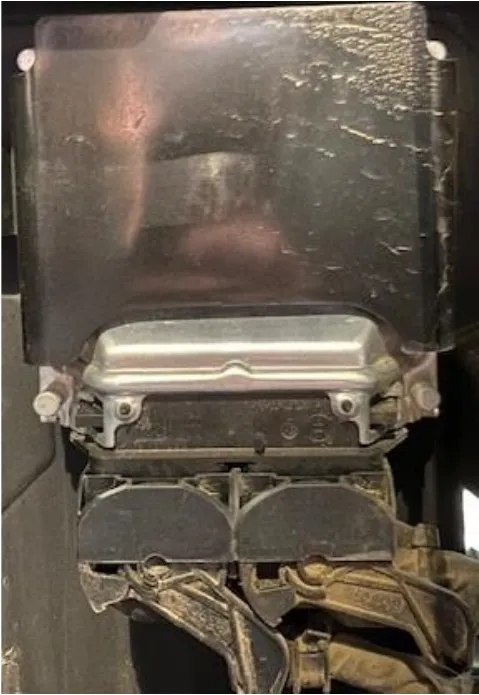
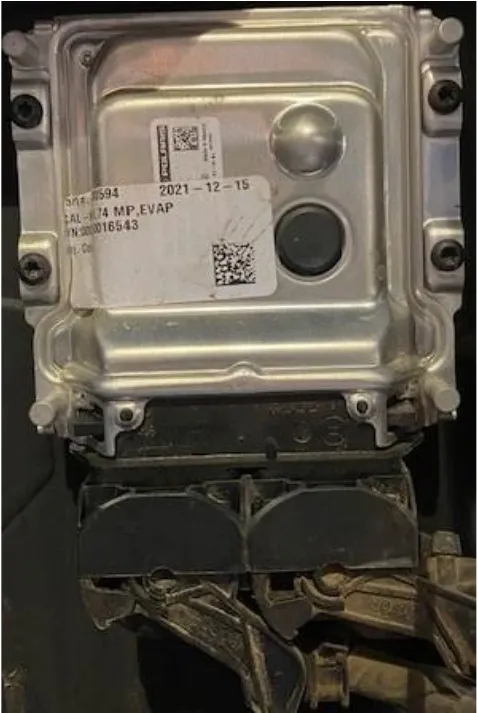
- Step 2
Located behind is the ECU. Remove the black clip. Remove the (4) T15 screws holding the ECU in place. Unclip the ECU connectors, left before the right.
- Step 3
Remove the bed to CVT ducting, (2) worm drive clamps.
- Step 4
Freely hold up the coolant reservoir bracket, keeping the EVP logo in line with the push dart hole and using the OEM existing hole for the bottom right Nutzert. (Figure 71-72).
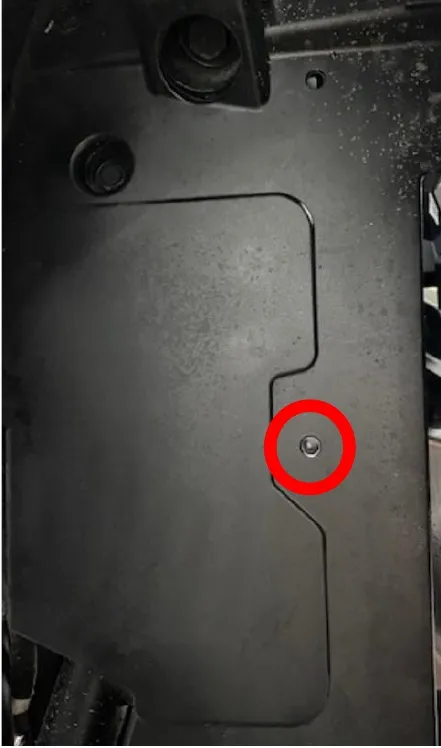
Fig. 71 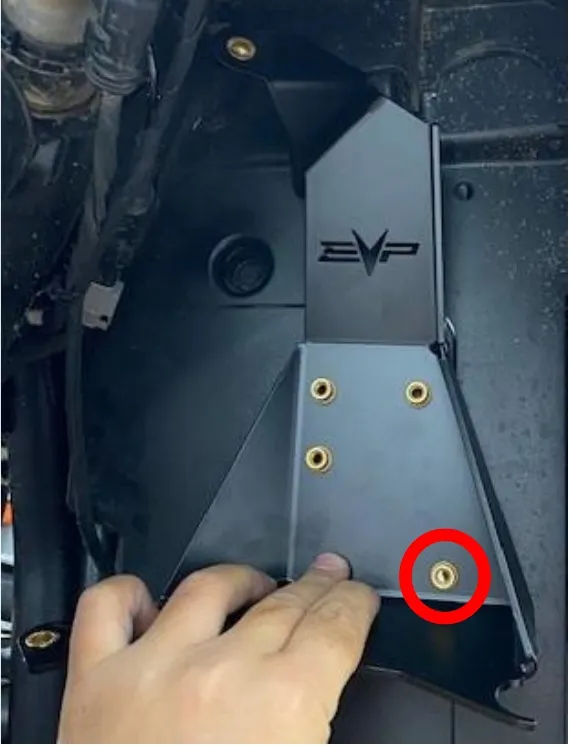
Fig. 72 - Step 5
Angle the bracket so you cannot see the 90-degree bend on the plastic. Figure 73 wrong, Figure 74 correct.
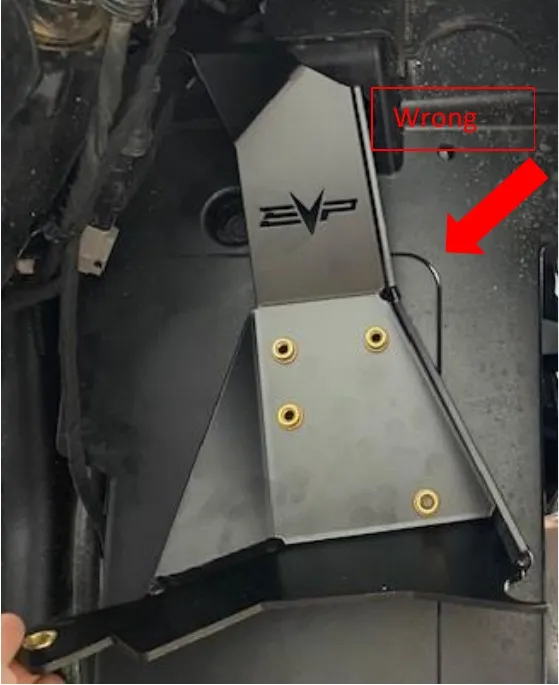
Fig. 73 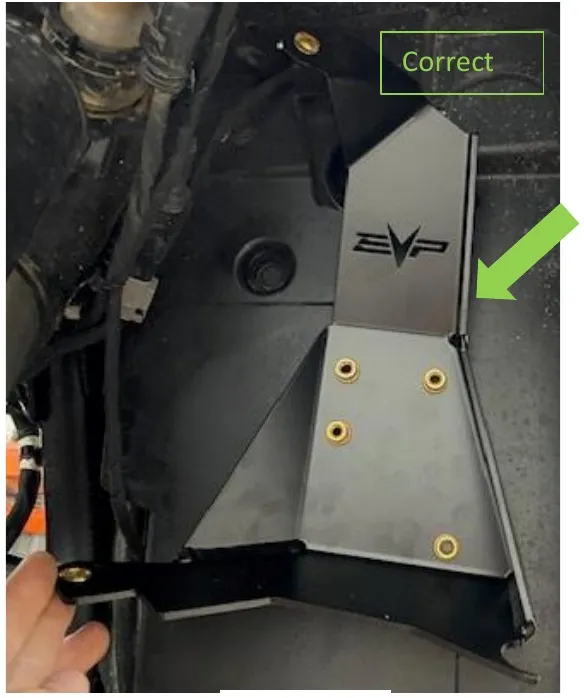
Fig. 74 - Step 6
Mark the (3) holes out with a sharpie. Cut the holes out with a 1/4" drill bit. Install the mounting hardware on the bracket side.
- Step 7
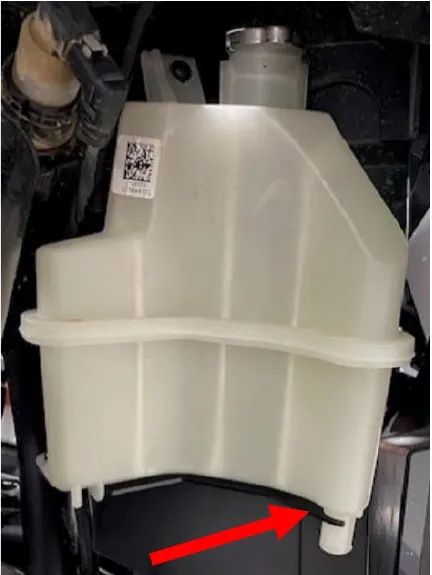
Mount the coolant tank. Make sure to mount the coolant tank inside the lower cutout.
Procedure
Pro R Coolant Tank/ECU Removal
- Step 6
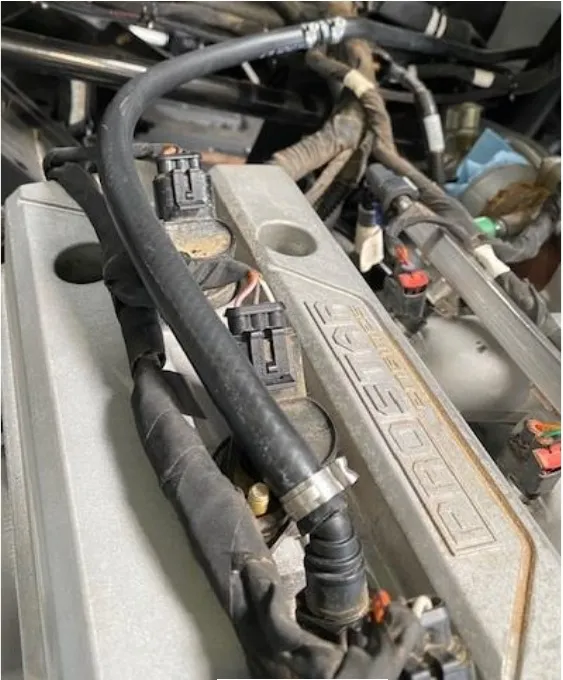
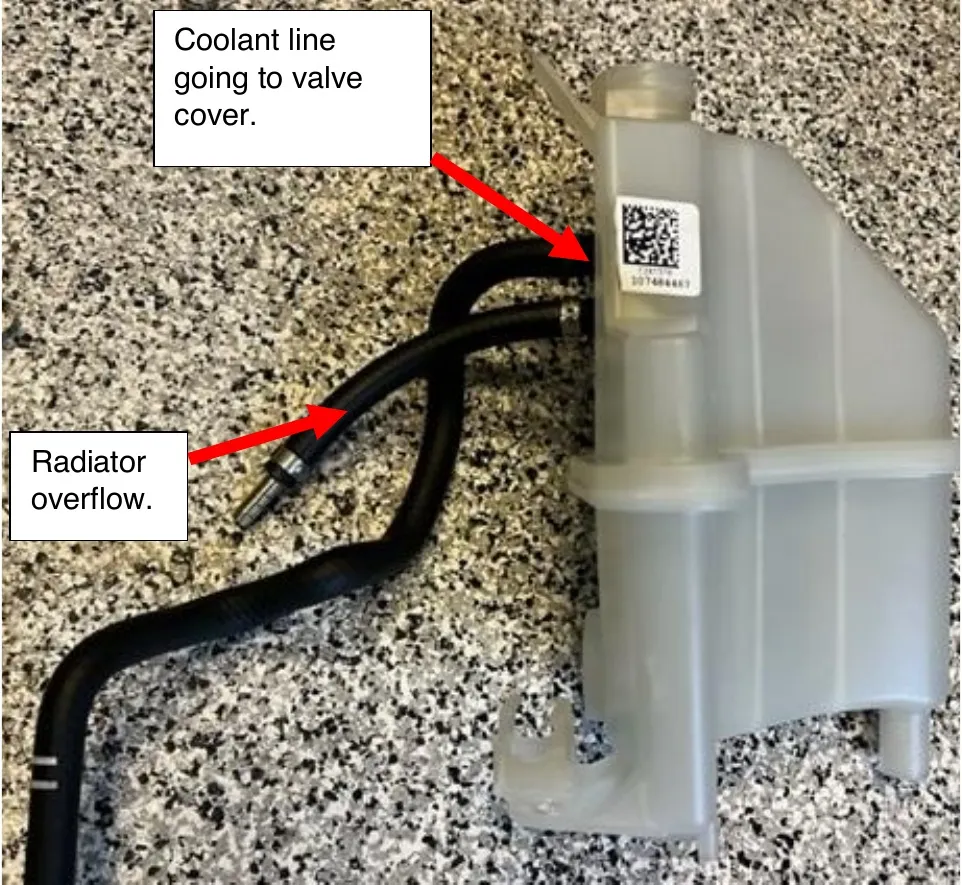
Cut the pinch clamp holding the valve cover water fitting on, remove the OEM hose from the valve cover fitting. Install the supplied 18” of 5/16” hose to the valve cover fitting. Use 15.7mm pinch clamp to secure.
- Step 7
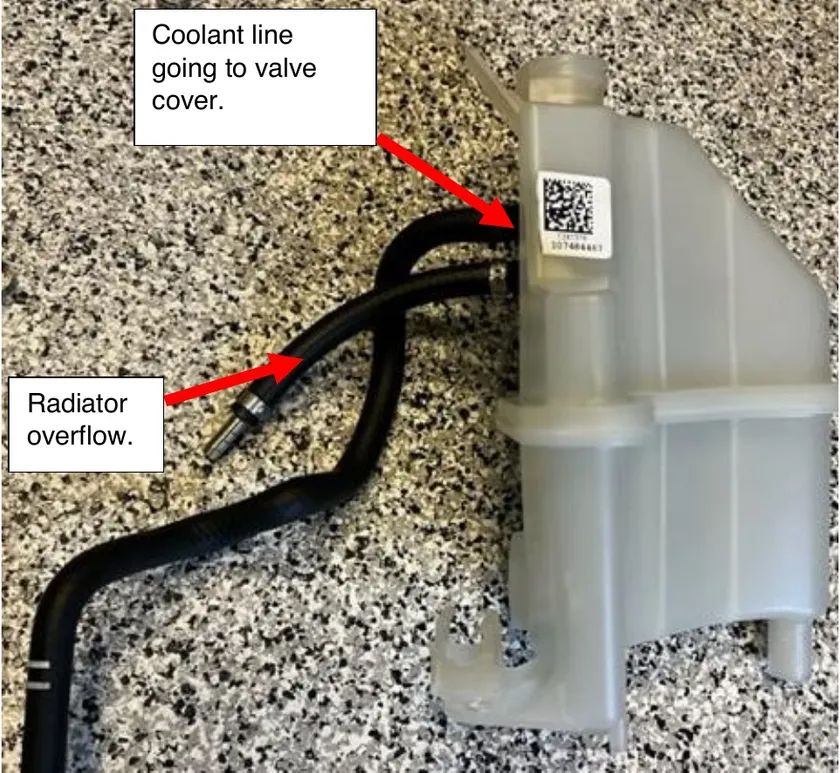
Install the OEM valve cover hose to the TOP barb on the coolant tank. Install the 8” piece of 5/16” hose on the BOTTOM barb for the radiator overflow. Install a 5/16 adapter to the end of the 8” piece of hose. Use 15.7mm pinch clamps.
- Step 8
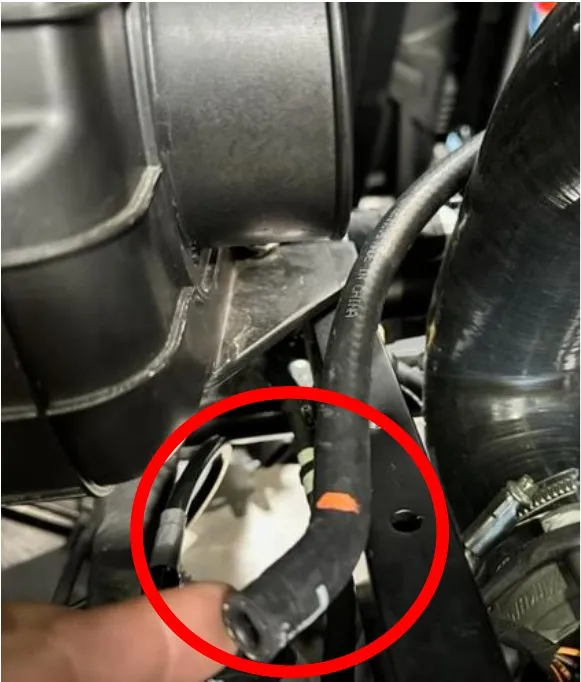
On the valve cover water hose, the part that was connected to the fitting, cut 1.0” or the 45-degree bend off.
- Step 9
Insert a 5/16” adaptor into the valve cover hose and connect it to the 18” of hose coming from the valve cover. Use 15.7mm pinch clamps.
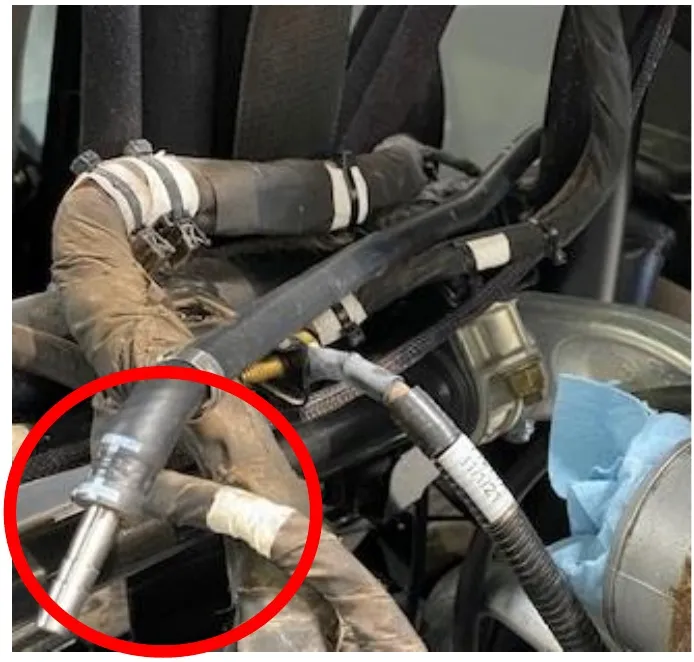
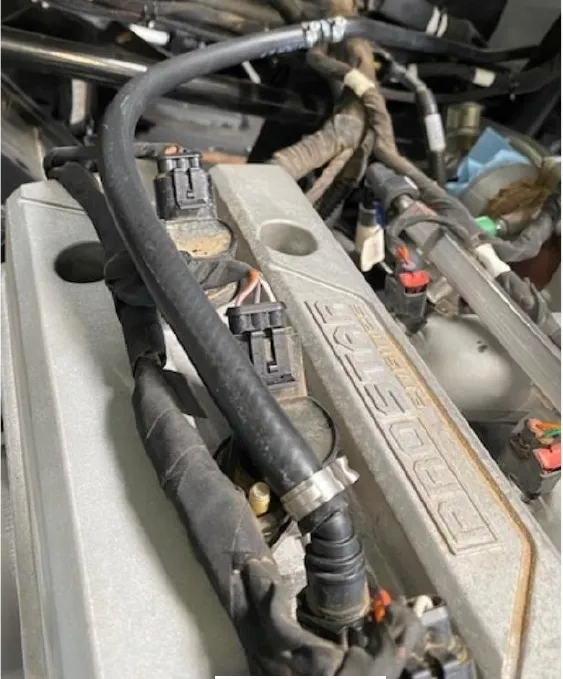
- Step 10
Install the supplied hose from the large barb on the coolant tank to the thermostat block. Reuse (2) self-tightening OEM clamps.
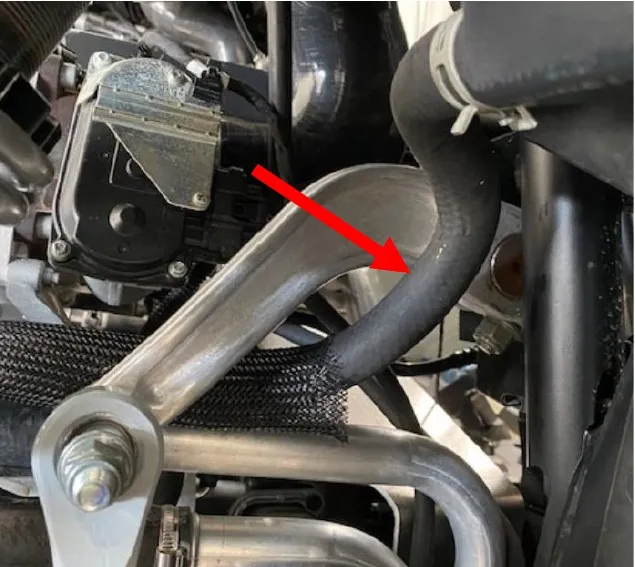
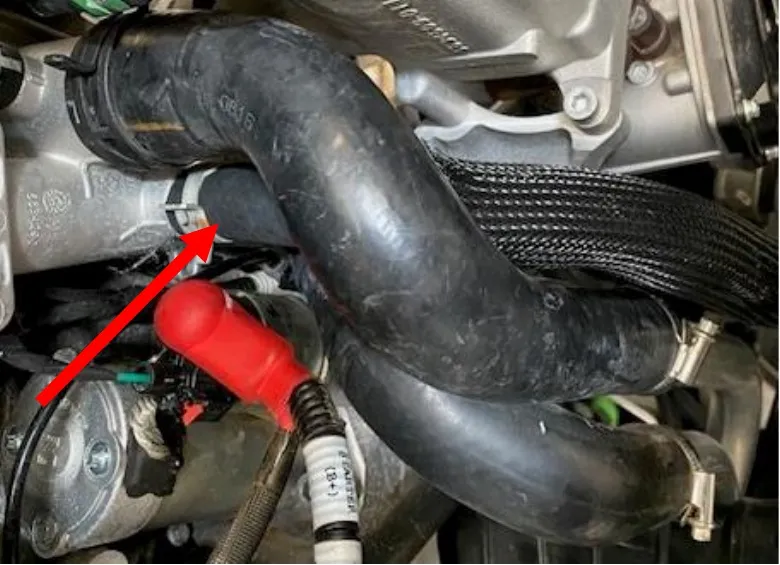
Procedure
Turbocharger Oil Lines
- Step 1
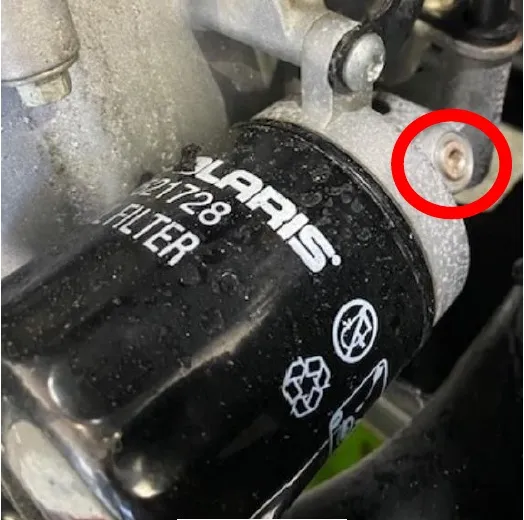
Locate the oil filter, remove the 5mm plug out of the oil filter housing.
- Step 2
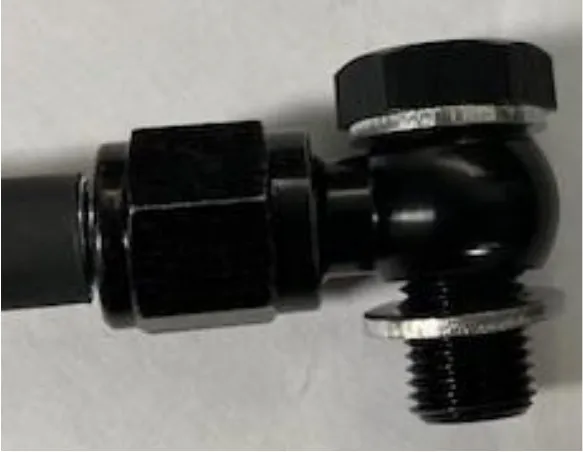
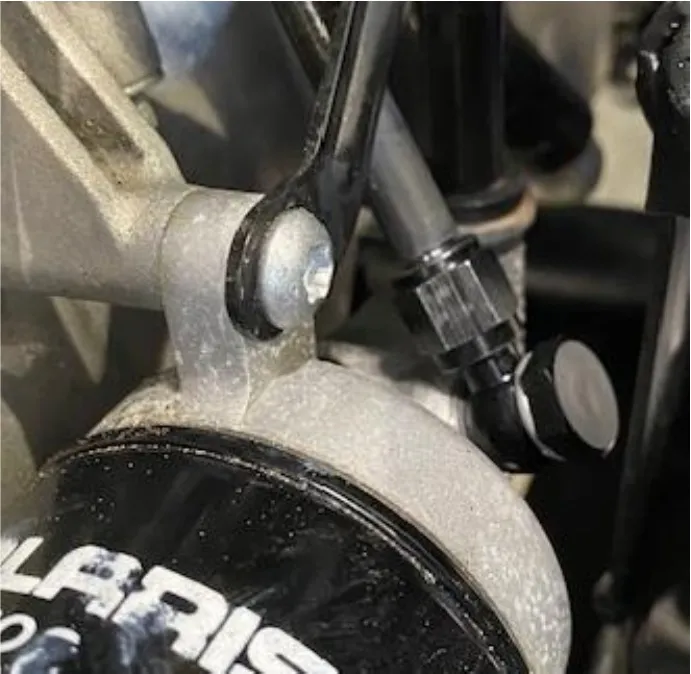
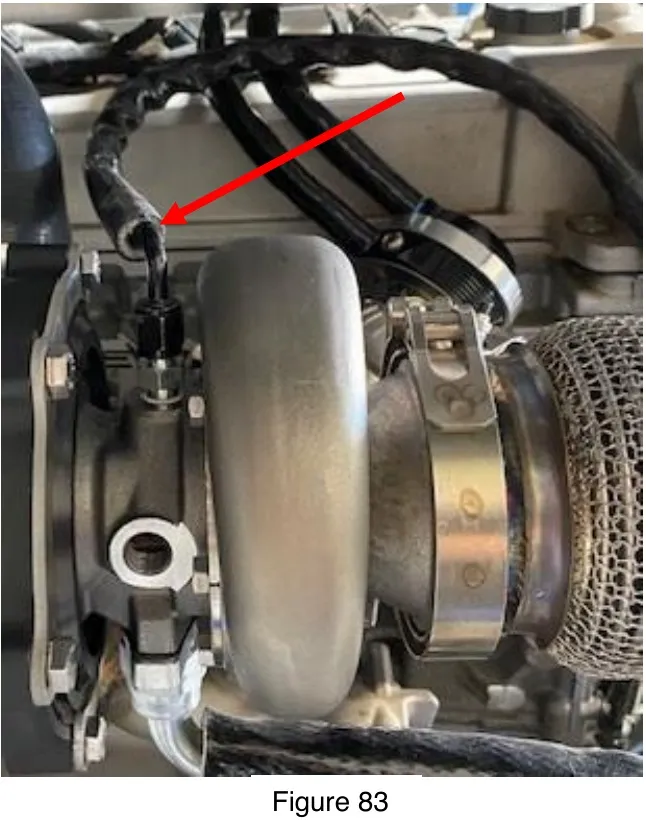
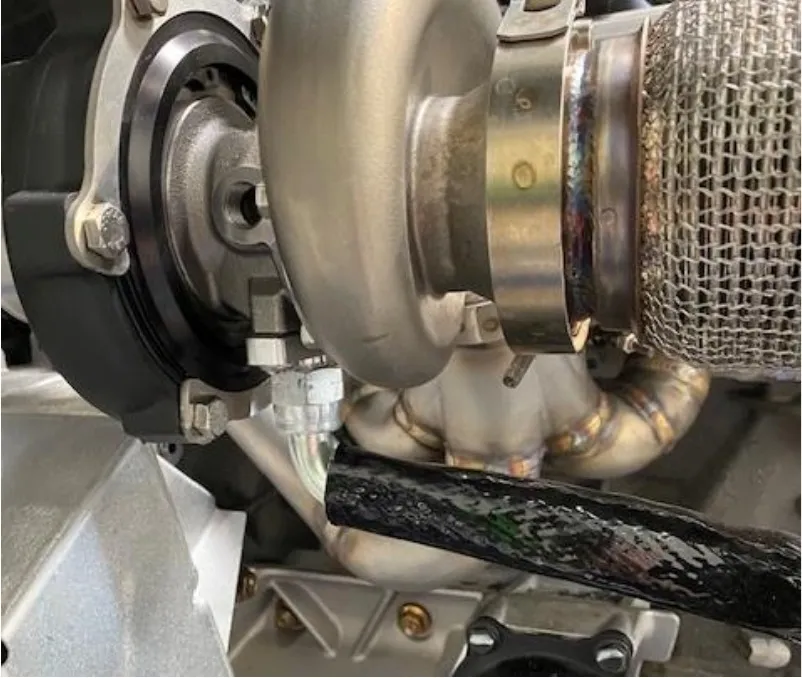
Locate the 60” oil feed line. Install supplied fire sleeve onto the oil feed line. Install supplied banjo bolt and washers on the straight fitting. Install it onto the oil filter housing. DO NOT OVER-TIGHTEN.
- Step 3
Route the 90-degree fitting to the oil feed on the turbocharger.
- Step 4
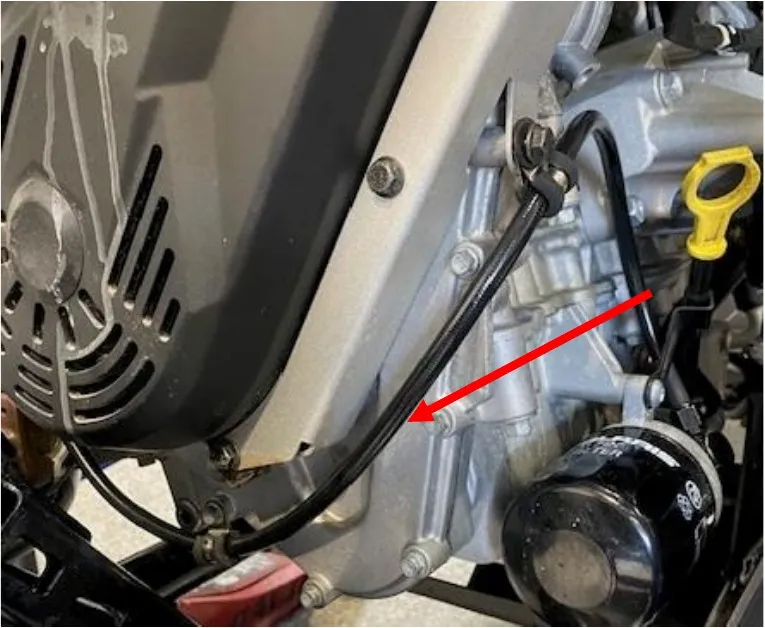
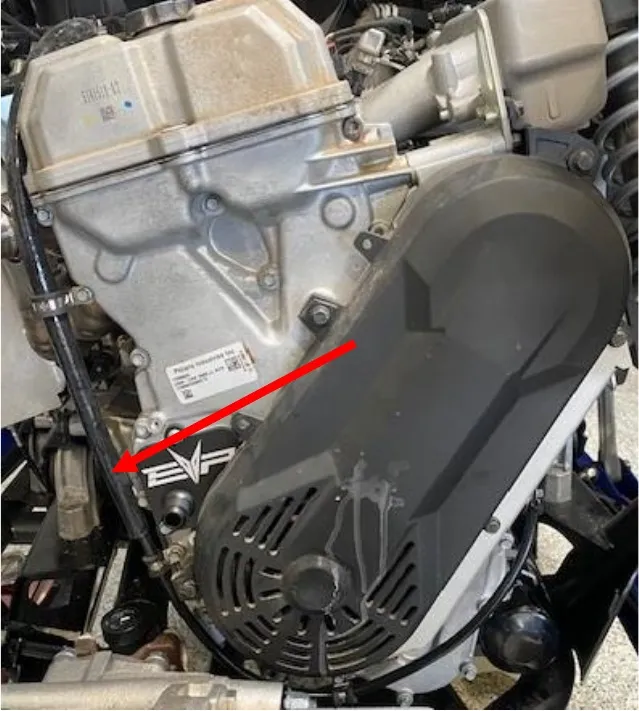
See oil feed line routing below, use supplied 5/16” & 1/2" P-clamps to hold the oil line around the timing chain cover.
- Step 5
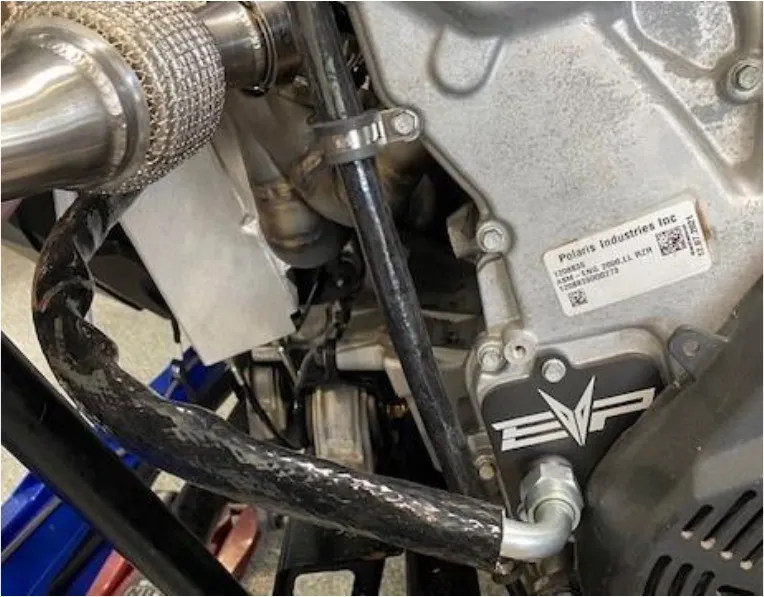
Locate the oil drain hose with (2) 90-Degree fittings. Install fire sleeve onto the oil drain hose. Install one end to the oil drain plate located where the timing chain access panel is.
- Step 6
Install the other 90-degree fitting to the oil drain located on the turbocharger.
Procedure
Pro R Charge Tube
- Step 1
Locate the airbox to turbocharger charge tube. Install the 1/2" plug into the crankcase vent port. Fasten with a 24.1mm pinch clamp. (Figure 88). Turbocharger to intercooler charge tube will need a BOV plug installed with a 34.6mm pinch clamp. (Figure 89)
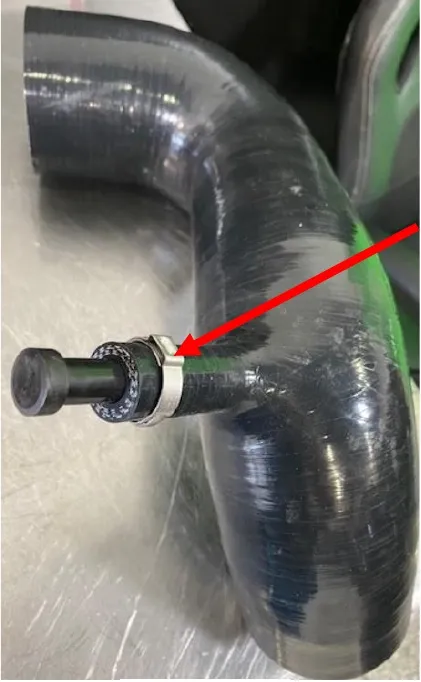
Fig. 88 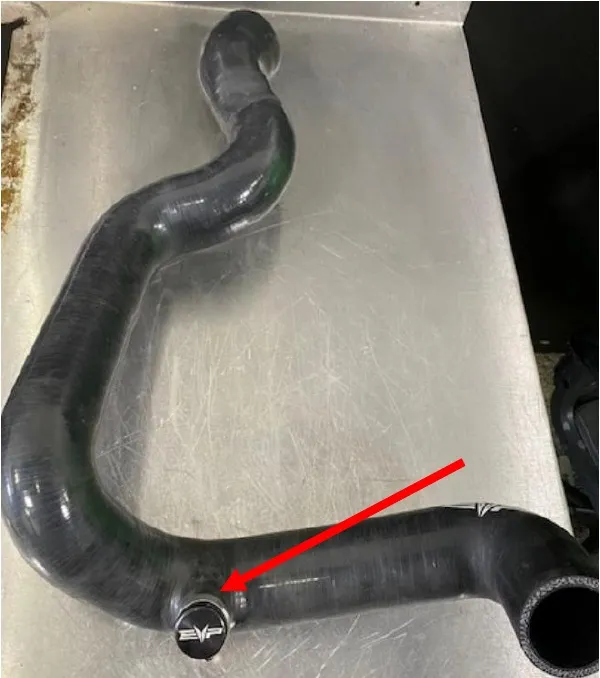
Fig. 89 - Step 2
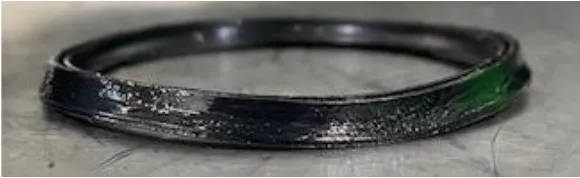
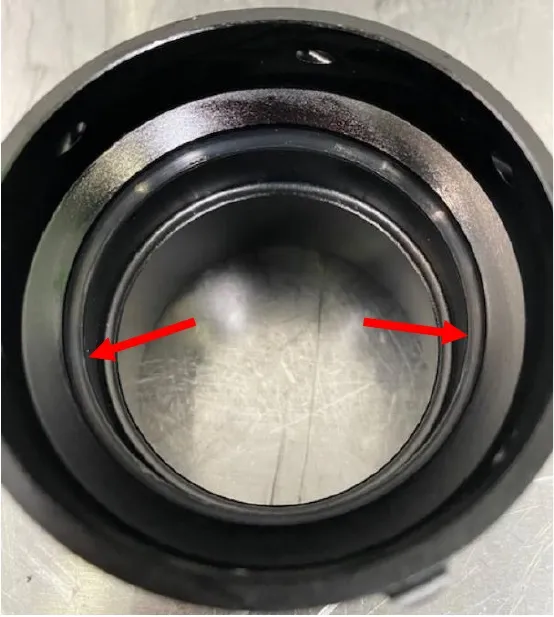
(PRE 1-7-2024 ONLY) Install the O-rings into the billet charge tube connectors. Apply dielectric grease to the O-rings. The O-rings are directional, install as shown below.
- Step 3
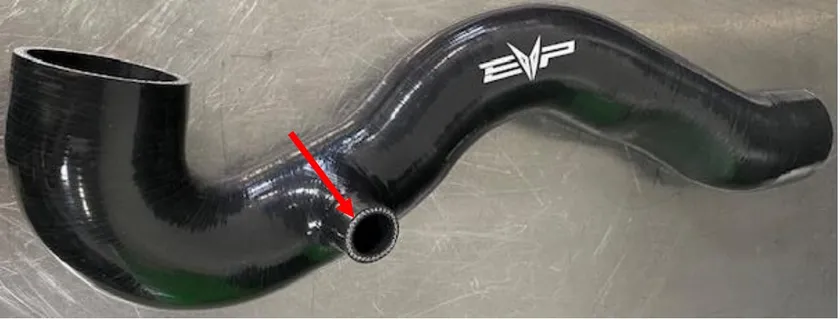
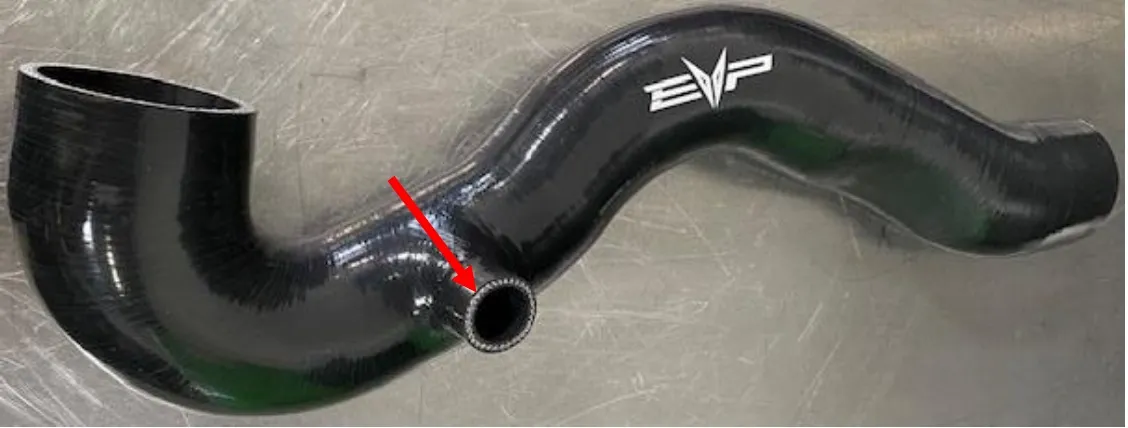
Locate the intercooler to throttle body charge tube. The blow off valve will be mounted in the port shown below.
- Step 4
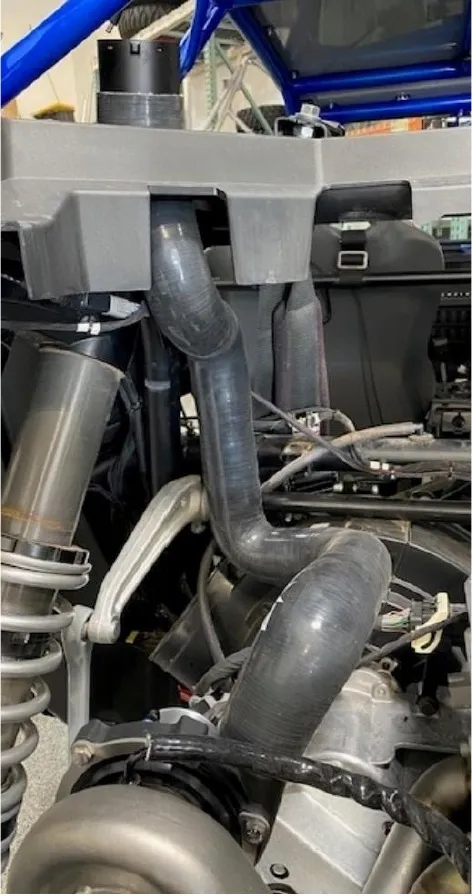
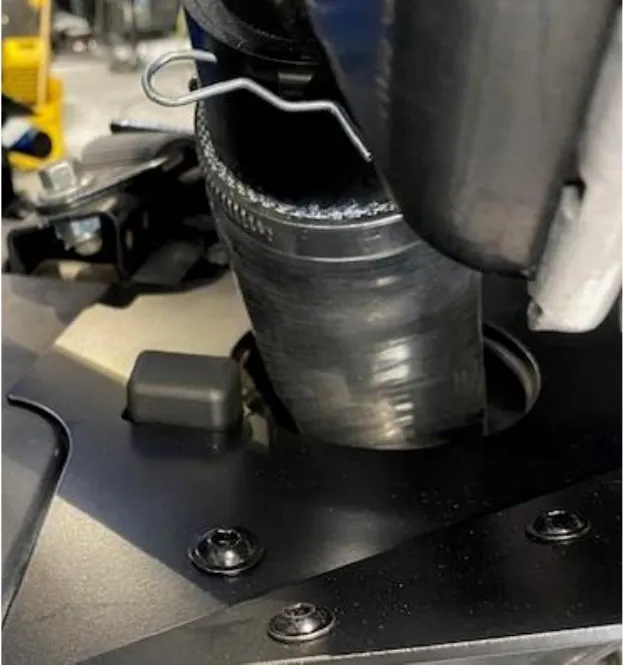
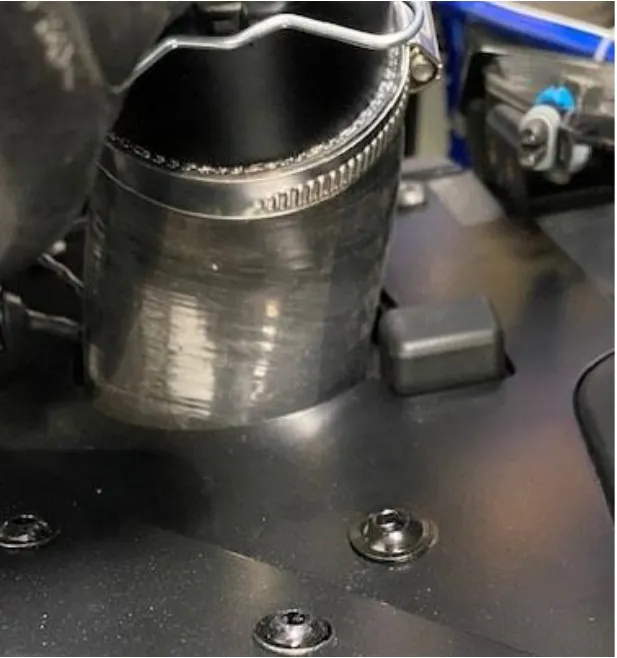
Install the turbocharger to intercooler charge tube. Once you have fit the silicone through the plastic. Use dielectric grease if needed. Fasten down with a 60-80mm worm drive clamp. Fastened the turbocharger side with a 50-70mm worm drive.
- Step 5
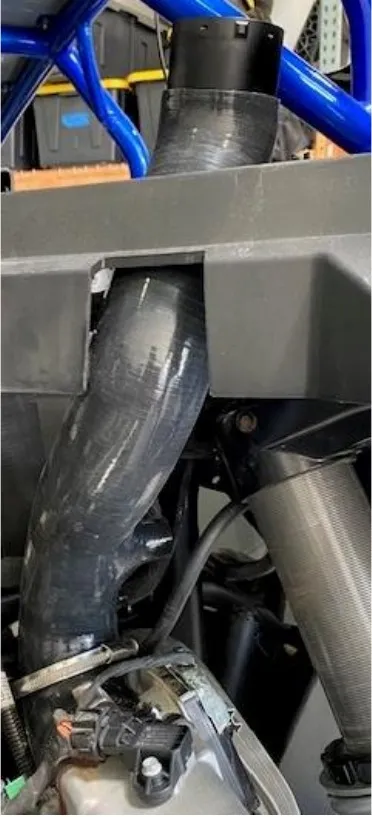
Install the throttle body to intercooler charge tube. Once you have fit the silicone through the plastic. Use dielectric grease if needed. Fastened down with a 60-80mm worm drive. Fastened down the throttle body side with a 70-90mm worm drive.
- Step 6
(PRE 1-7-2024 ONLY) Install the billet connectors to the intercooler. Use (3) cotter pins per each side.
Procedure
Pro R Airbox (Pre 10-24-2023)
- Step 1
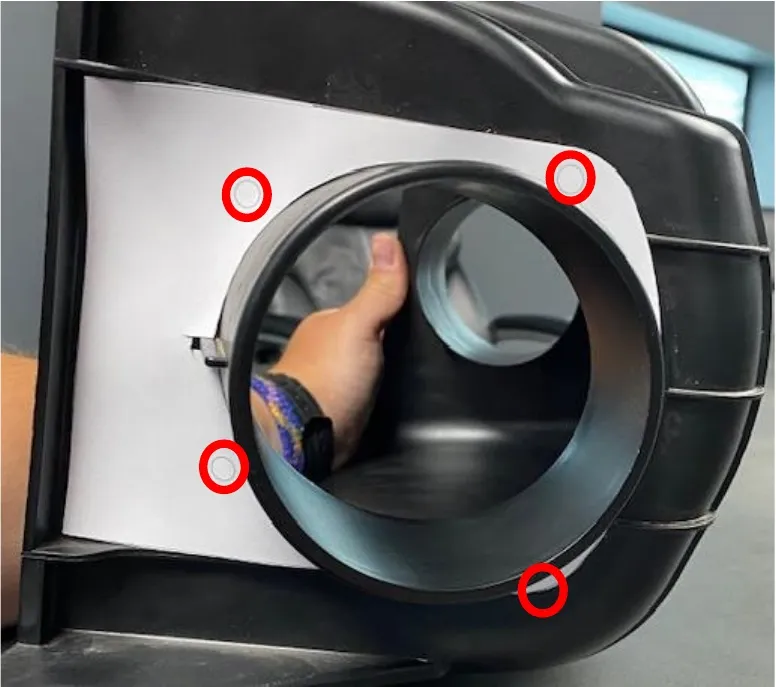
Locate the air filter adaptor template. Install it onto the outside of the airbox. Once aligned properly mark the (4) holes with a silver sharpie.
- Step 2
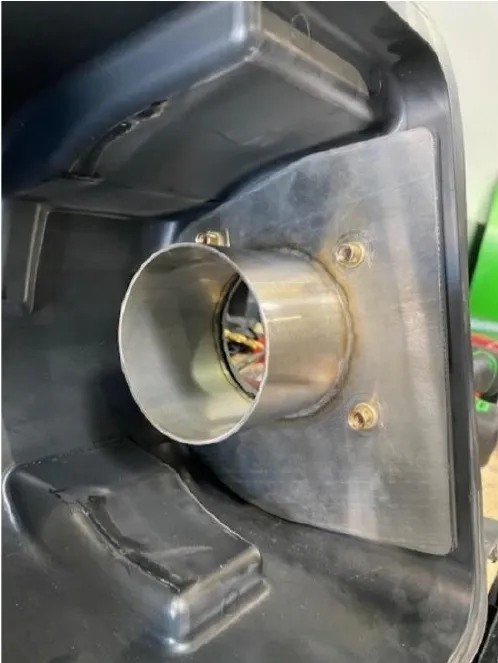
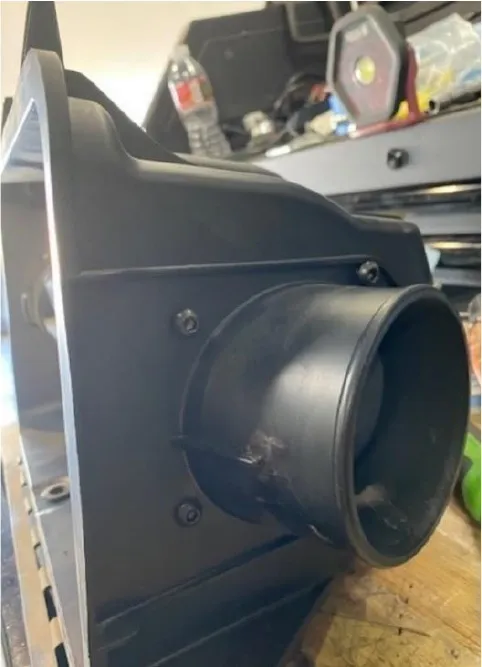
Use a 1/4" drill bit and drill out (4) holes. Fasten the bracket down with supplied (4) M6x16mm flanged head screws into the Nutzerts.
- Step 3
Reinstall the airbox (loosely) into the vehicle.
- Step 4
Reinstall the bed frame with OEM hardware.
- Step 5
Reinstall airbox hardware and engine harness clips. Use supplied zip-ties.
- Step 6
Install supplied air filter and pre filter into the airbox.
Procedure
Pro R Airbox (Post 10-24-2023)
- Step 1
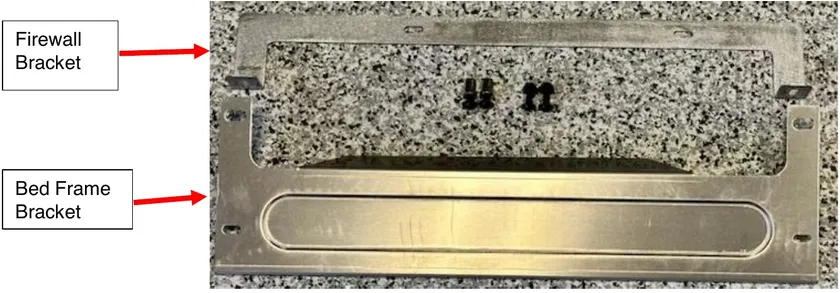
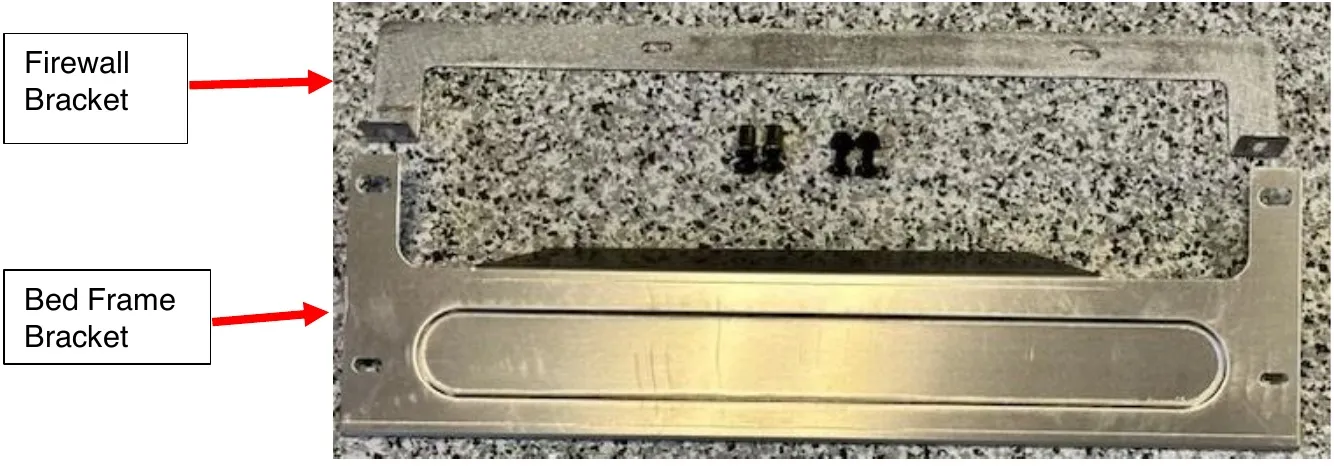
Locate firewall and bed frame brackets along with (4) M6x16mm flange bolts, (2) Nylock nuts and (2) M6 Nutzert.
- Step 2
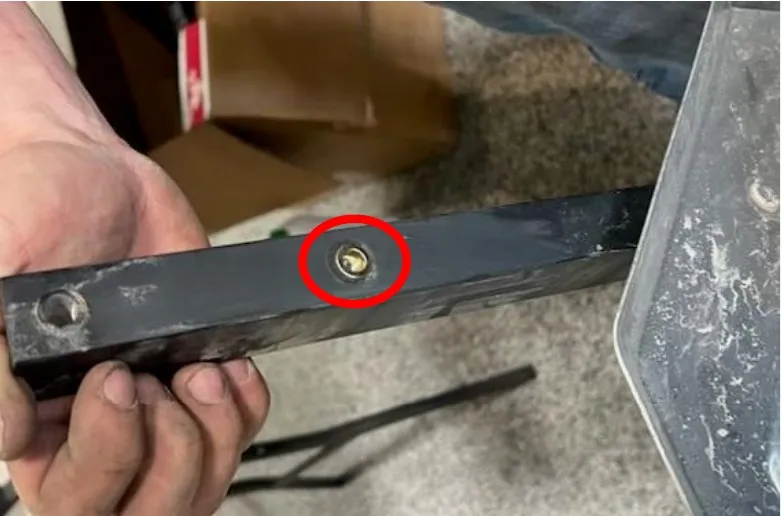
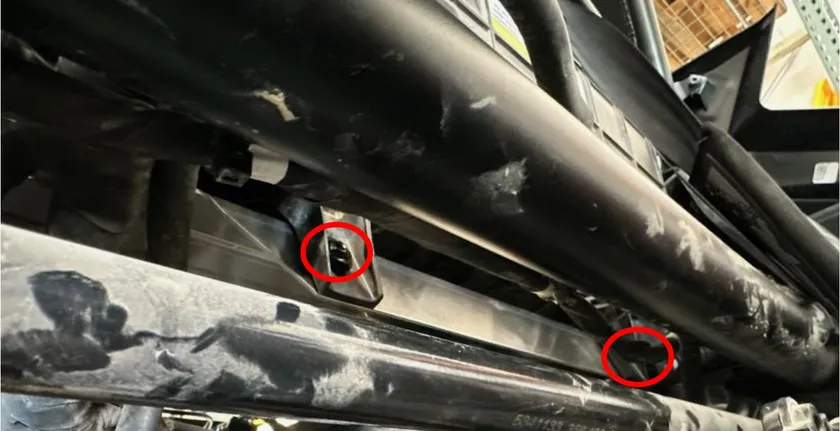
Locate the firewall side of the bed frame, you will find (4) holes total (2) per frame rail. Install a M6x1.0 Nutzert into the bottom hole. On the bottom of bed frame.
- Step 3
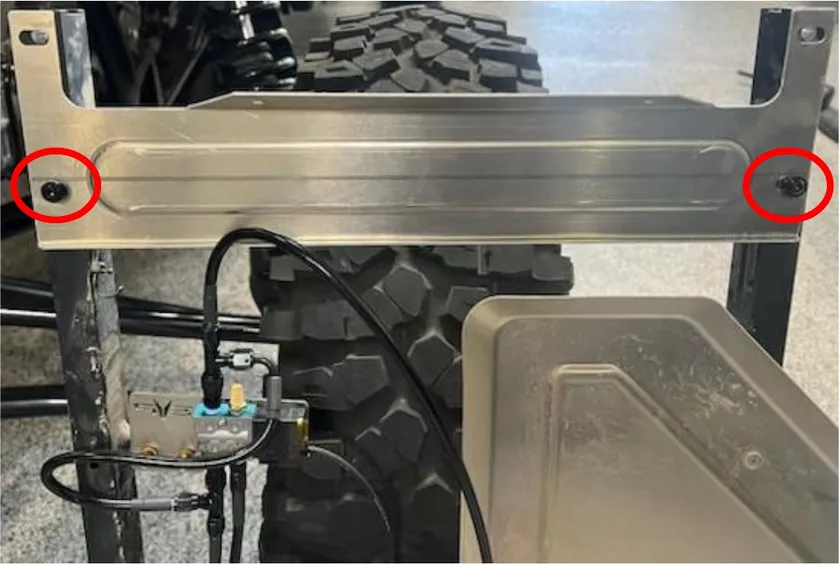
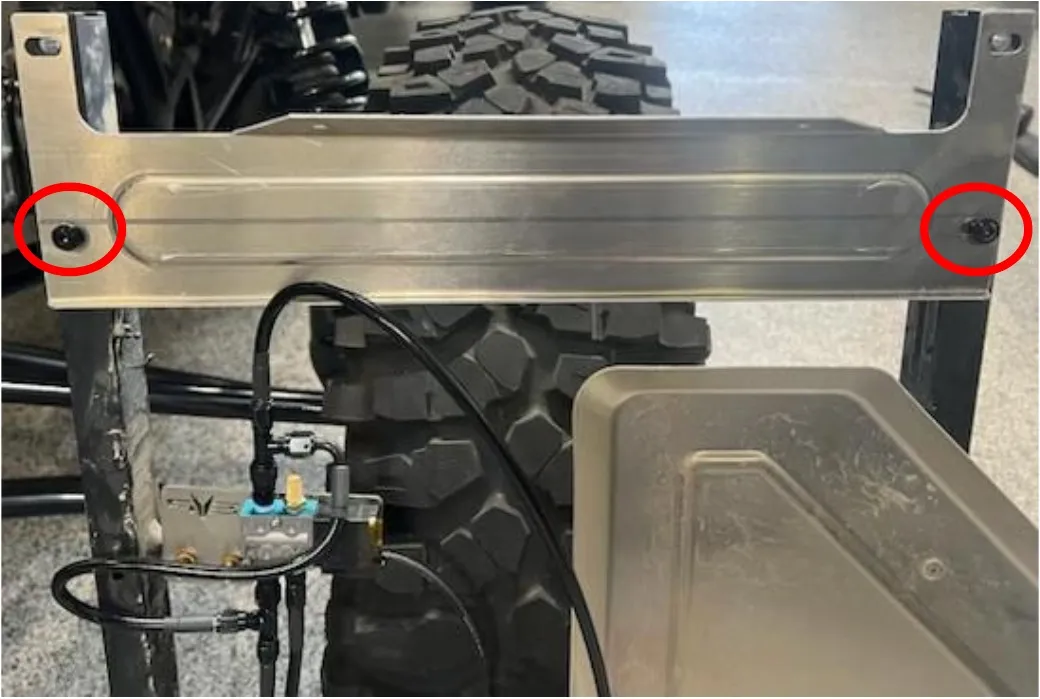
Install (2) M6x16mm flanged screws holding the bed frame air box relocation bracket to the bottom of the bed frame. See photo.
- Step 4
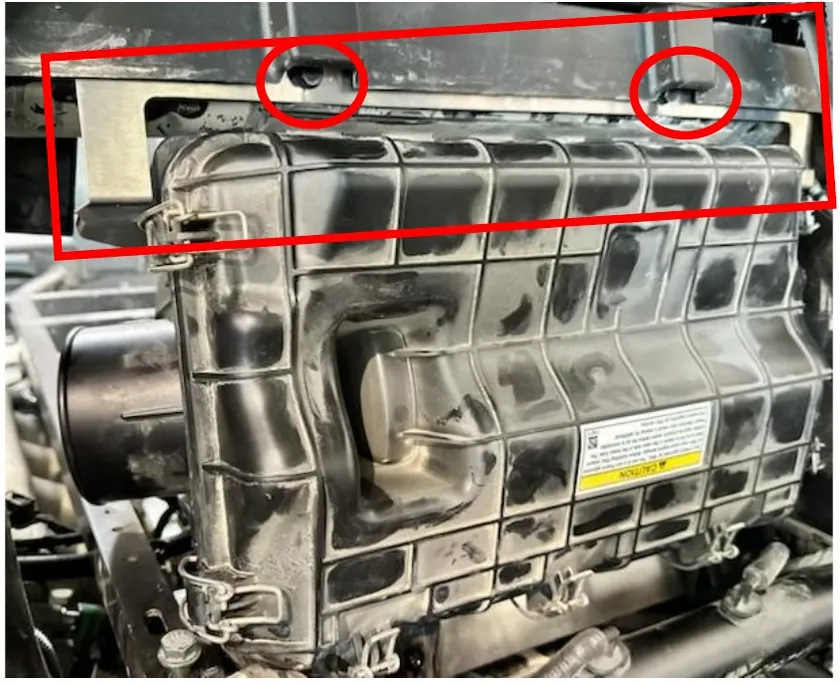
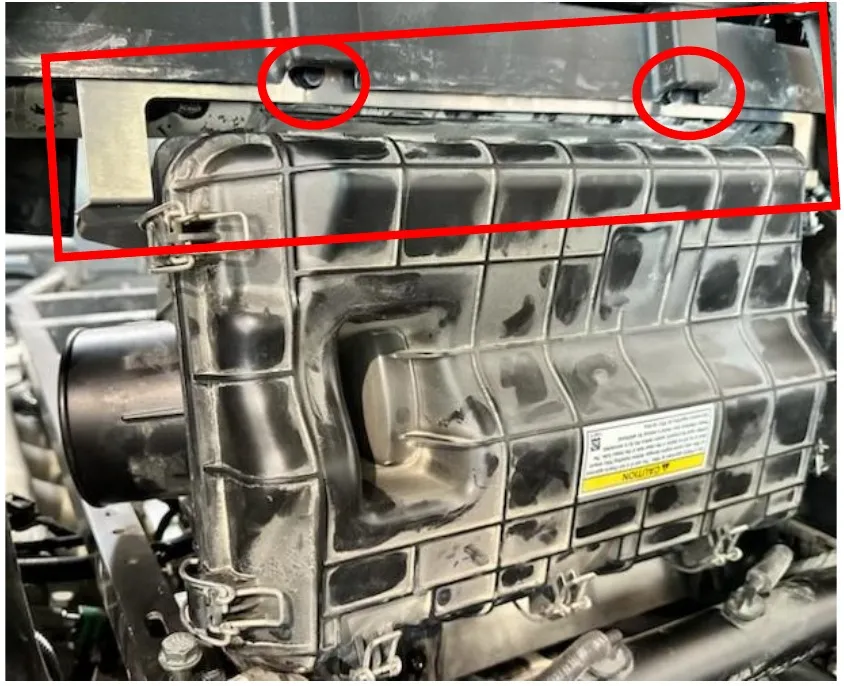
Install the bed frame loosely, flip the airbox 180 degrees (making sure the airbox still opens inside the cab). Install the firewall air box relocation bracket using OEM hardware.
- Step 5
Install (2) M6x16mm screws and (2) M6 Nylock nuts holding the bottom of the airbox to the bed frame air box relocation bracket.
- Step 6
Reinstall the bed frame with OEM hardware.
- Step 7
Reinstall airbox hardware and engine harness clips. Use supplied zip-ties.
- Step 8
Install supplied air filter and pre filter into the airbox.
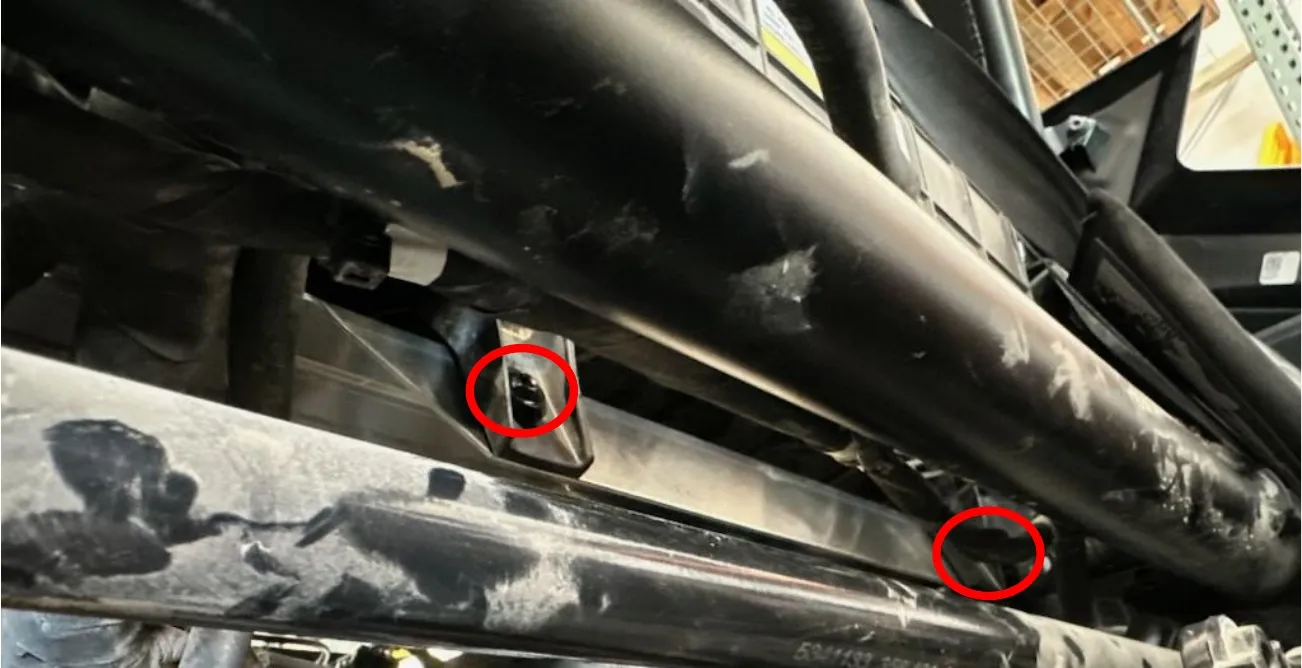
Procedure
Pro R Boost Control
- Step 1
Locate the 4-Port boost control solenoid with bracket. Install the bracket onto the bed frame. Fasten down with (2) M6x16 flanged head screws. See below.
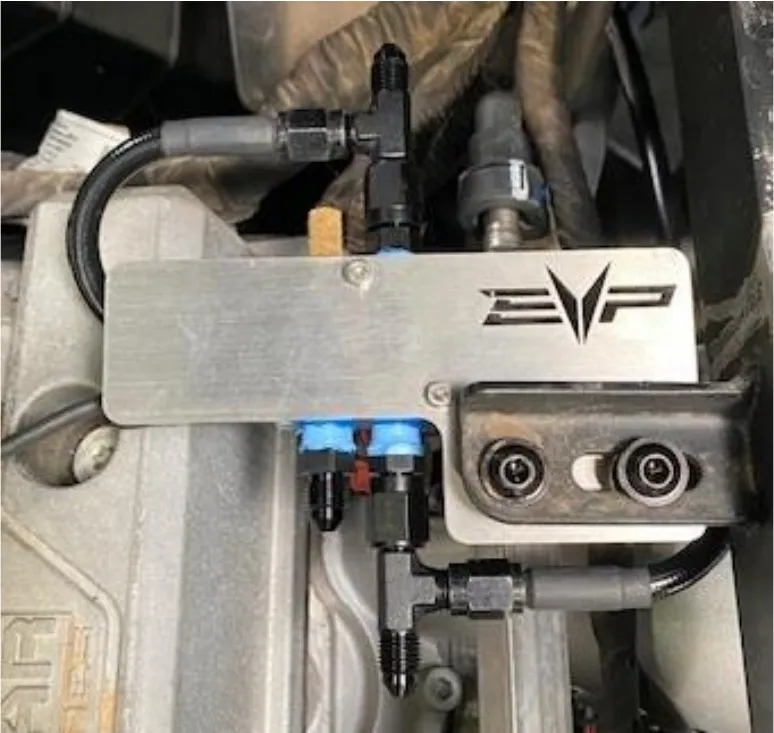
- Step 2
Install both 12” fire sleeve pieces onto the 21” lines. Install the 30” boost line between the top right “T” on the boost control solenoid to the turbocharger boost reference port. Install one 21” boost line between the bottom left single port on the boost control solenoid to the top port on the wastegate. Install the other 21” boost line between the bottom right “T” on the boost control solenoid to the bottom port on the wastegate. Fasten all fittings down with Teflon. (See diagram below).
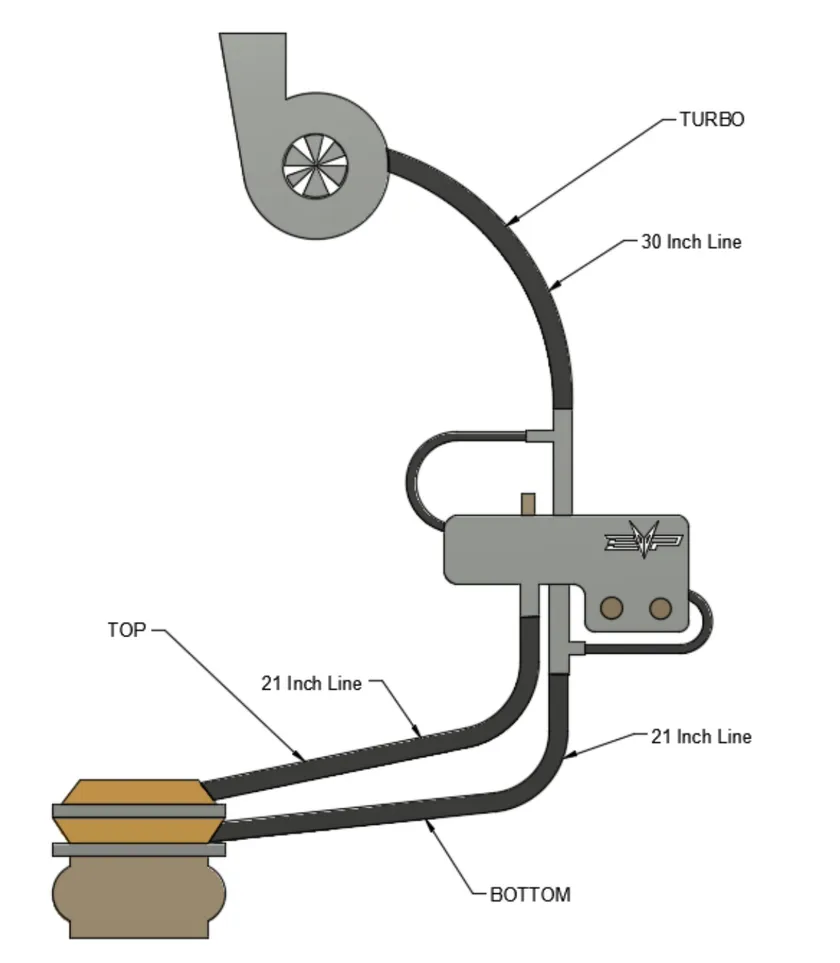
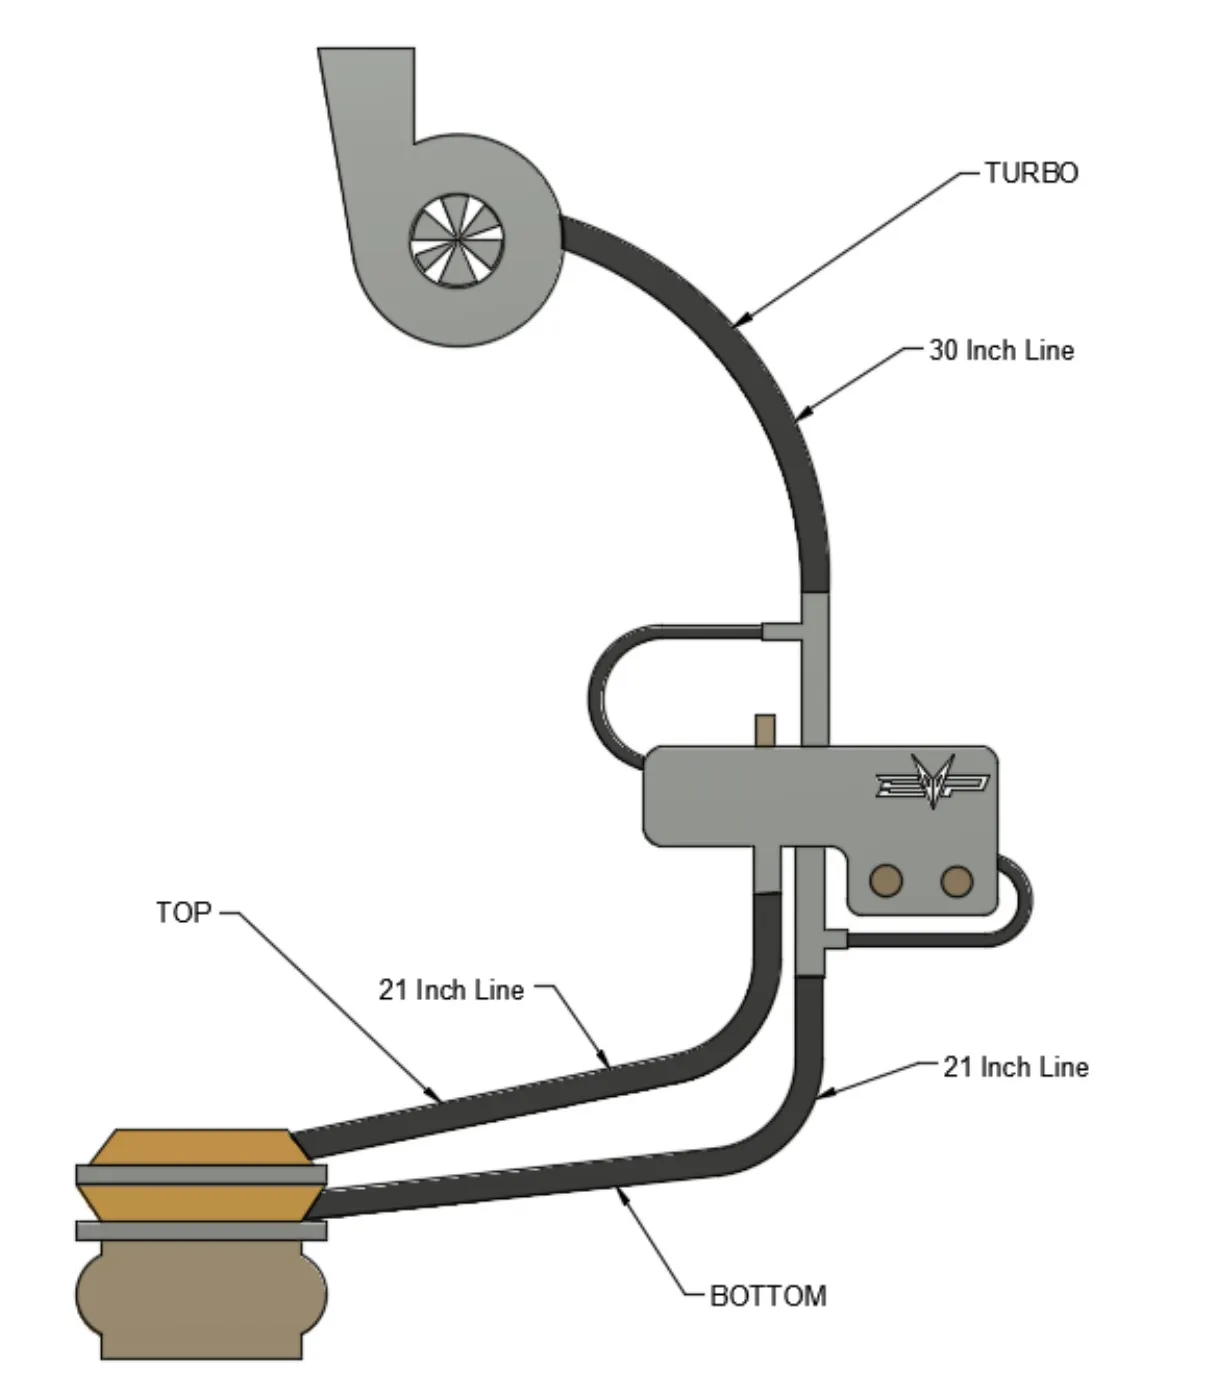
Procedure
Pro R Kaizen Relay Harness
- Step 1
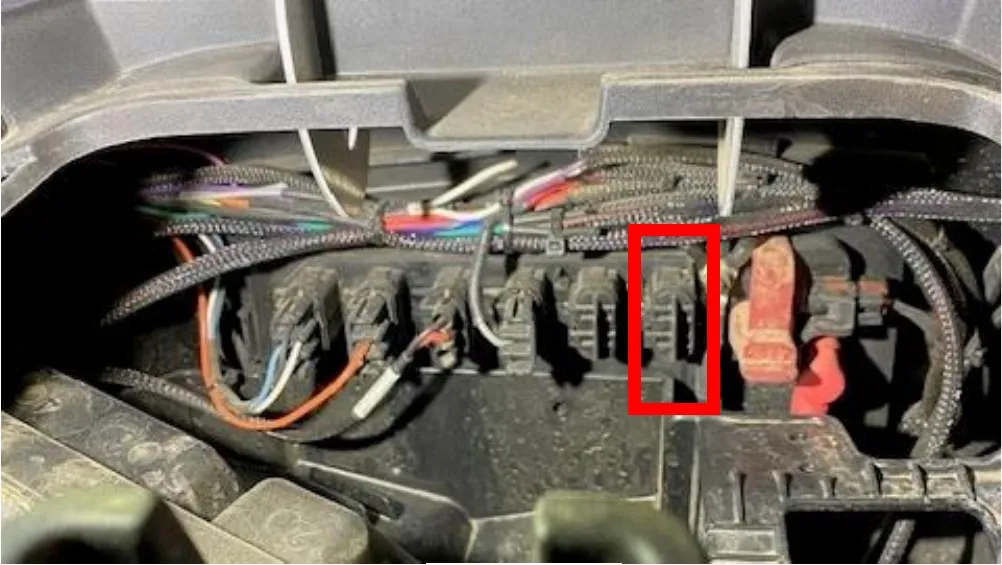
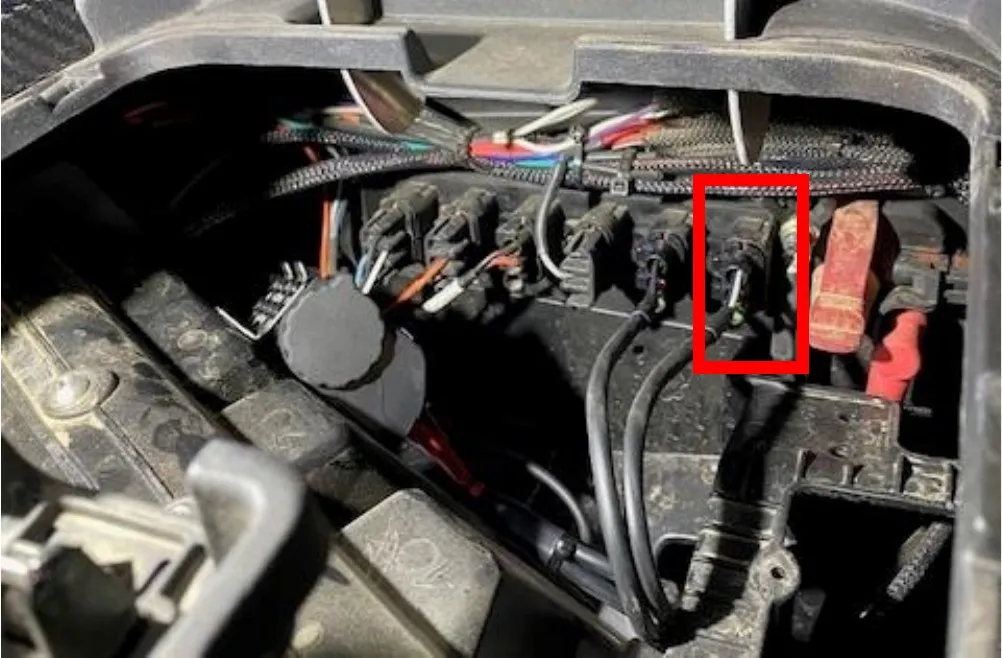
Locate the storage compartment on top of the dash. Remove the insert. With the insert removed you will find the electrical BUS bar. You will need (1) port. Remove (1) blank from the bus bar. Install (1) plugs into the bus bar from the Kaizen relay harness.
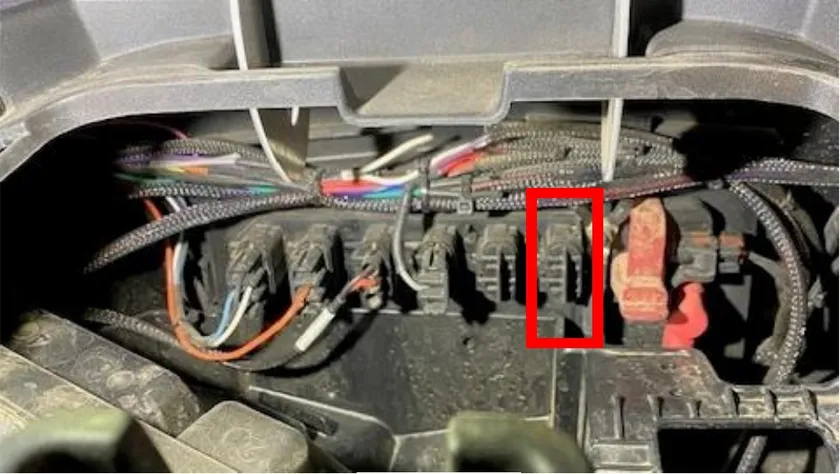
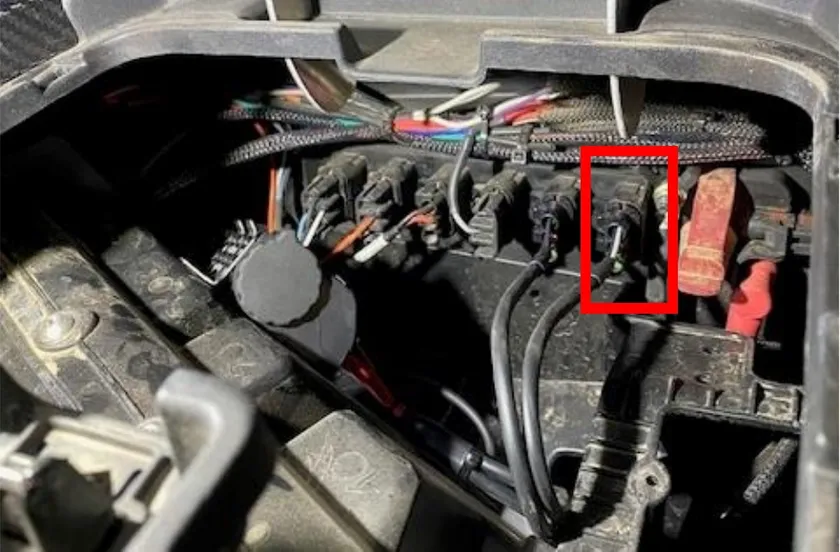
- Step 2
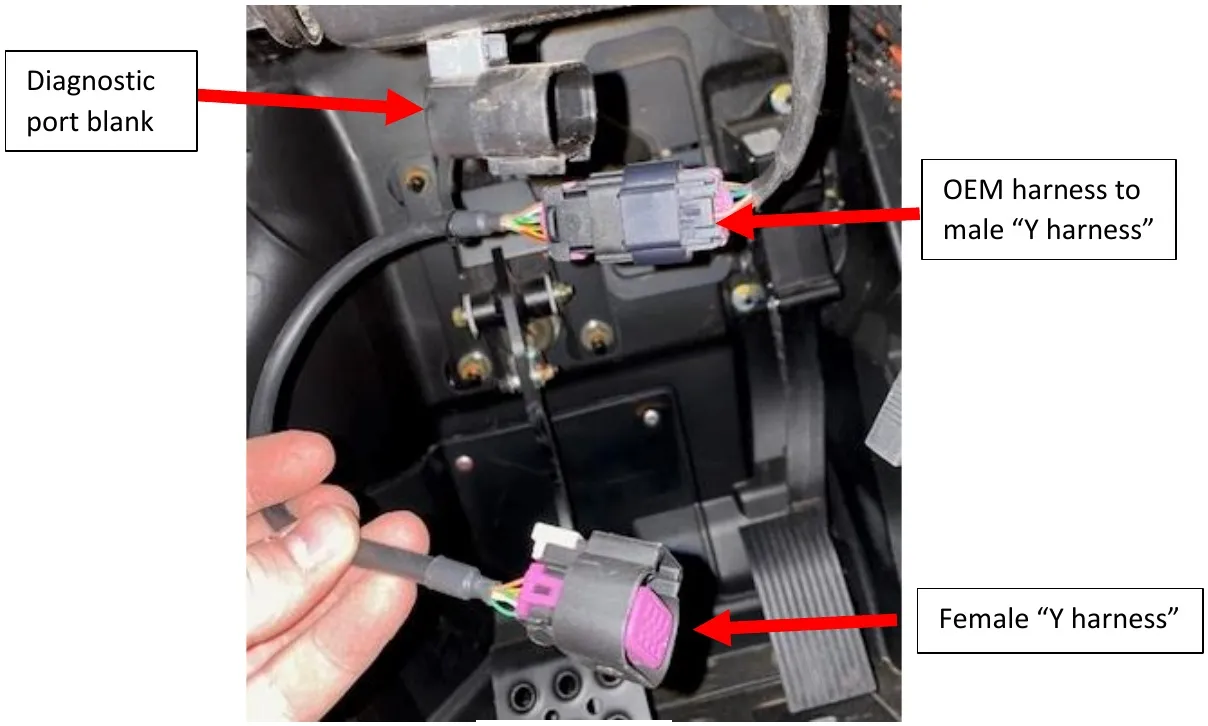
Run the diagnostic port “Y harness” under the dash and over to the diagnostic port located under the steering wheel. Remove the OEM diagnostic port from the blank and connect it to the male connector off the “Y harness”. Install the female end back into the blank.
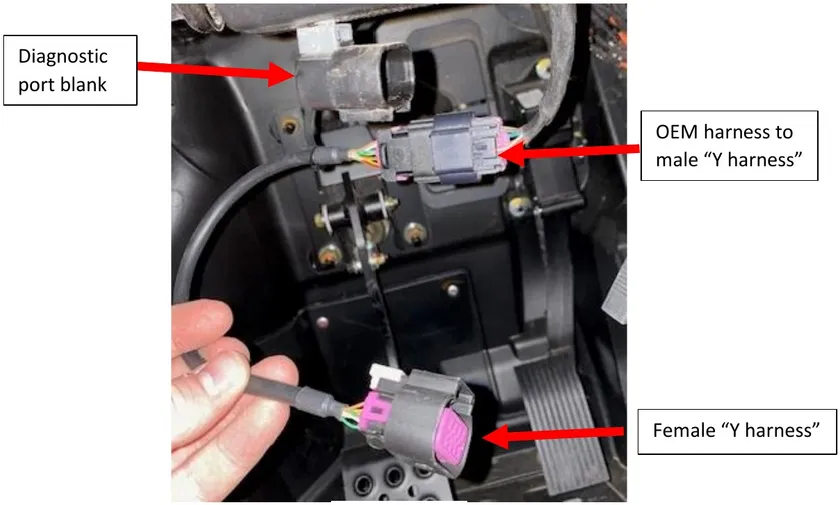
- Step 3
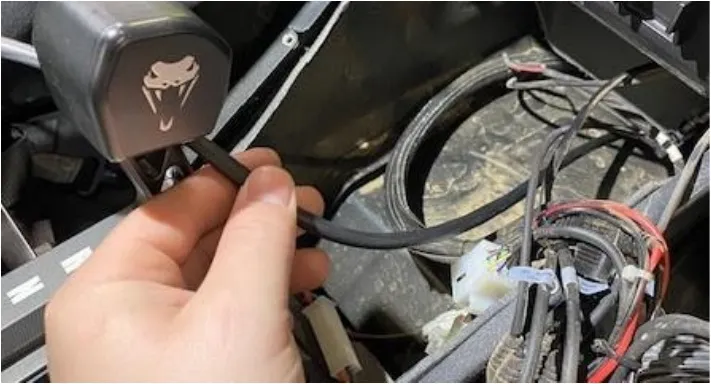
Route the 4-pin connector under the dash and through the center tunnel, by the shifter and cup holders. (If a 4-seater run it through the rear tunnel). Run the harness back to the firewall.
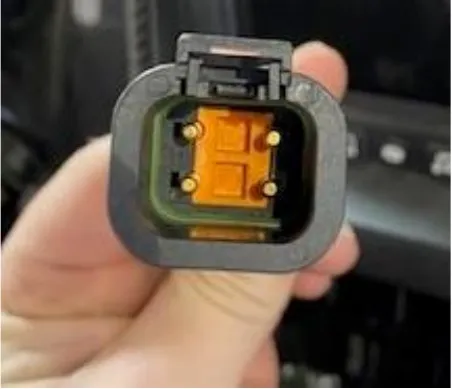
- Step 4
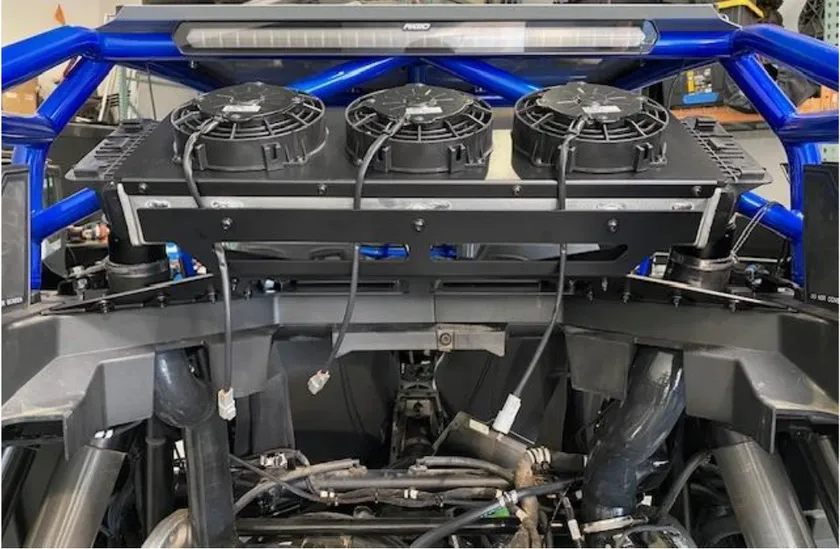
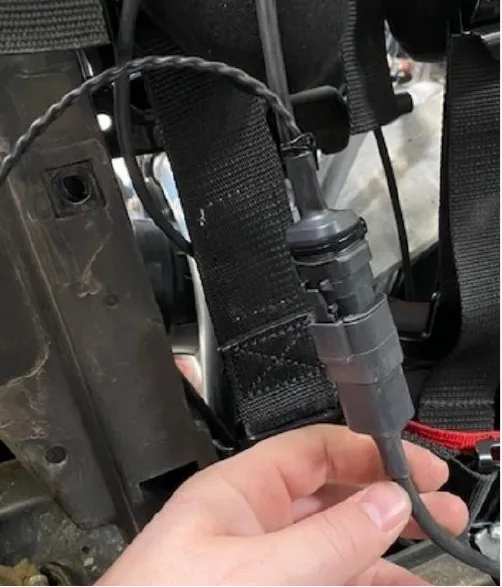
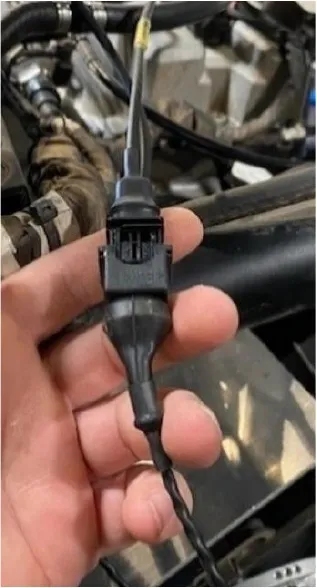
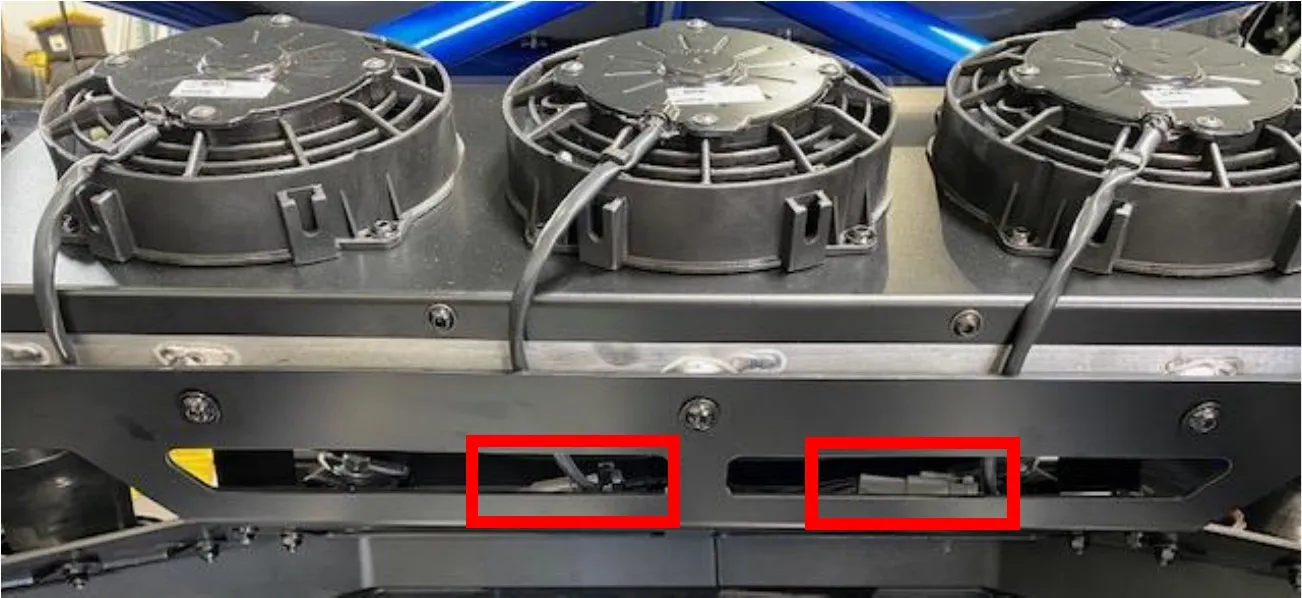
With the 4-pin connector back at the firewall, install the intercooler triple fan harness. Run the triple fan harness back to the intercooler fans (on the inside of the cage). Also attached to the triple fan harness is a 2-pin connector. Connect the 2-pin connector to the 4-port boost control solenoid.
- Step 5
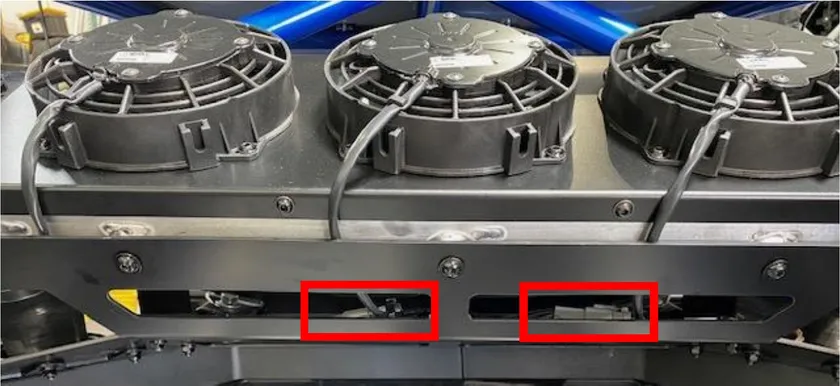
Use (2) supplied 5/16” P-clamps to secure the (3) fan harnesses to the intercooler cage. Remove a M6 screw to fasten the clamp down with.
- Step 6
Use supplied zip-ties to secure all wire harness to the frame, up to the front compartment.
Note
While keyed off, the CAN module LED should be solid RED. When fully keyed on (engine running or not), the CAN module LED should be flashing GREEN.
Procedure
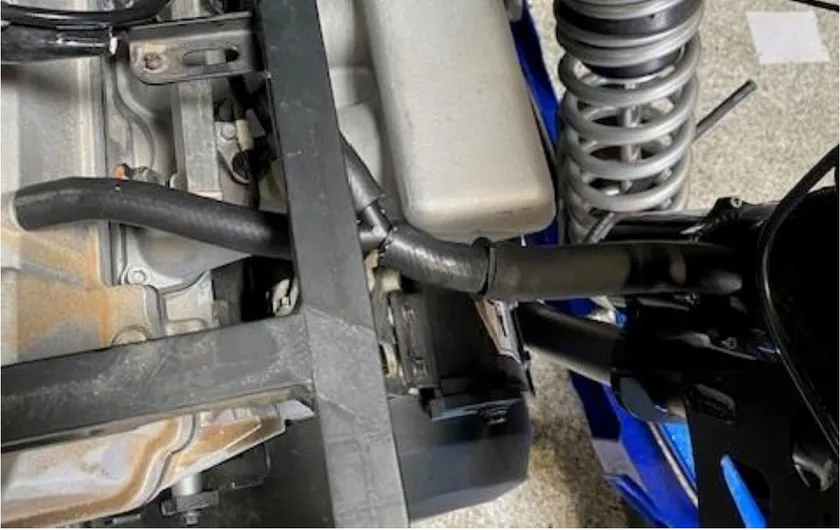
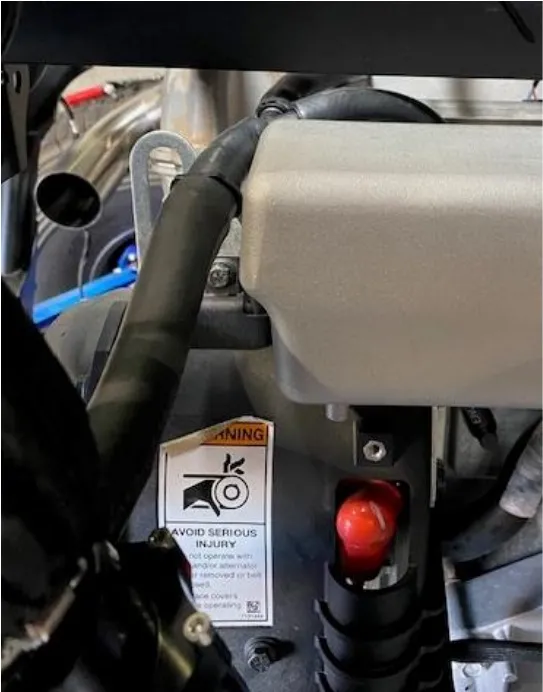
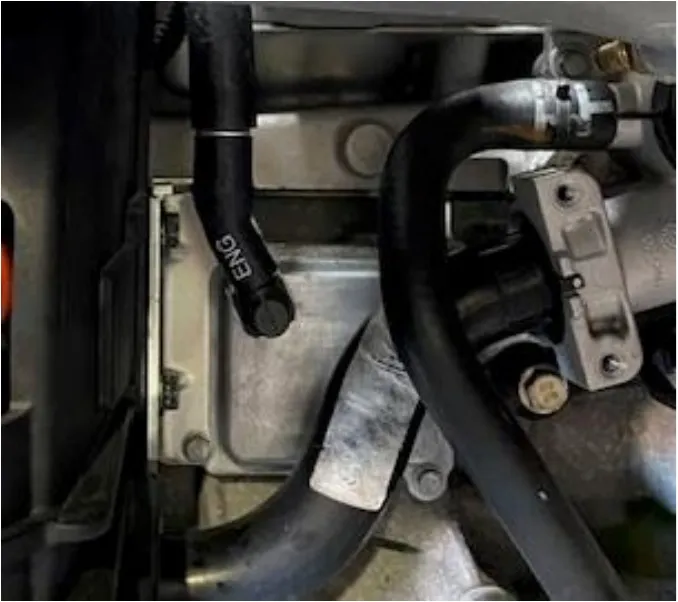
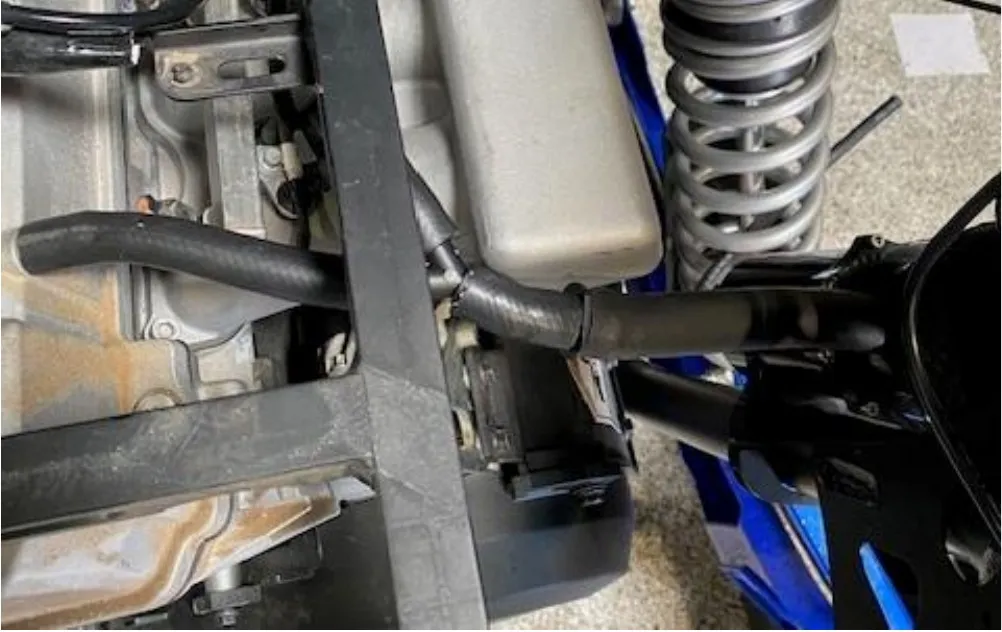
Pro R Catch Can
- Step 1
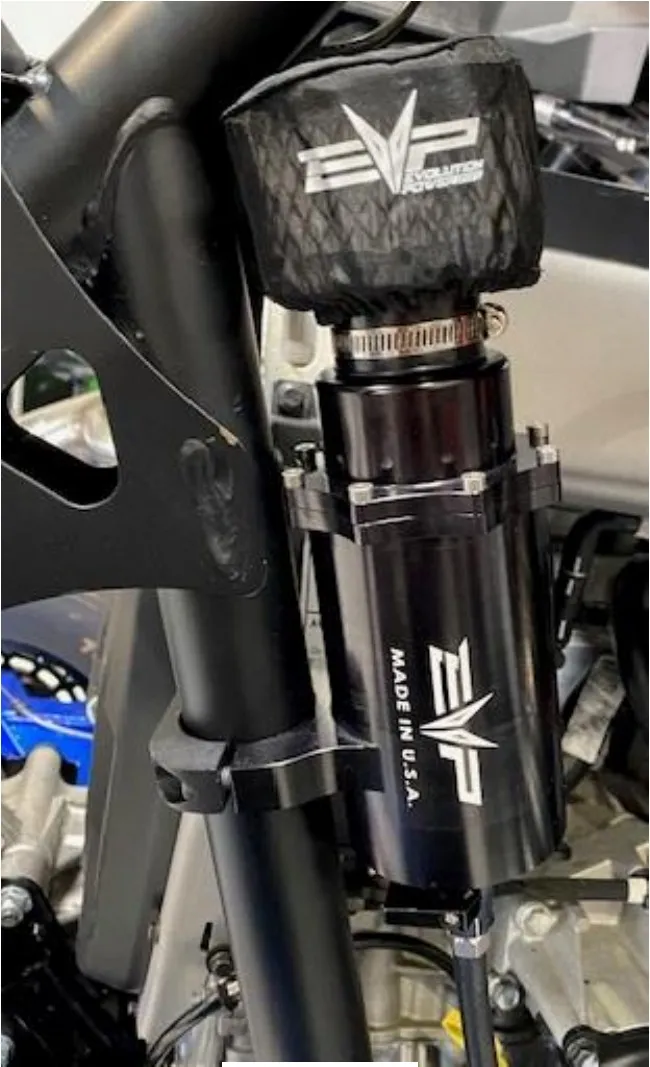
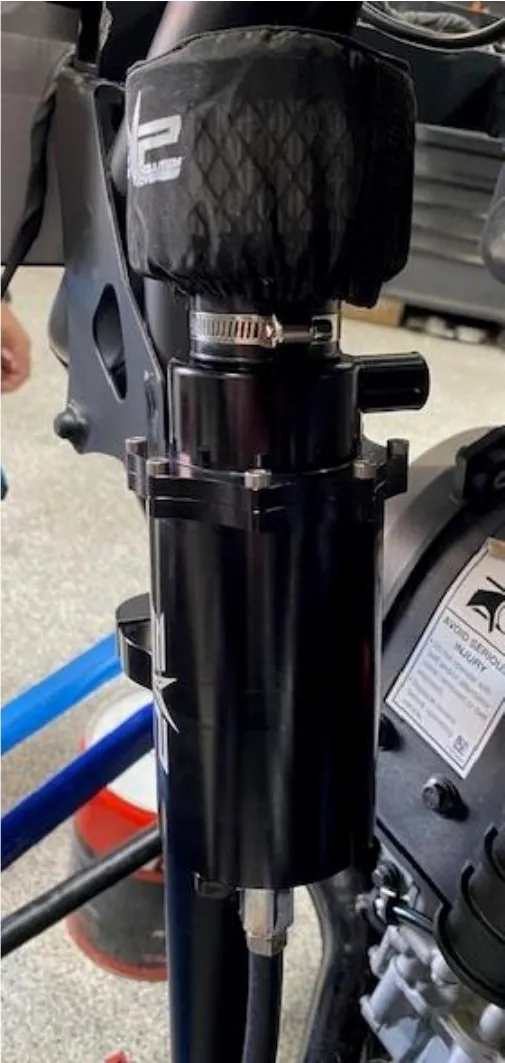
Install the catch can on the right-rear frame. Tighten down the clamp around the tube frame. The port on the cap will face the engine bay. Install the 1/4" rubber hose to the barb located on the bottom of the catch can. Run it down into the belly pan.
- Step 2
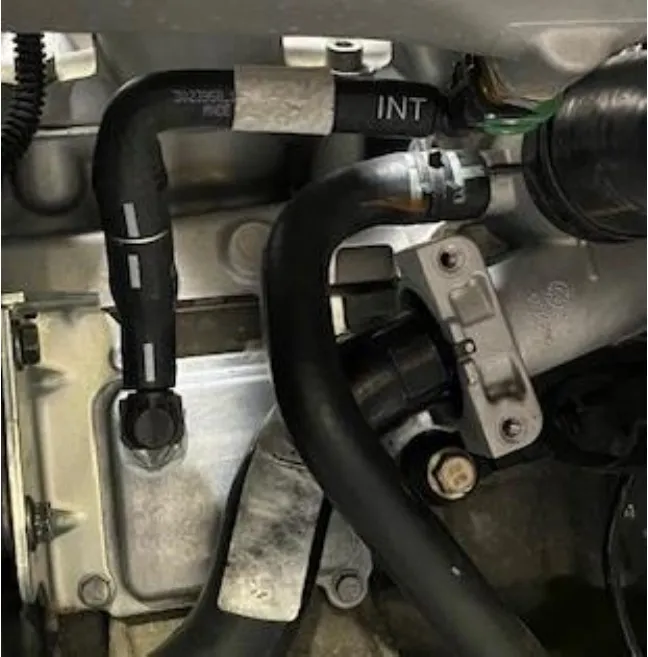
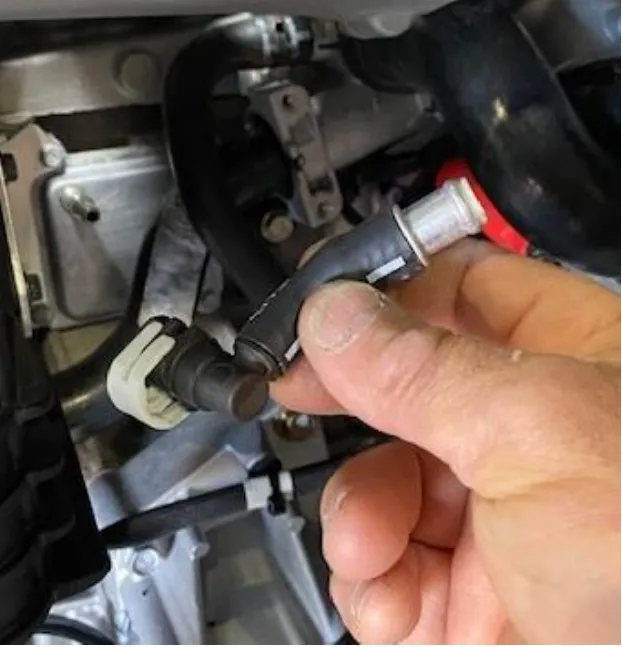
Locate the engine breather hose going to the plenum (which is currently removed). Remove the hose from the engine. Remove the longer piece of hose. Keep the small piece with the connector and one-way-ball valve. Reconnect the small piece to the engine.
- Step 3
Install the catch can hose. The “Y” portion of the hose will go to the small connector on the engine and the valve cover.
Procedure
Pro R Blow Off Valve (BOV)
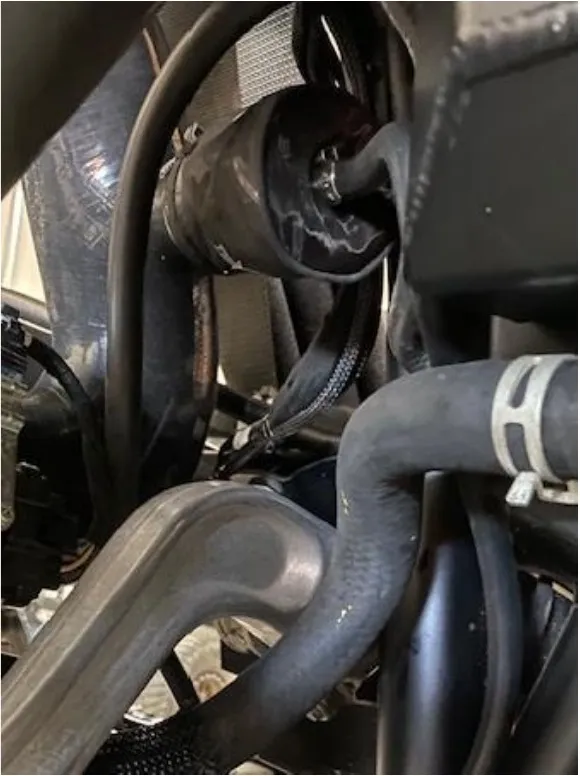
- Step 1
Install the pre-filter onto the BOV and use supplied zip-tie around the base of the BOV to hold the prefilter on.
- Step 2
Install the BOV into the charge tube between the intercooler and throttle body. Use supplied 25-40mm worm drive to fasten down.
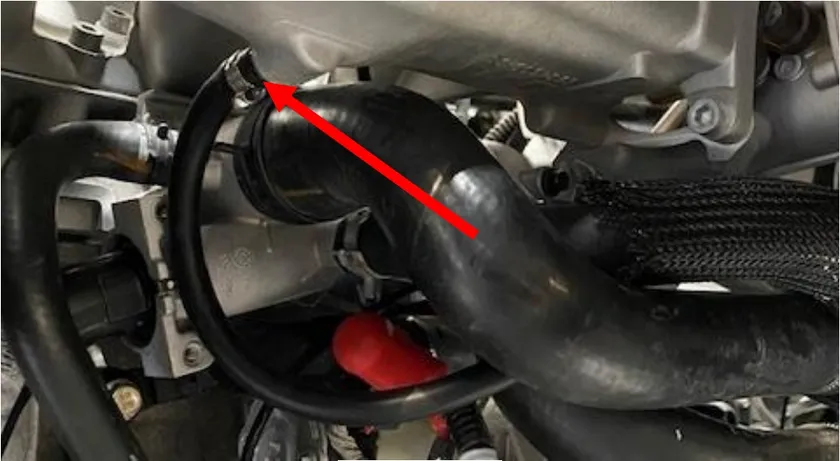
- Step 3
Install the vacuum line to the BOV and plenum barb, that was installed earlier. Use pinch clamps to secure.
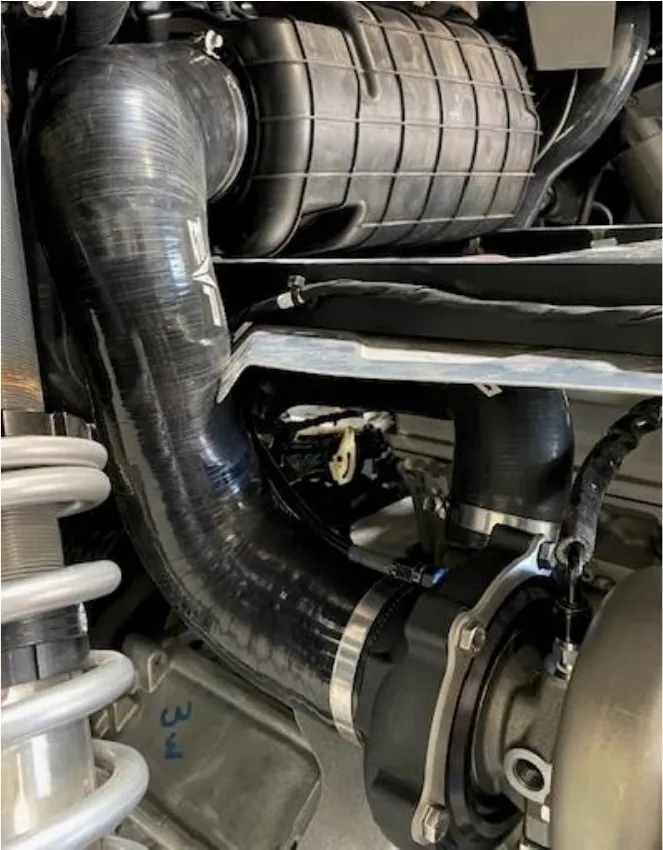
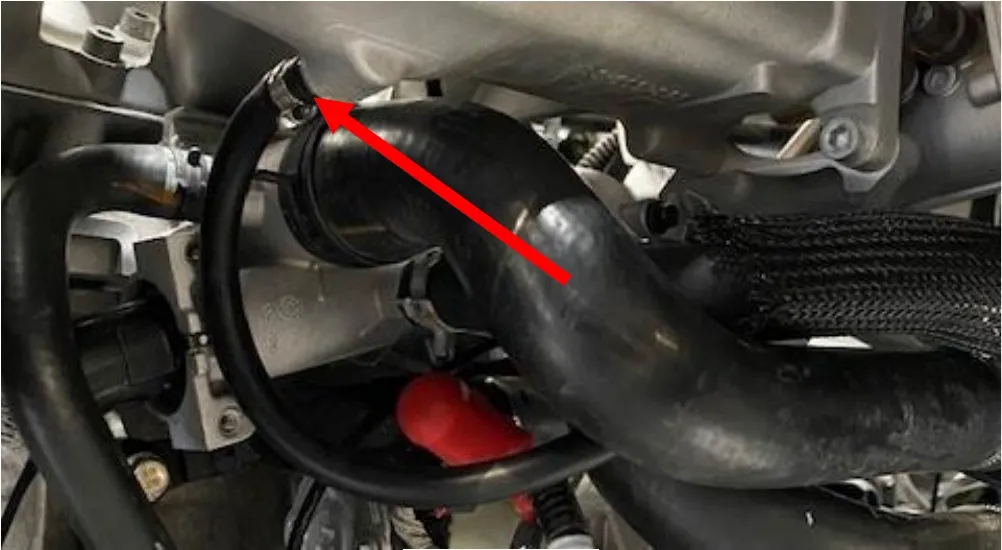
- Step 4
Install the V-flow from the turbocharger to airbox. Use supplied 70-90mm and 90-110 worm drive clamps.
Procedure
Pro R Turbocharger Exhaust
- Step 1
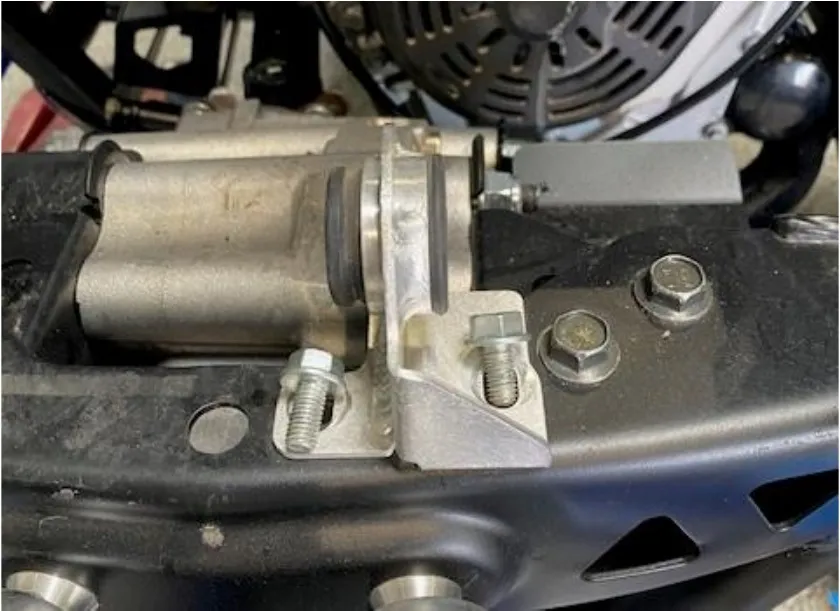
Remove the lower exhaust isolator from the frame. Use a 13mm socket.
- Step 2
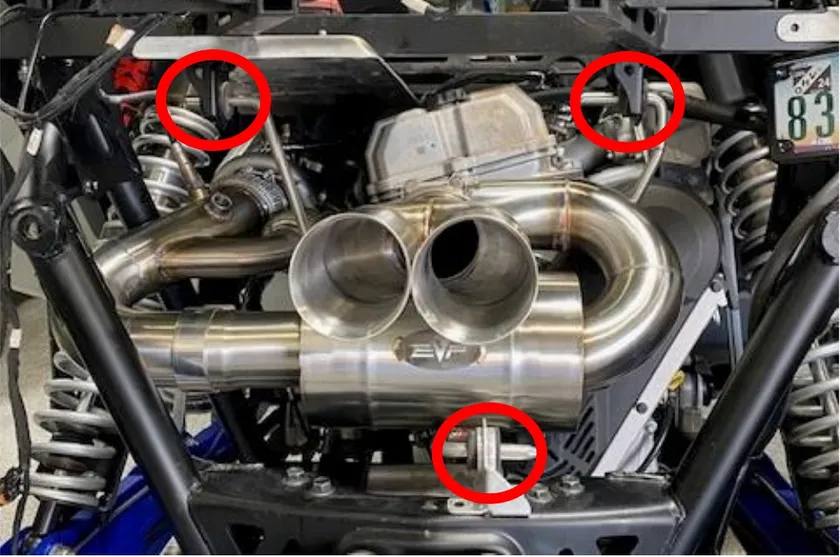
Install the exhaust clamp onto the muffler pipe. Install the muffler to the vehicle, re-use both top isolators. Install the bottom isolator onto the muffler and frame. Reinstall hardware.
- Step 3
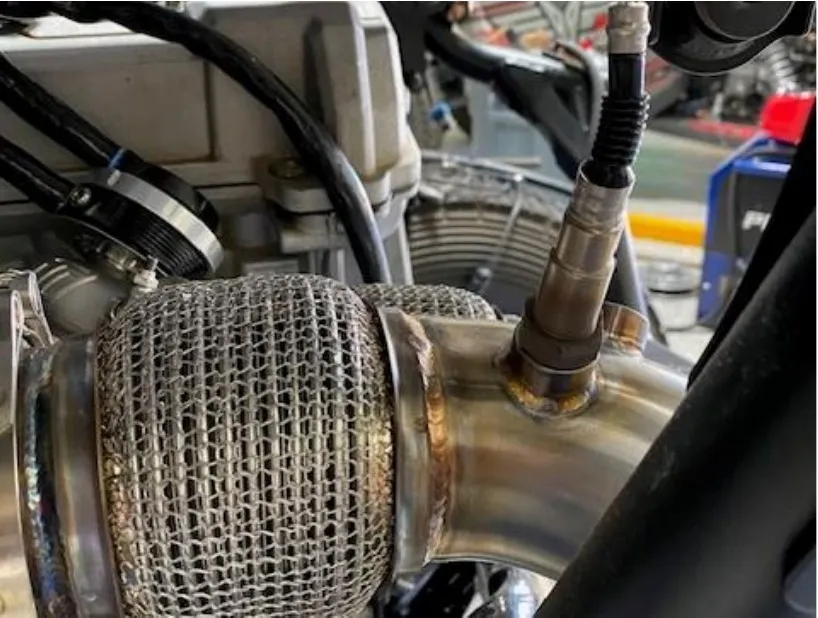
Remove the 02 sensor out of the OEM header using a 7/8” or 19mm wrench. Use anti seize on the threads and install onto the new down pipe. Reconnect the electrical connector to the harness.
- Step 4
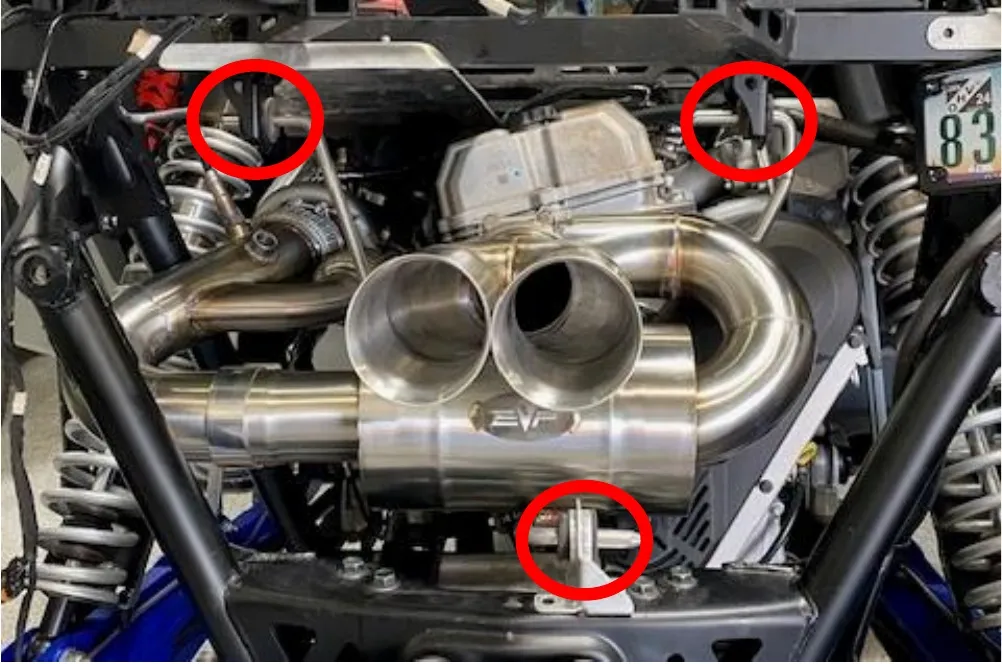
Tighten all clamps on the turbocharger, wastegate, mid-pipe, muffler, and muffler tips. Use anti seize on all threads. DO NOT overtighten the V-band clamps.
Procedure
Polaris Pro R Rear Facia
- Step 1
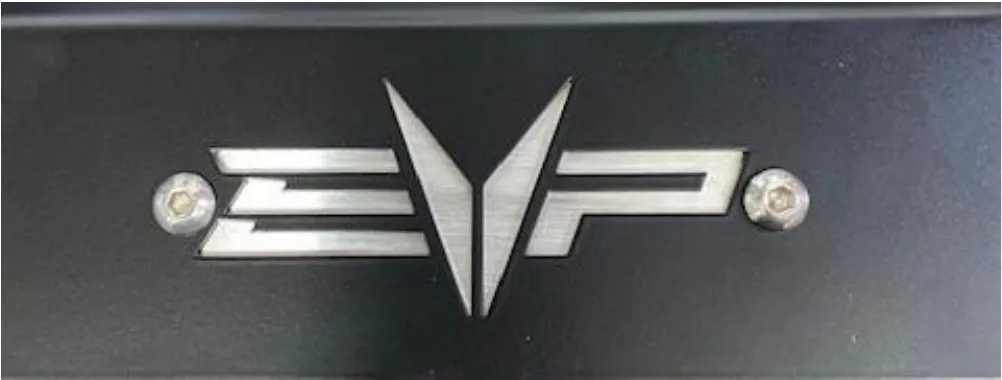
Open the new Pro R rear Facia box. Place the raw aluminum backer plate onto the rear facia trim. Use the M4 hardware and install. Keep the head of the screws on the outside.
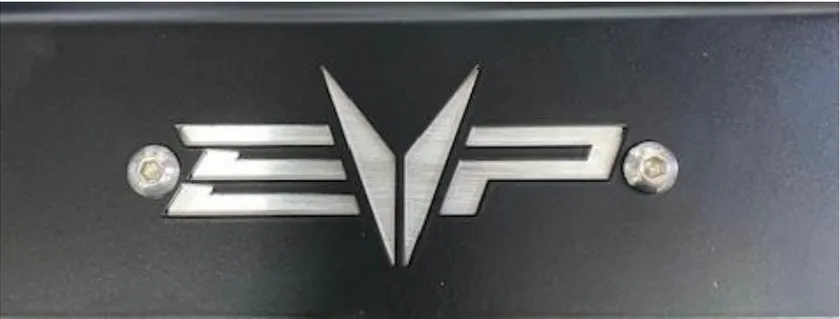
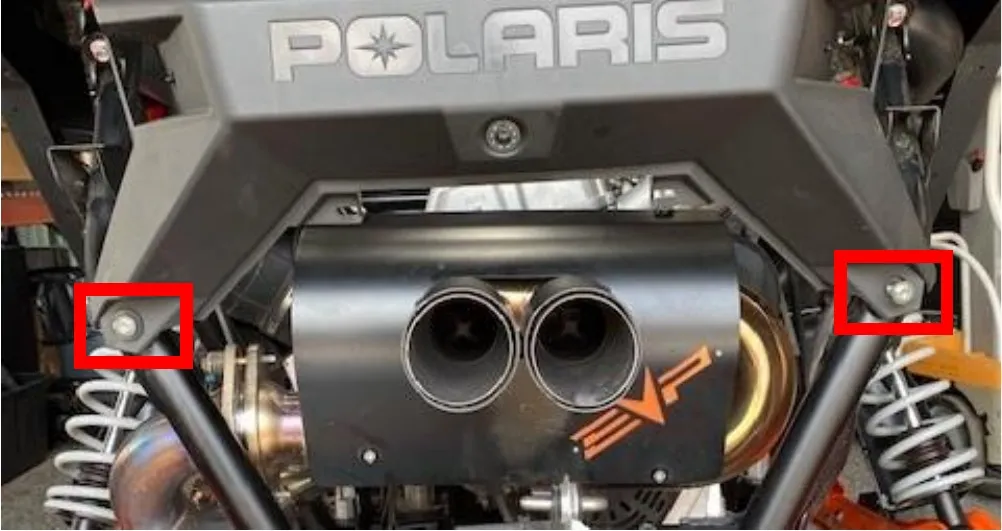
- Step 2
With a T50 socket remove the (2) screws holding the rear facia to the frame. Keep the plastic step washers.
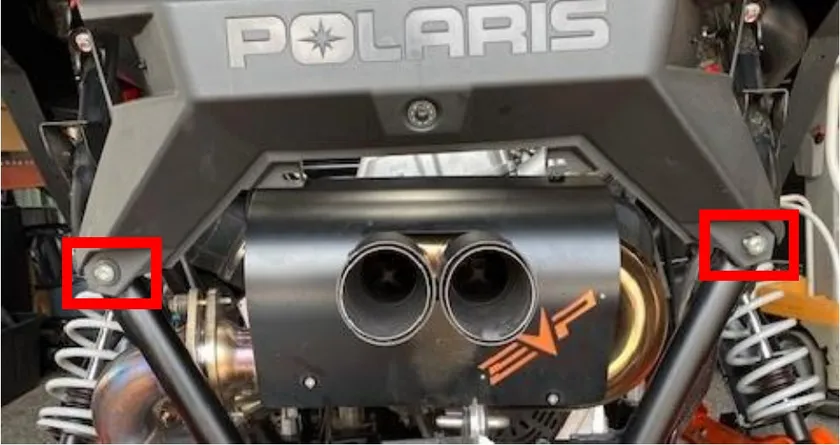
- Step 3
Place the EVP facia trim piece onto the vehicle. Reuse the OEM plastic step washer and bolt. Start securing but leave somewhat loose.
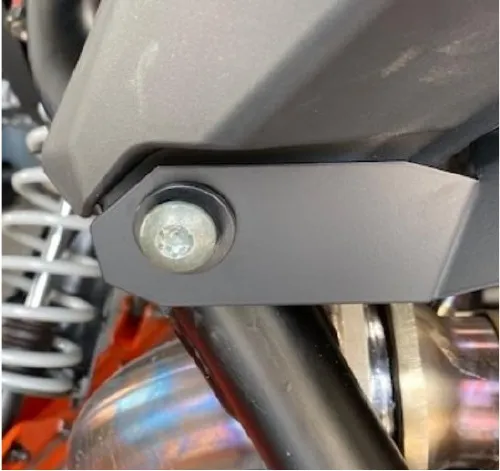
- Step 4
Install the remaining hardware through the OEM plastic tabs. Place a washer on the head and nut side. Fasten down. Also finish fastening the T50 screws.
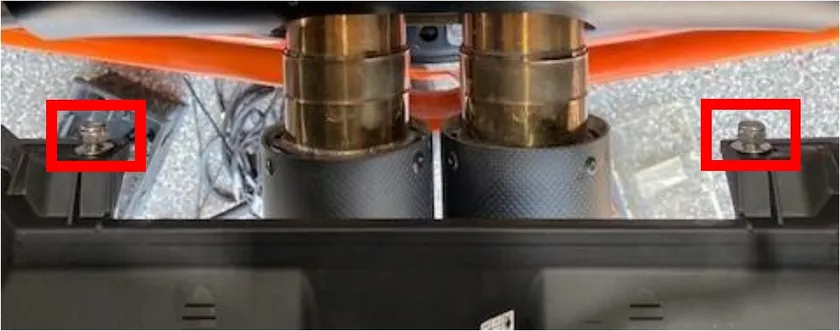

Procedure
Pro R Turbocharger Clutching
- Step 1
Remove the (5) CVT cover bolts using a 10mm socket. Loosen the 1/4 twist latches around the CVT cover. Remove the cover.
- Step 2
Remove the belt.
- Step 3
Remove the primary bolt using a breaker bar and T60 socket.
- Step 4
Use a P90X primary clutch puller to remove the primary clutch from the crankshaft.
- Step 5
Remove the secondary bolt using a 13mm socket.
- Step 6
Using a clutch compression tool, loosen (3) helix bolts using a 13mm socket.
- Step 7
Remove the OEM secondary spring and install supplied orange/blue spring. Put the secondary clutch back together.
- Step 8
Reinstall the secondary clutch and torque the bolt to 55 ft-lbs.
- Step 9
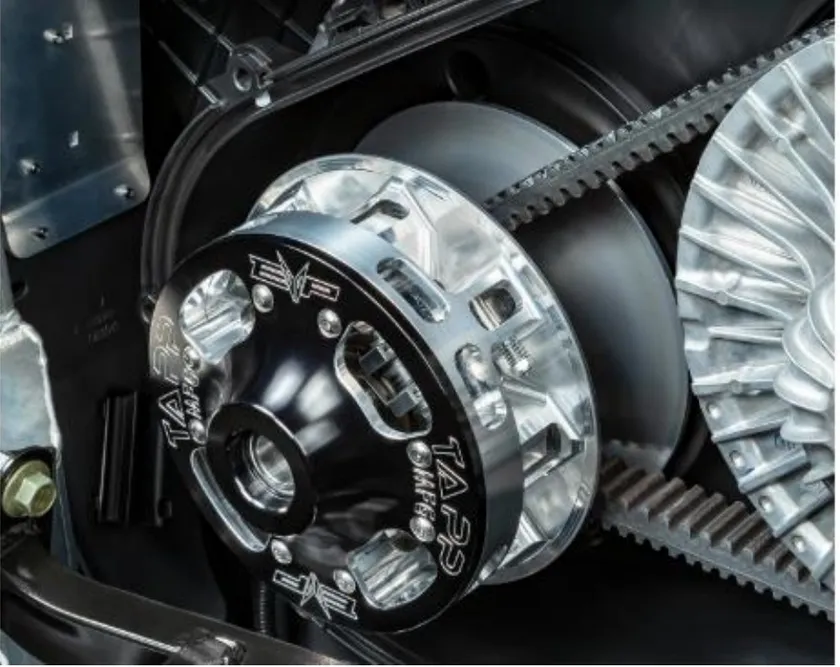
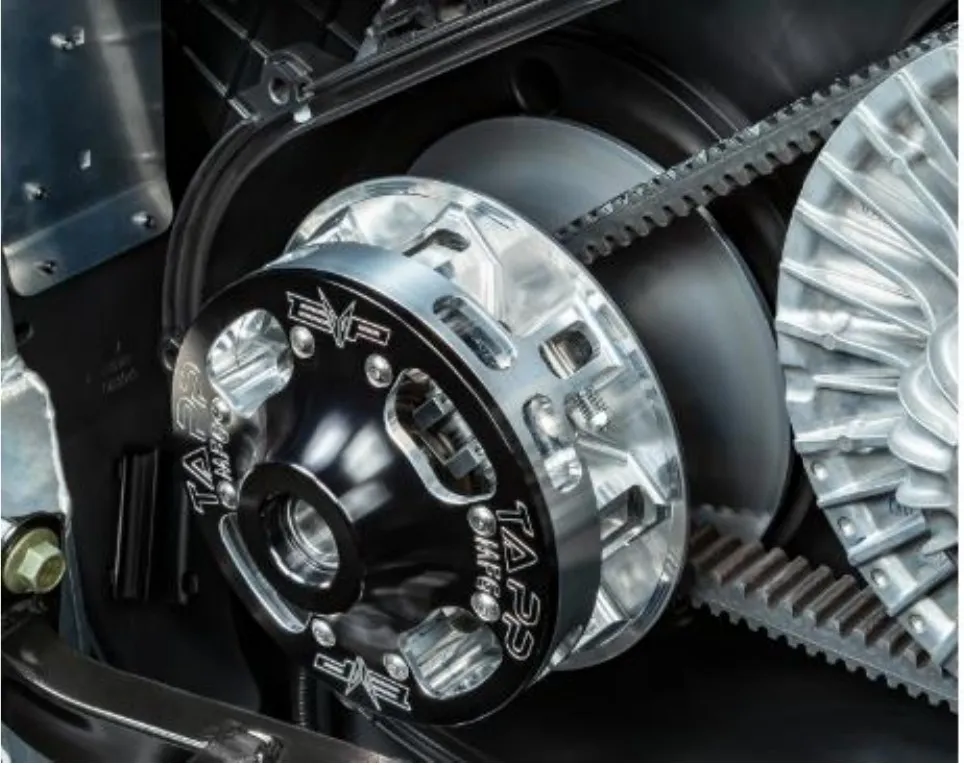
Install the TAPP primary clutch. Install supplied spacer on the OEM bolt and torque to 90 ft-lbs.
- Step 10
Reinstall the CVT belt in the correct orientation.
- Step 11
Spin the secondary a total of 5 rotations to set belt deflection.
- Step 12
Reinstall the CVT cover and hardware.
Procedure
Finishing Up
- Step 1
Change engine oil and oil filter.
- Step 2
Add coolant to the reservoir.
- Step 3
Drain the fuel tank and add correct fuel for your tune.
- Step 4
Reinstall your ECU.
- Step 5
Start the vehicle and let it idle for a few minutes, keep an eye on the coolant level. Add if necessary. Look for any leaking. Once the coolant level is correct, shut the vehicle off.
- Step 6
Reinstall all body panels, bed, skid plate, interior, etc.
Emissions notice. This product is exempt from the emission standards and related requirements of 40 C.F.R. § 1051 as provided by 40 C.F.R. § 1051.620, and California law [e.g., vehicle code §§ 27156 and 38391]. This product is sold only for use in connection with EPA certified, purpose-built, nonroad vehicles used solely for closed course, nonroad competition/racing and not used for any recreational purpose or on public highways or right of ways maintained by and open to the public. This product is sold only in connection with machines that do not fall under state and/or federal noise or emission standards/regulations. Purchasers who/that purchase this product represent and warrant that the product is purchased only in connection with EPA-certified, emission-regulations-exempt and noise-regulations-exempt competition/racing vehicles as interpreted under applicable state and/or federal law.
Need technical support?
Submit a ticket with your vehicle and what you're seeing, and our support team will get back to you.
