Can-Am 2023+ Maverick X3 Turbo (135hp) Stock & Big Injector Tunes

Tuning & programming for the 2023+ Maverick X3 Turbo (135hp) Stock & Big Injector Tunes on the 2023+ Can-Am Maverick X3. Parts, tools, and full procedure.

Category
Tuning

Reference

Overview

2023+ Maverick X3 Turbo (135hp) Stock & Big Injector Tunes

Tune Features:

  • Improved boost response, boost pressure, and MORE POWER!
  • Speed limits raised in high and low gear.
  • High and low gear Rev limits increased from stock (8300 stock to 9300)
  • Operating RPM 7800-8100.
  • Improved throttle response and drivability.
  • Engine cooling fan on/off temperatures modified to enhance engine cooling.
  • Race start enabled (no-brake start)
  • Works with stock or aftermarket exhaust systems.

Reference

Stock Injector No Intercooler

StageFuel OctaneWastegate Actuator Spec.BoostFuel Pump UpgradeInjectorsSpark Plug GapExhaustHorsepower
Stock916 psi (stock)8-12 psiStockStockStockStock or Aftermarket122 Wheel 140 Engine
Stage 3-91916 psi (stock)9-13 psiStockStock0.018”Stock or Aftermarket133 Wheel 153 Engine
Stage 5-E85E-856 psi (stock)10-14psiStockStock0.018”Stock or Aftermarket148 Wheel 170 Engine

Recommended Parts: Base Model charge tube and Blow-off valve.

Reference

Stock Injector With Intercooler

StageFuel OctaneWastegate Actuator Spec.BoostFuel Pump UpgradeInjectorsSpark Plug GapExhaustHorsepower
Stock916 psi (stock)8-12 psiStockStockStockStock or Aftermarket122 Wheel 140 Engine
Stage 3R-91918 psi15-18 psiStockStock0.018”Stock or Aftermarket172 Wheel 198 Engine
Stage 3R-93939 psi16-19psiStockStock0.018”Stock or Aftermarket181 Wheel 208 Engine
Stage 3R-96969 psi16-19psiStockStock0.018”Stock or Aftermarket195 Wheel 227 Engine

Required Parts: EVP clutch kit, EVP spark plugs intercooler charge tube kit, intercooler, intercooler fan harness.

Recommended Parts: Blow-off valve.

Reference

Big Injector With Intercooler

StageFuel OctaneWastegate Actuator Spec.BoostFuel Pump UpgradeInjectorsSpark Plug GapExhaustHorsepower
Stock916 psi (stock)8-12 psiStockStockStockStock or Aftermarket122 Wheel 140 Engine
Stage 3RWI-9191EVP X3 Wastegate (8PSI)15-18 psiStock1000cc0.018”Stock or Aftermarket175 Wheel 201 Engine
Stage 4RWI-X100100EVP X3 Wastegate (11 PSI)21-24 psiStock1000cc0.018”Stock or Aftermarket205 Wheel 236 Engine
Stage 5RWI-X85E85EVP X3 Wastegate (12 PSI)21-24 psiStock1000cc0.018”Stock or Aftermarket214 Wheel 246 Engine

Required Parts: EVP clutch kit, EVP spark plugs, intercooler charge tube kit, blow-off valve, intercooler, intercooler fan harness, EVP X3 wastegate, EVP 1000cc injectors.

Reference

Flex Fuel With Intercooler

StageFuel OctaneWastegate Actuator Spec.BoostFuel Pump UpgradeInjectorsSpark Plug GapExhaustHorsepower
Stock916 psi (stock)8-12 psiStockStockStockStock or Aftermarket122 Wheel 140 Engine
Stage 3RWI-9191EVP X3 Wastegate (8PSI)15-18 psiStock1000cc0.018”Stock or Aftermarket175 Wheel 201 Engine
Stage 4RWI-X100100EVP X3 Wastegate (11 PSI)21-24 psiStock1000cc0.018”Stock or Aftermarket205 Wheel 236 Engine
Stage 5RWI-X85E85EVP X3 Wastegate (12 PSI)21-24 psiStock1000cc0.018”Stock or Aftermarket214 Wheel 246 Engine

Required Parts: EVP clutch kit, EVP spark plugs, intercooler charge tube kit, blow-off valve, intercooler, intercooler fan harness, EVP X3 wastegate, EVP 1000cc injectors, flex fuel hardware.

NOTE: After EVP unlocks and flashes your ECU, the Can Am Diagnostic Software Tool (BUDs tool used by Dealers) should not be able to flash the ECU. This is by design so that the dealer cannot relock the ECU. Regardless of the safety we have built in to prevent this, it is your responsibility to ensure the dealer does not attempt to flash over our tune. They may brick the ECU which may necessitate another unlock and associated cost. All other Buds functions will continue to function. It is also imperative that the VIN number is not changed in the ECU. The vehicle will not run if the VIN is altered. After the unlock is performed and you install your ECU into the vehicle, you will need to reset the maintenance reminder on the dash. This can be done by navigating to the “settings menu”, then “reset maintenance” and holding down the center button on the keypad for 5 seconds.

Reference

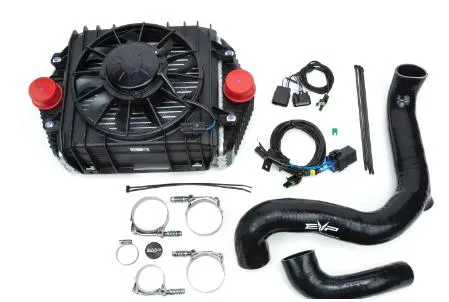
2023 Can Am X3 Turbo (135hp) Intercooler Upgrade Kit

INCLUDED PARTS

  • Intercooler with Fan Assembly
  • EVP Intercooler Harness(s)
  • Hardware Kit
  • Charge Tube Kit
  • (Optional) Big Injectors
  • (Optional) Big Wastegate
  • (Optional) 265 Fuel Pump

REQUIRED TOOLS

  • 10,11mm Sockets
  • Torx Sockets
  • M6 Allen Socket
  • Side Cutters
  • Push Dart Tool
2023 Can Am X3 Turbo (135hp) Intercooler Upgrade Kit
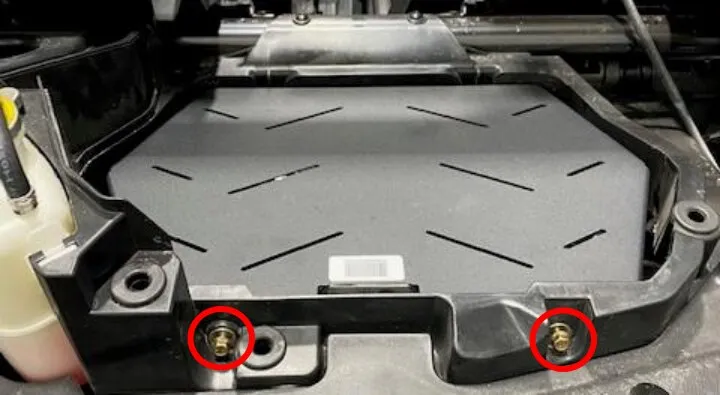
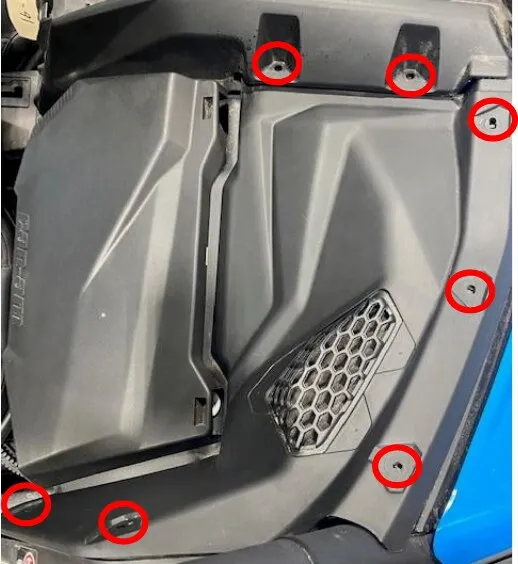
  1. Remove the intercooler and intake plastic shrouds. Remove the intercooler blank by loosening (4) 10mm screws. (2) are located behind the turbocharger access panel.
Remove the intercooler and intake plastic shrouds.
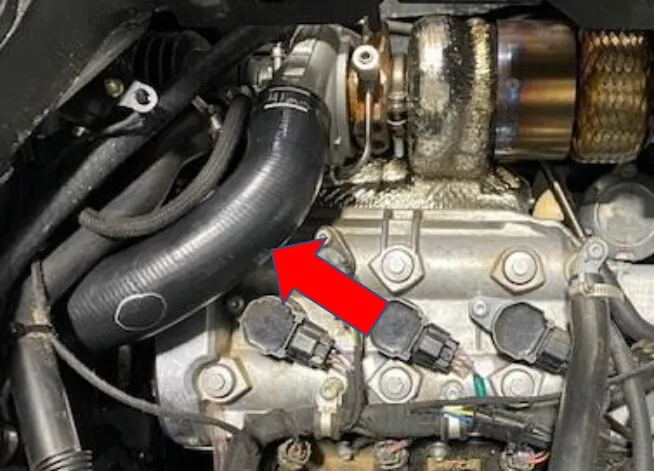
  1. Loosen and remove the clamps securing the charge tube. Remove the charge tube from the throttle body and intercooler. It may be easier to remove some CVT duct work. This will allow more room around the throttle body.
Loosen and remove the clamps securing the charge tube.
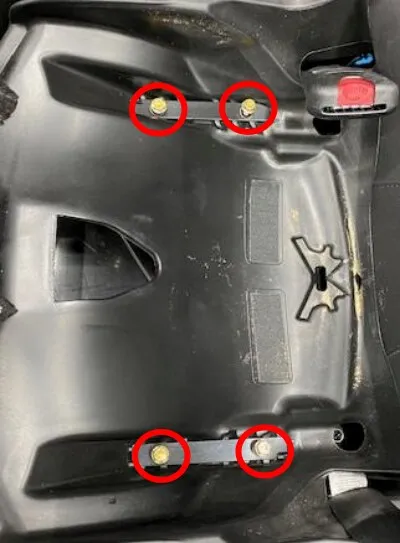
  1. Locate the front passenger seat. Lift up the bottom seat cushion, you will find (4) screws and (2) plates. With a 13mm socket remove all (4) screws. You can now move the seat around. Next, remove the passenger side of the center counsel. You must pop (3) clips.
Lift up the bottom seat cushion, you will find (4) screws and (2) plates.
Next, remove the passenger side of the center counsel.
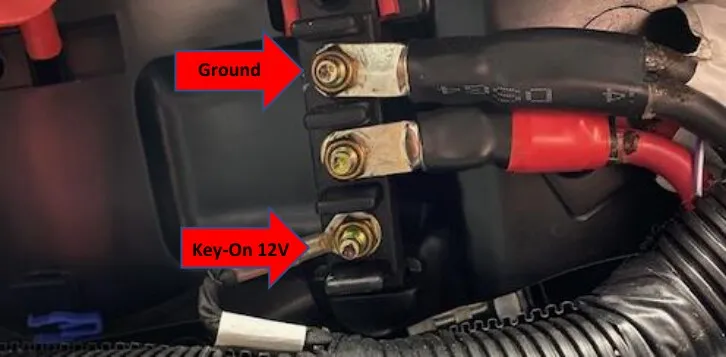
  1. Locate the bus bar located in the middle of the center counsel. From top to bottom: Ground, 12v battery power, key on power labeled Acc_1. Mount up the supplied harness as shown below. Use a 10mm socket.
Locate the bus bar located in the middle of the center counsel.
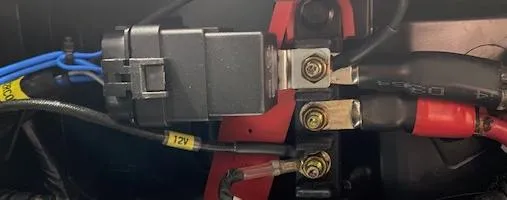
  1. Final: You can mount the relay anywhere or mount it with the ground stud as shown below.
You can mount the relay anywhere or mount it with the ground stud
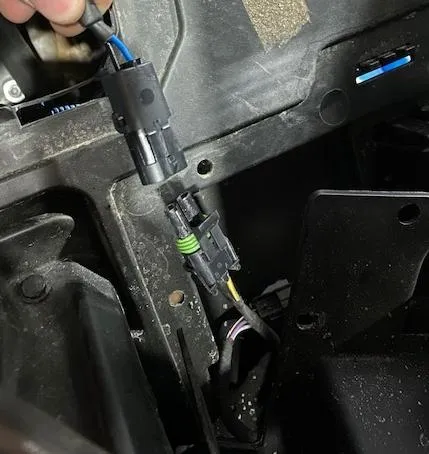
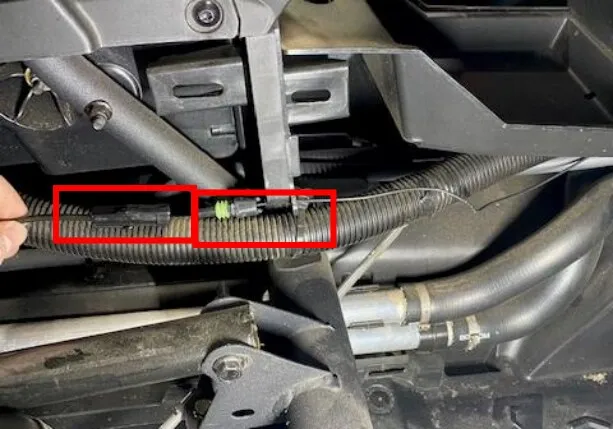
  1. Run the 2-contact connector (for the intercooler fan) through the center console to the ECU tray. Located behind the drivers seat (rear passenger in 4 seater). Inside the ECU tray you will find the OEM intercooler 2 pin connector. Connect them. Make sure the OEM connectors are clean.
Inside the ECU tray you will find the OEM intercooler 2 pin connector.
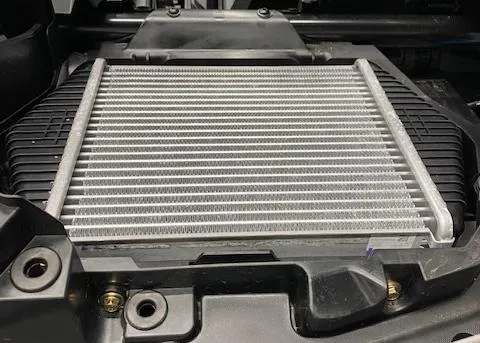
  1. Install the charge tubes onto the vehicle. It is easier to install the upper charge tube onto the turbocharger, and lower charge tube onto the throttle body. Install the intercooler into the car. Connect both charge tubes to the intercooler and reuse the (4) 10mm screws to fasten down the intercooler. Use an 11mm socket to tighten all charge tube clamps.
Install the intercooler into the car.
  1. Connect the fan pigtail to the 2 pin connector on the OEM harness. It may be zip tied to the bottom of the bed.
Connect the fan pigtail to the 2 pin connector on the OEM harness.
  1. Remove the upper dash on the passenger side. There will be (2) push darts and (5) T-30 screws.
Remove the upper dash on the passenger side.
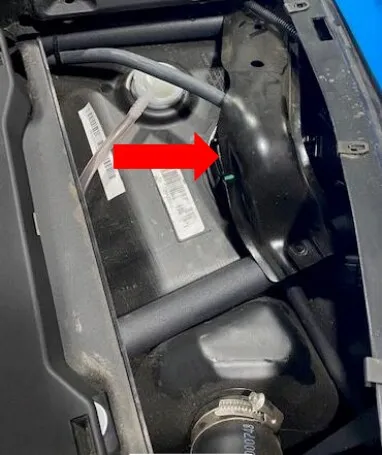
  1. remove the fuel pump assembly bracket using a 10mm socket.
remove the fuel pump assembly bracket using a 10mm socket.
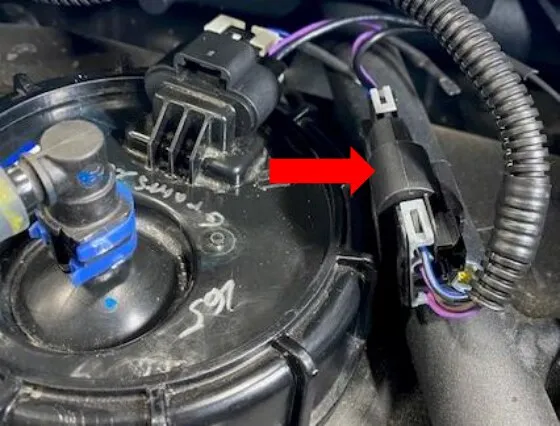
  1. Remove the silver safety clip on the electrical connector, then remove plug. Install the supplied EVP fuel pump pigtail. One connector will go the OEM harness and one connector will go to the fuel pump assembly. Reinstall the grey clip on both male connectors.
  2. NOTE: If you are changing fuel octane, now is the time to drain your fuel tank!
Remove the silver safety clip on the electrical connector, then remove plug.
Install the supplied EVP fuel pump pigtail.
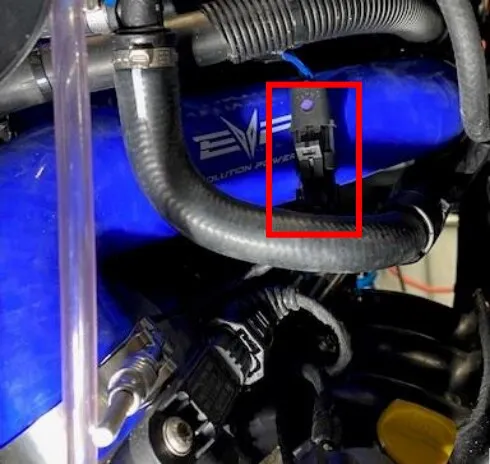
  1. On the other end of the fuel pump harness you will find a 1 contact connector. Route that through the dash and into the cab (next to the coolant lines). Plug into the other 1 contact connector coming from the relay harness. Zip tie any excess wire.
Plug into the other 1 contact connector coming from the relay harness.
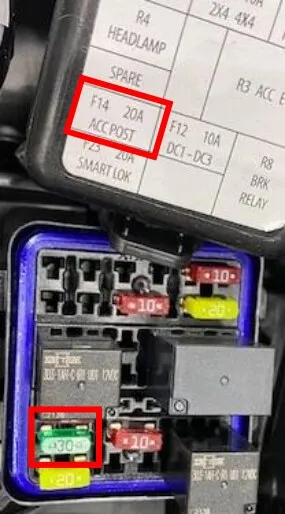
  1. Located on the dashboard is a fuse box. Open the fuse box and remove the 20amp fuse in box F14 and replace it with the supplied 30amp fuse.
Open the fuse box and remove the 20amp fuse in box F14 and replace it with the supplied 30amp fuse.
  1. Zip tie any access wires underneath the center counsel. Keep wires away from heat sources. Reinstall the center counsel panel and passenger seat. Reinstall the turbocharger access panel and CVT duct work.

Procedure

Wastegate Installation

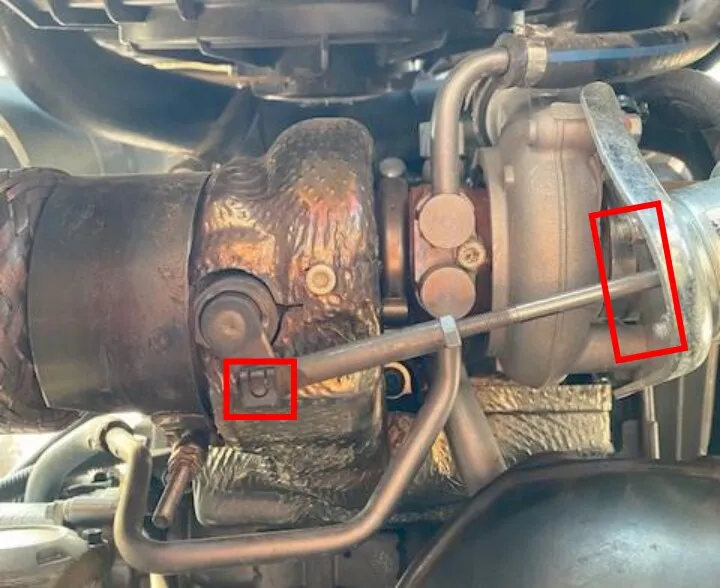
  1. With the turbocharger access panel remove, find the wastegate. Remove the wastegate clip (be careful not to lose the clip). Remove the wastegate line and both nuts holding the wastegate to the bracket. Install the supplied wastegate onto the OEM bracket. Install both nuts. Set the crack pressure to your tune level setting, reinstall the safety clip on the rod end and vacuum line on the diaphragm side.
With the turbocharger access panel remove, find the wastegate.

Procedure

Injector Installation (Big Injector Tunes Only)

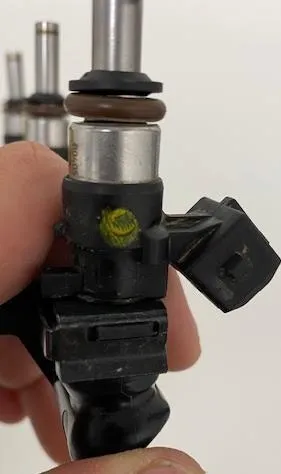
  1. With brake cleaner, spray around all (3) injector ports and fuel rail. Wipe debris away with a rag. Turbo and Turbo R models press the metal clip down and remove the connector from the injector. Remove the fuel hose from the fuel rail. Push the connector in and spread left/right side away from the fuel rail. Remove the fuel rail, keep the O-rings with the fuel hose. Remove the (2) fuel rail screws.
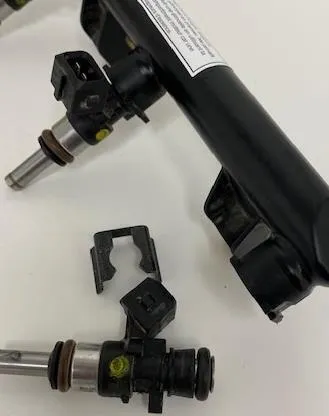
  2. Remove the injector clip, once the clip is removed you can pull the injector out of the fuel rail. Install the EVP injectors, use dielectric grease on the O-rings allowing for easier installation. Place the injector clip back onto the fuel rail, make sure the clip is in both grooves. Reinstall the fuel rail in reverse order.
Remove the injector clip, once the clip is removed you can pull the injector out of the fuel rail.
Place the injector clip back onto the fuel rail, make sure the clip is in both grooves.
Emissions notice. This product is exempt from the emission standards and related requirements of 40 C.F.R. § 1051 as provided by 40 C.F.R. § 1051.620, and California law [e.g., vehicle code §§ 27156 and 38391]. This product is sold only for use in connection with EPA certified, purpose-built, nonroad vehicles used solely for closed course, nonroad competition/racing and not used for any recreational purpose or on public highways or right of ways maintained by and open to the public. This product is sold only in connection with machines that do not fall under state and/or federal noise or emission standards/regulations. Purchasers who/that purchase this product represent and warrant that the product is purchased only in connection with EPA-certified, emission-regulations-exempt and noise-regulations-exempt competition/racing vehicles as interpreted under applicable state and/or federal law.

Need technical support?

Submit a ticket with your vehicle and what you're seeing, and our support team will get back to you.

Contact Support
We use cookies to improve your experience on our website. Read about how we use cookies in our Privacy Policy. By browsing this website, you agree to our use of cookies. privacy policy
accept

Your cart

×
×