 BUY NOW, PAY LATER. Starting at 0% APR


READ THROUGH ALL INSTRUCTIONS PRIOR TO BEGINNING THIS INSTALLATION
2017-2021 Polaris RZR Turbo/S Dynomite 2.0 Turbo Kit
2017-2021 Polaris RZR Turbo/S Dynomite 2.0 Turbo Kit
Before you start
Note
- Expect 24–48-hour delay from the time you request a tune to when the file is enabled. Please create your Maptuner account before starting the project.
- Free Flowing Exhaust is Required
- STM clutches, weights and springs are recommended.
- Crack pressure is set at 6psi.
Caution
Follow octane rating requirements for the proper ECU tune.
In the box
Parts and tools
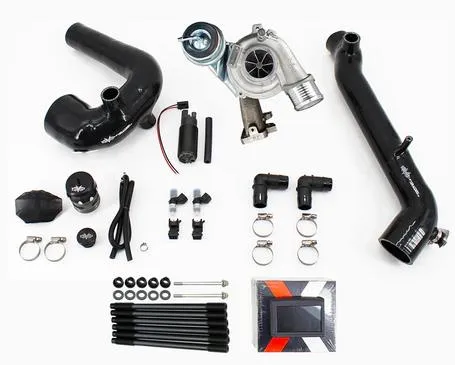
Included parts
- 1Dynomite 2.0 Turbocharger
- 1Set 1300cc Fuel Injectors with Adaptors and Spacers
- 1Maptuner X Dynomite Flash
- 1EVP Charge Tube Kit (Color Options)
- 1V-Flow Intake Kit (Color Options)
- 1EVP Blow Off Valve 2.0 Kit
- 1High Pressure Fuel Pump Kit
- 1XR Series EVP Head Studs
- 1Turbo Water Coolant Kit
Required tools
- Torque Wrench
- Anti-Seize/ Penetrating Lube
- Flat Head Screwdriver
- Metric Socket Set
- Metric Open End Wrench Set
- Pinch Clamp Tool
- Motor Oil
- Engine Coolant
- Torx Sockets
- Grinder
Procedure
Installation
- Step 1
Although the kit can be installed without removing the bed, it is highly recommended to remove it for better access.
- Step 2
Install 1300cc fuel injectors. See Instructions “XP Turbo/S & Pro XP 1300cc Injector, Set of 2”
- Step 3
With a 10mm socket remove the heat shields over the top of the engine and heat shields attached to the header/turbocharger.
- Step 4
With an 11mm socket remove OEM charge tube, intake pipe and airbox.
- Step 5
Soak the bolts holding the down pipe (turbo exhaust pipe) to the turbocharger with PB Blaster or other penetrating lubricant and let sit for 30 minutes, then remove and clean with a shop rag. Save gasket.
- Step 6
Remove oil drain hose from turbocharger, but leave it connected to the engine.
- Step 7
Label the vacuum lines going to the wastegate actuator and compressor cover turbo port and disconnect from turbocharger.
- Step 8
Remove the 13mm oil supply banjo bolt from the top of the OEM turbo. Make sure to save both copper washers as well as the banjo bolt.
- Step 9
Remove the fasteners connecting to the top of the OEM turbo support bracket (TSB) to the turbo charger (reference the shop manual pages at the end of these instructions.)
- Step 10
Loosen the (4) bolts securing the TSB to the frame and pull toward the front of the vehicle to give enough clearance to remove the OEM turbocharger.
- Step 11
Remove the turbocharger from the engine by removing the (4) hex nuts and (2) socket head bolts. A ball nosed Allen socket with an extension works best for the socket head bolts.
- Step 12
Remove the OEM turbocharger from the engine.
- Step 13
Transfer the OEM turbo charger to a clean workbench.
- Step 14
Install the Dynomite turbocharger onto the engine and secure with (2) nuts.
- Step 15
Before permanently installing the turbo support bracket (TSB), install all turbo to engine fasteners- socket head cap screws and nuts. The nuts are to be torqued to 26 ft lbs and the socket head cap screws to 17 ft lbs. (Figure 1)
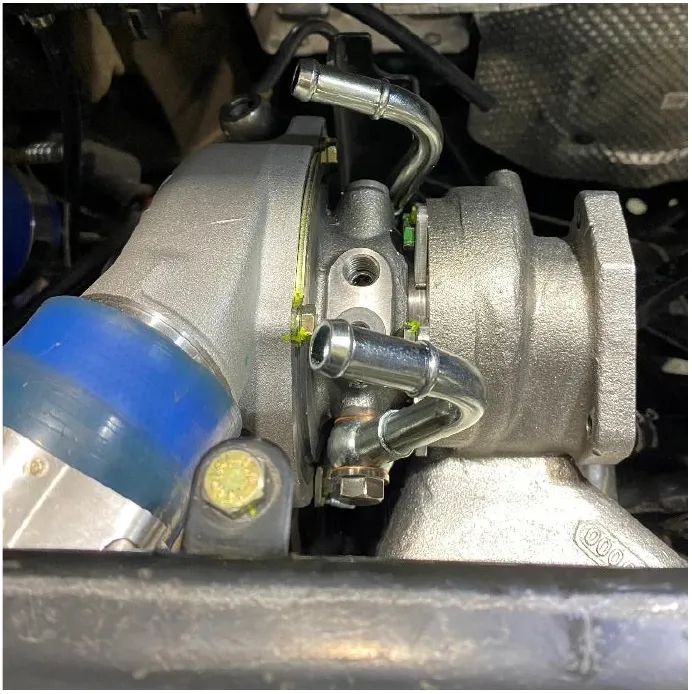
Figure 1 - Step 16
Install the OEM support bracket bottom frame. Re-use the bolts and nuts that originally held the turbocharger to the top of the OEM support bracket and tighten.
- Step 17
Install both 26” turbo coolant lines onto the turbo coolant fittings. Clamp them both with 19mm pinch clamps.
NoteIt is easier to slide the pinch clamp onto the fitting first, then the coolant hose.
- Step 18
Install the (2) supplied “T” fittings into the coolant hoses. The 3/8” fittings will slide into the OEM coolant hoses, clamp with (2) 22mm pinch clamps per hose. (Figure 2).
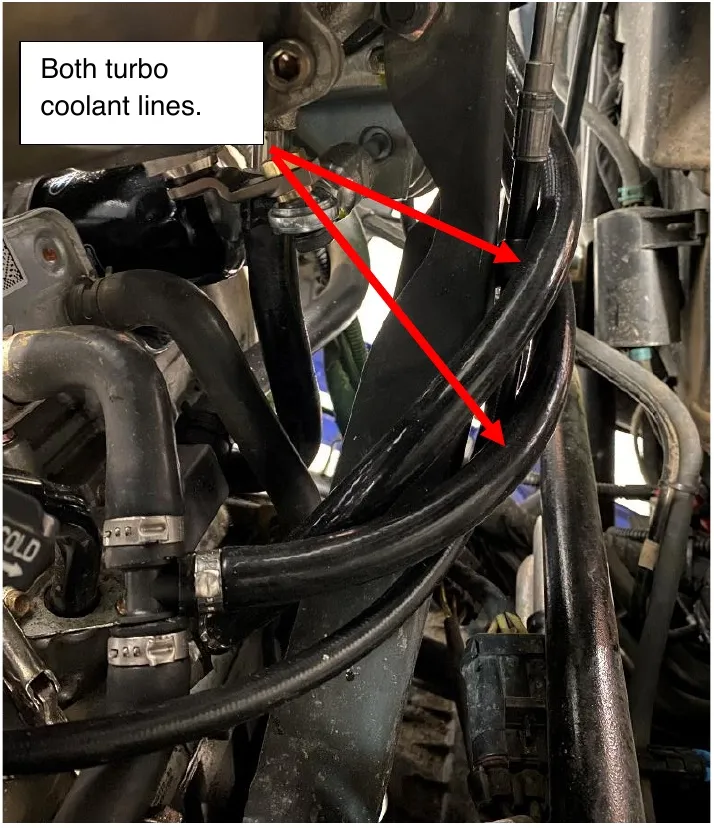
Figure 2 - Step 19
Route the (2) turbo coolant lines around the turbo and down to the “T” fittings. Slide both hoses onto the 1/4" fitting. Clamp with supplied 19mm clamps. (Figure 3).
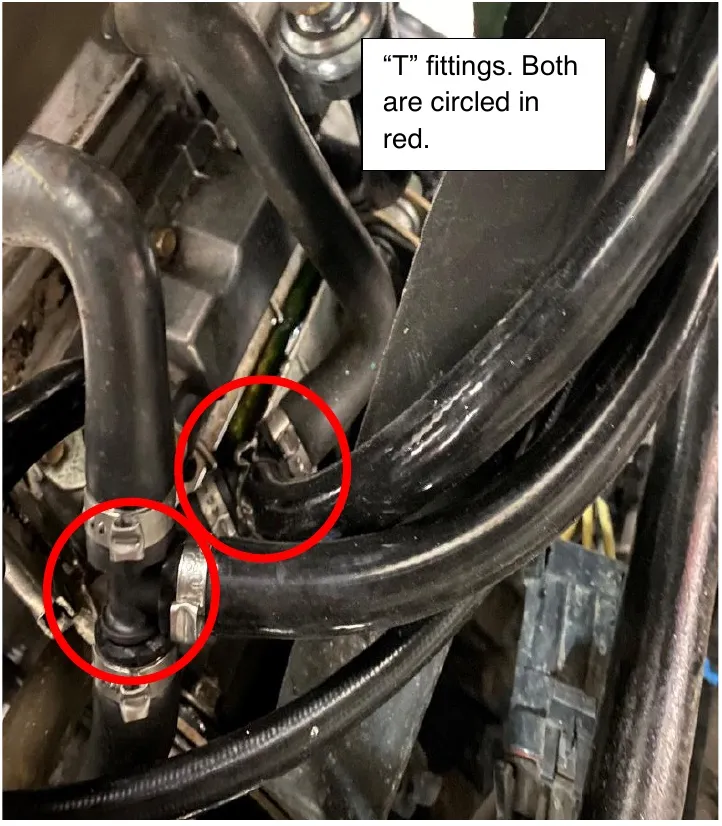
Figure 3 - Step 20
Using the supplied syringe put oil in the oil supply boss, then install the oil supply line and banjo bolt reusing the copper washers – one on each side of the banjo bolt. Torque the oil supply banjo bolt to 33 ft lbs.
- Step 21
Install EVP charge tube, re-use the OEM intercooler T bolt clamp.
- Step 22
Reconnect the vacuum lines to the turbo compressor port and wastegate port (make sure they are connected to their designated positions.)
- Step 23
Connect the oil drain line re-using the OEM spring clamp.
- Step 24
Reinstall the exhaust downpipe re-using the OEM steel gasket and bolts – it is best to use anti-seize on the downpipe to the turbo bolts prior to installation.
- Step 25
Grab the turbo heat shield, you will have to grind (2) areas away now that the turbo has coolant lines. See figure 4-5.
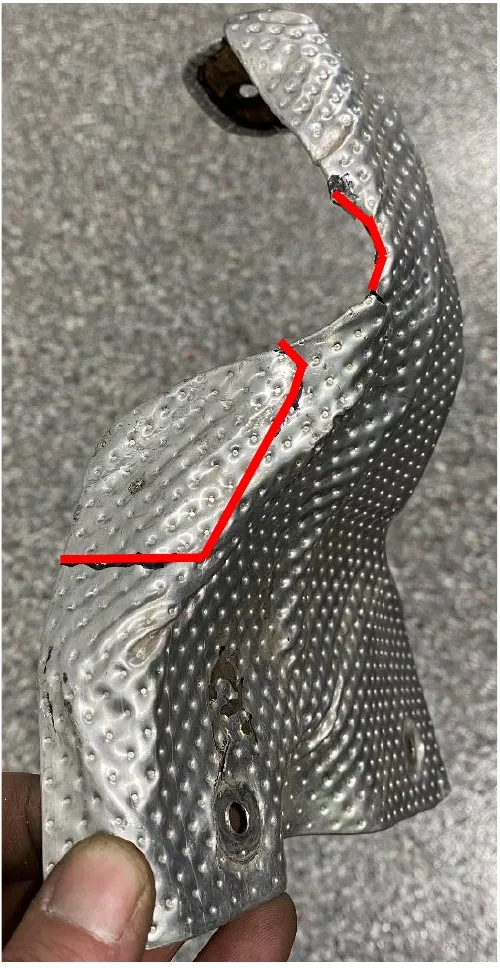
Figure 4 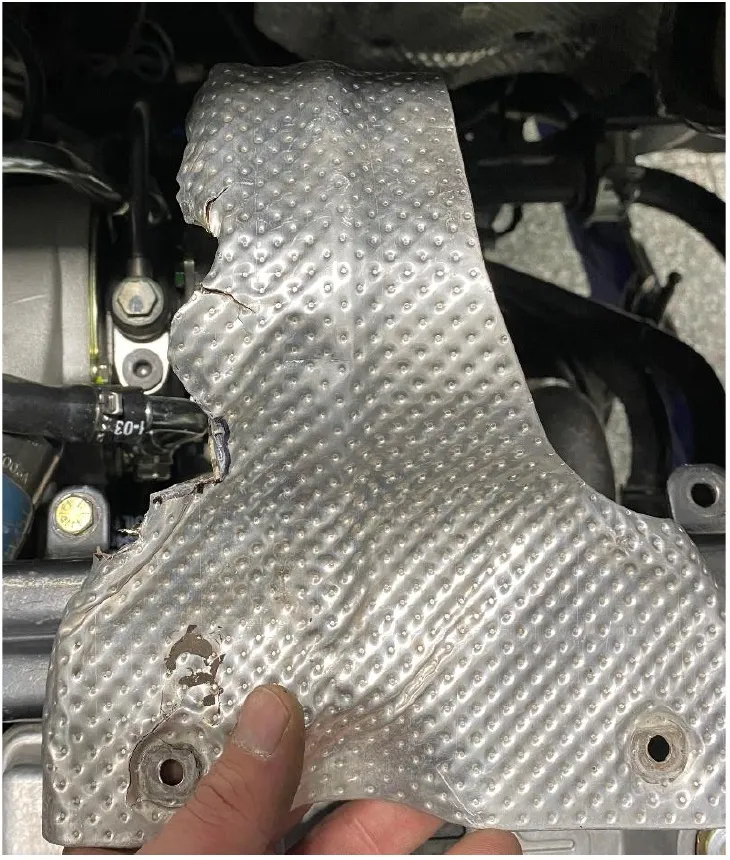
Figure 5 - Step 26
Grab the exhaust to bed heat shield, you will need to make square cut outs on it for the new turbo coolant hoses to pass. See figure 6-7.
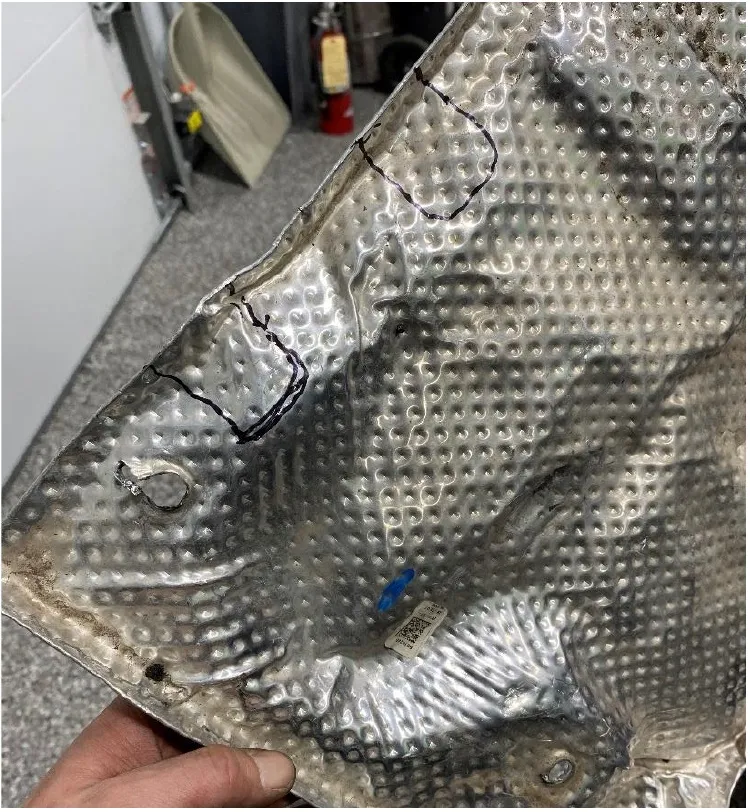
Figure 6 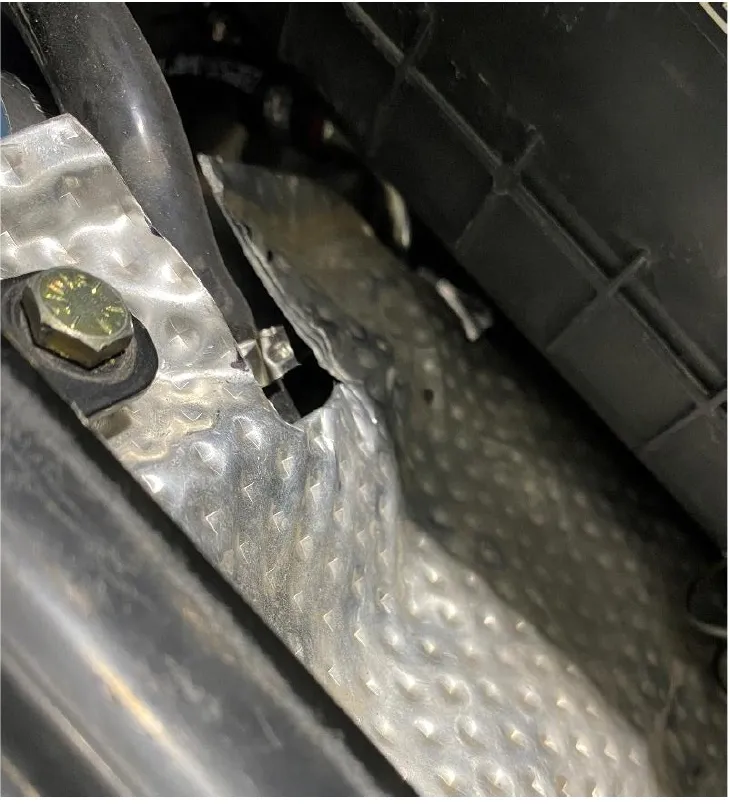
Figure 7 - Step 27
Reinstall the intake elbow and airbox.
- Step 28
Reinstall the bed and all plastic pieces.
- Step 29
Install clutching – STM clutches, weights and springs are recommended.
- Step 30
Once the vehicle is complete, key on
CautionDO NOT start the vehicle. Make sure you hear the fuel pump.
- Step 31
Start vehicle and let it idle. Check for leaks.
- Step 32
Allow vehicle to warm up (160-degree water temperature).
Emissions notice. This product is exempt from the emission standards and related requirements of 40 C.F.R. § 1051 as provided by 40 C.F.R. § 1051.620, and California law [e.g., vehicle code §§ 27156 and 38391]. This product is sold only for use in connection with EPA certified, purpose-built, nonroad vehicles used solely for closed course, nonroad competition/racing and not used for any recreational purpose or on public highways or right of ways maintained by and open to the public. This product is sold only in connection with machines that do not fall under state and/or federal noise or emission standards/regulations. Purchasers who/that purchase this product represent and warrant that the product is purchased only in connection with EPA-certified, emission-regulations-exempt and noise-regulations-exempt competition/racing vehicles as interpreted under applicable state and/or federal law.
Need technical support?
Submit a ticket with your vehicle and what you're seeing, and our support team will get back to you.
